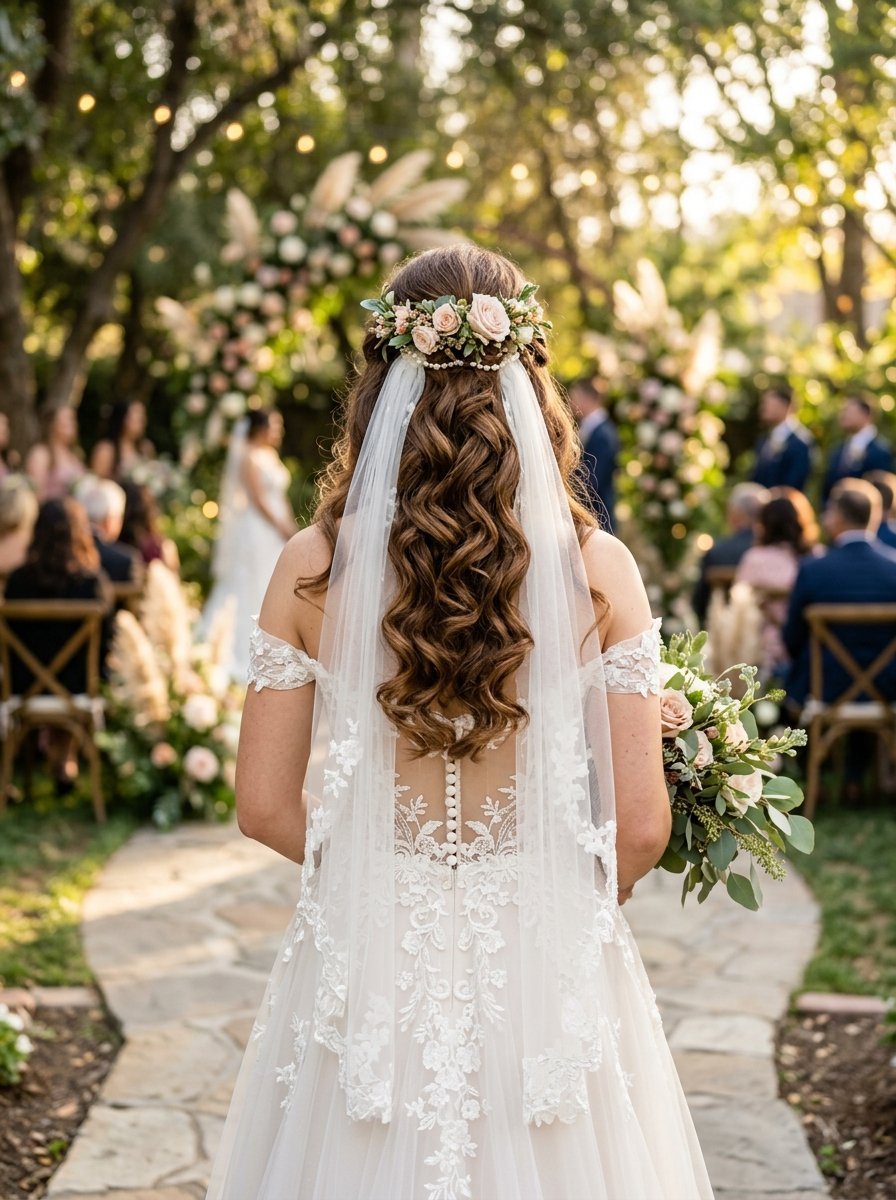
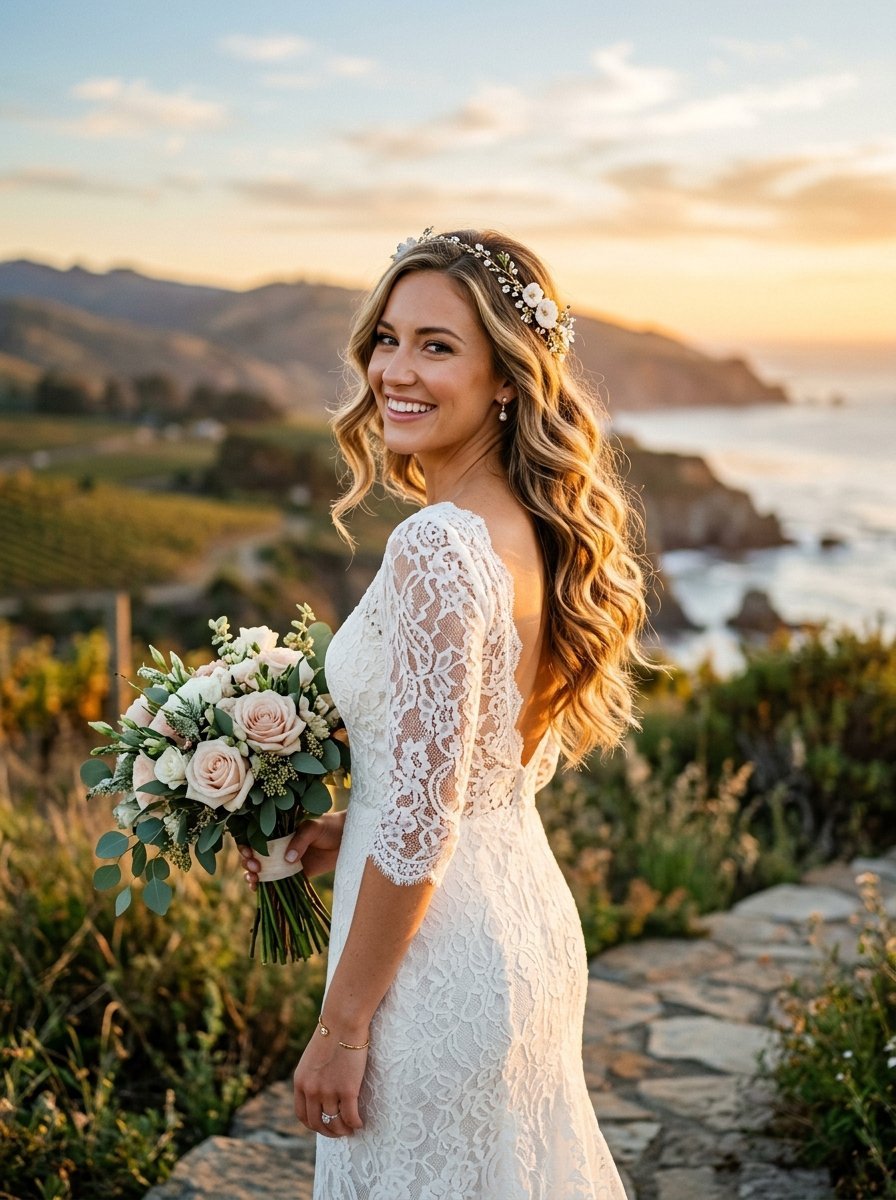
Step-by-Step Guide to Loose Bridal Curls That Last Through Photos
It happens all the time. A bride spends hours in the styling chair. She walks out looking flawless. By the time group photos happen her hair falls completely flat. You want your hair to look perfect from the first look to the final dance. I have seen countless brides struggle with limp hair. You need a reliable routine. Your wedding day photos will last a lifetime. Loose bridal curls give you that soft and timeless look. Holding that shape requires specific styling secrets. Here is exactly what you need to know.
You will get a complete styling routine right here. This guide walks you through every single phase of hair prep. I will share the exact tools you need. You will find out why your hair drops so fast. We cover everything from washing to the final hairspray coat. You will master sectioning hair for curling. You will know exactly when to pick up a barrel curling iron. I will even share heatless curls techniques. You can save hundreds of dollars by doing this yourself. Let us create a look you will love forever.
Why Do Bridal Curls Drop So Fast?
Gravity pulls down on your hair all day. Moisture in the air makes the hair swell. These two forces work against your styling efforts from the moment you leave the chair. Heavy products make the situation worse. Many brides load their hair with thick conditioners. They apply heavy oils to make their hair shine. This extra weight pulls the curl straight down.
In my experience with summer weddings I see humidity destroy hair daily. I worked with a bride last July. Her hair fell completely flat in ten minutes during outdoor photos. We skipped the deep conditioner for her reception look. We used a lightweight texturizing spray instead. The style stayed perfectly all night. Clean and soft hair is actually your enemy here. You want grit and texture. Hair needs to feel slightly rough to hold a bend.
Heat plays another huge role. You curl the hair with hot tools. The hair fiber becomes moldable. If you let that hot hair hang down immediately it will cool in a straight shape. You must control the cooling phase. Rushing through the styling routine guarantees a dropped curl. You need patience. You need the right grip.
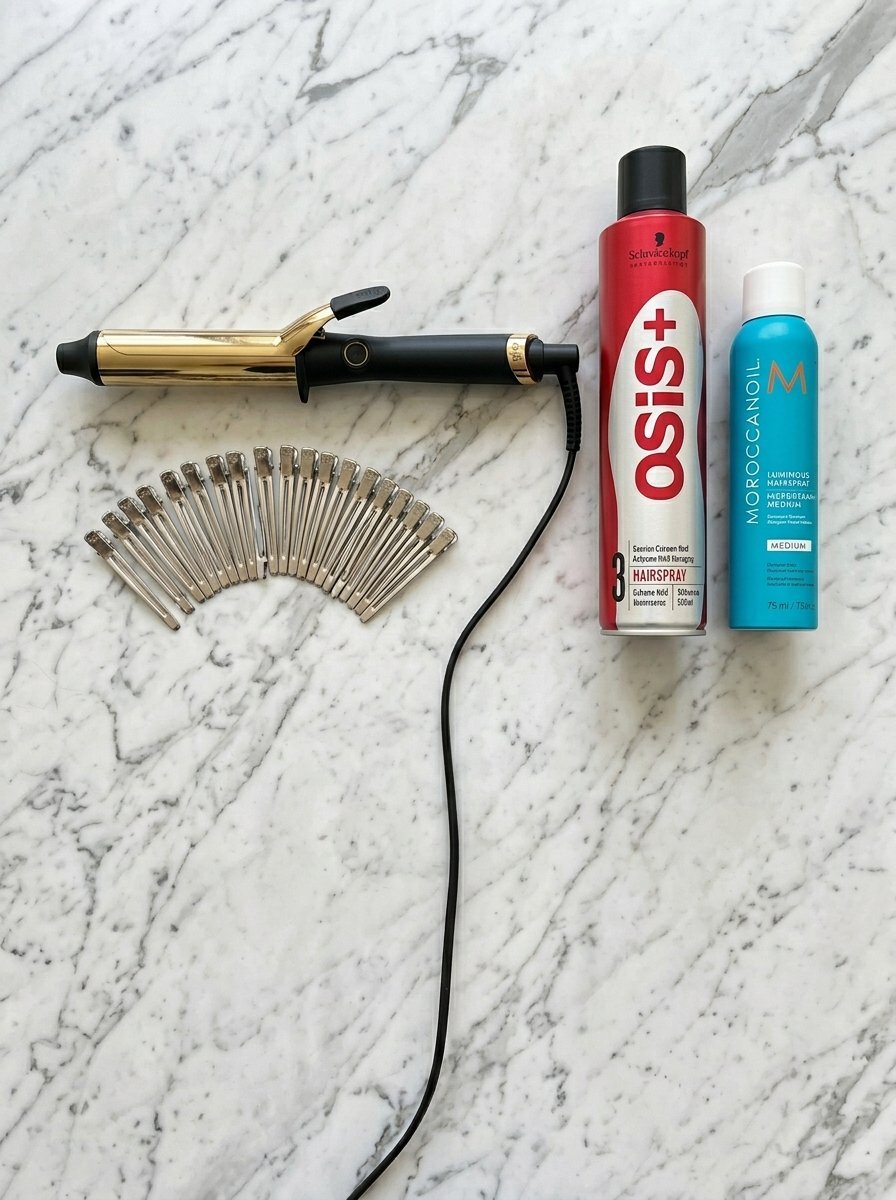
Tools You Actually Need For Long-Lasting Curls
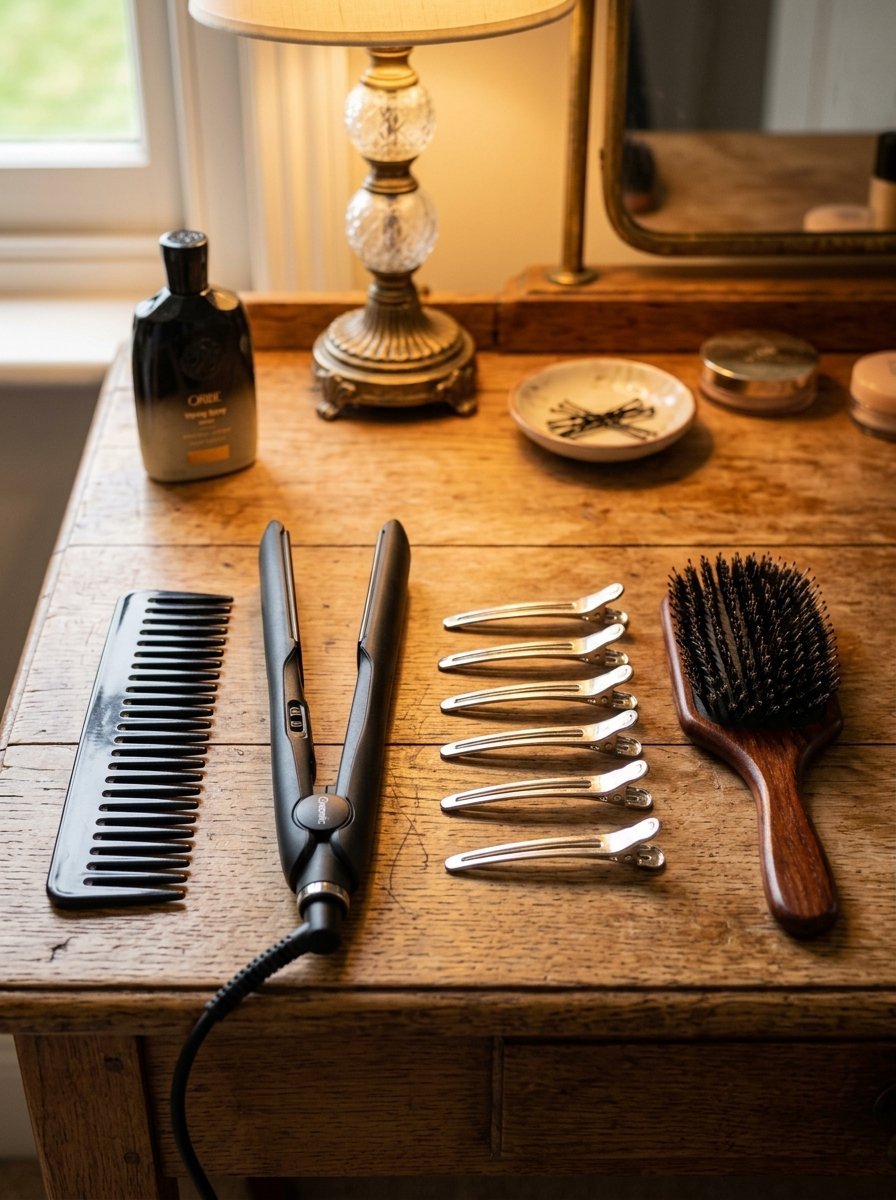
You cannot rely on basic drugstore tools for a wedding. You need professional grade items. A standard curling wand might work for a casual Friday. It will not survive a twelve hour wedding day. Invest in items that deliver consistent heat. You will spend around fifty to eighty dollars on a good iron. This investment pays off instantly.
- Professional grade barrel curling iron
- Ceramic or titanium flat iron
- Volumizing root lifting mousse
- Aerosol heat protectant spray
- Strong hold dry hairspray
- Metal pin curl clips
- Wide tooth detangling comb
- Boar bristle smoothing brush
- Clear elastic hair bands
I have tried dozens of irons over the years. The Hot Tools Pro 24K Gold iron works brilliantly. It holds a steady temperature. It grips the hair tightly. You also need good clips. Metal duckbill clips cost about ten dollars for a large box. They slide into the hair easily. They do not leave crease marks. Your hairspray choices matter heavily. Kenra Volume Spray 25 locks styles in place. It brushes out cleanly later.
Preparing Your Hair For The Big Day
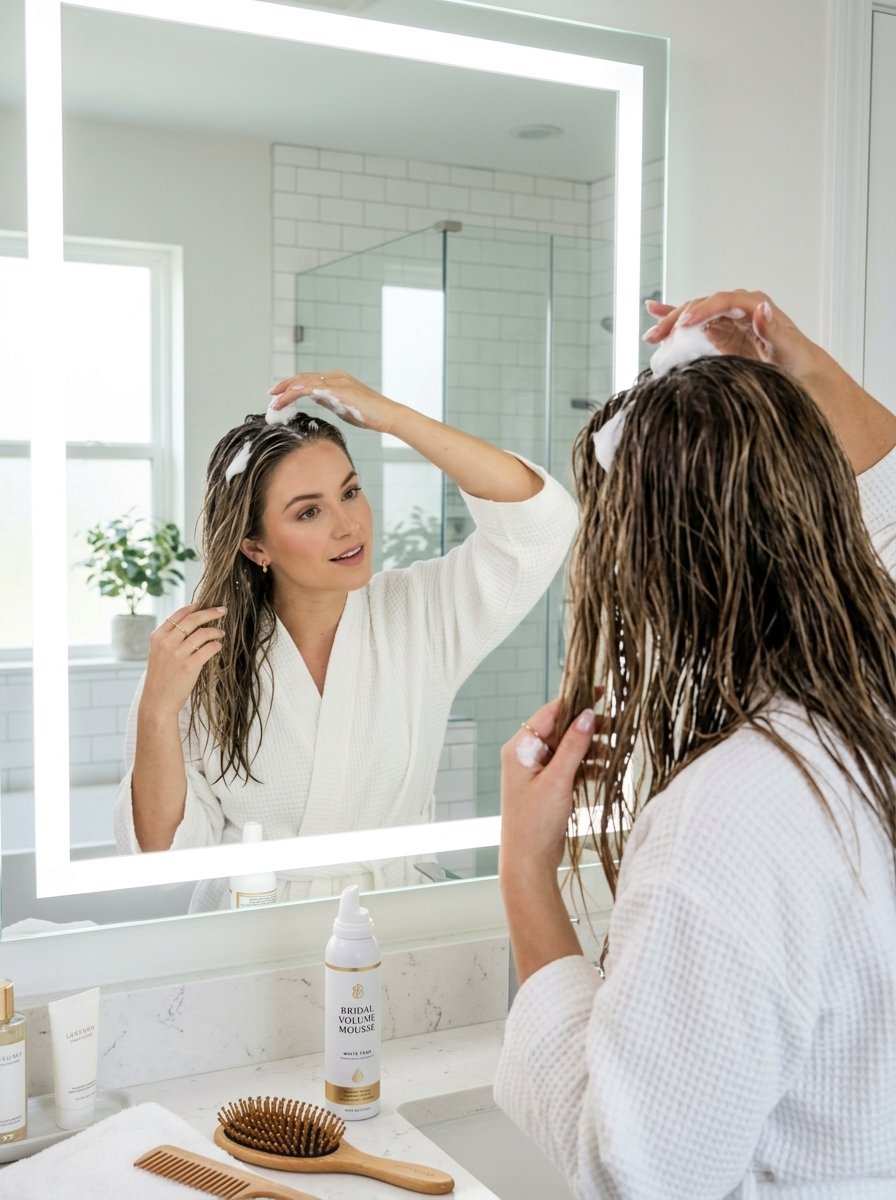
Proper prep starts the night before the wedding. You should wash your hair with a clarifying shampoo. This strips away old oils and product buildup. Do not use a heavy moisturizing mask. Apply a very light conditioner only to the very ends of your hair. Rinse your hair with cool water. This seals the hair cuticle tightly.
Apply a palm full of volumizing mousse to your damp roots. Work it through the middle of your hair strands. Blow dry your hair upside down. This creates massive root lift. I have noticed that second day hair always holds a curl better. The natural oils give the hair structure.
If you must wash your hair on the wedding morning you need to blow dry it completely. Even a tiny bit of moisture will ruin your curls. Run your hands through your hair. Check the back of your neck. It must feel bone dry. Spray a generous layer of heat protectant over your entire head. Brush it through evenly. You are now ready to begin styling.
Step 1: Mastering Sectioning Hair For Curling
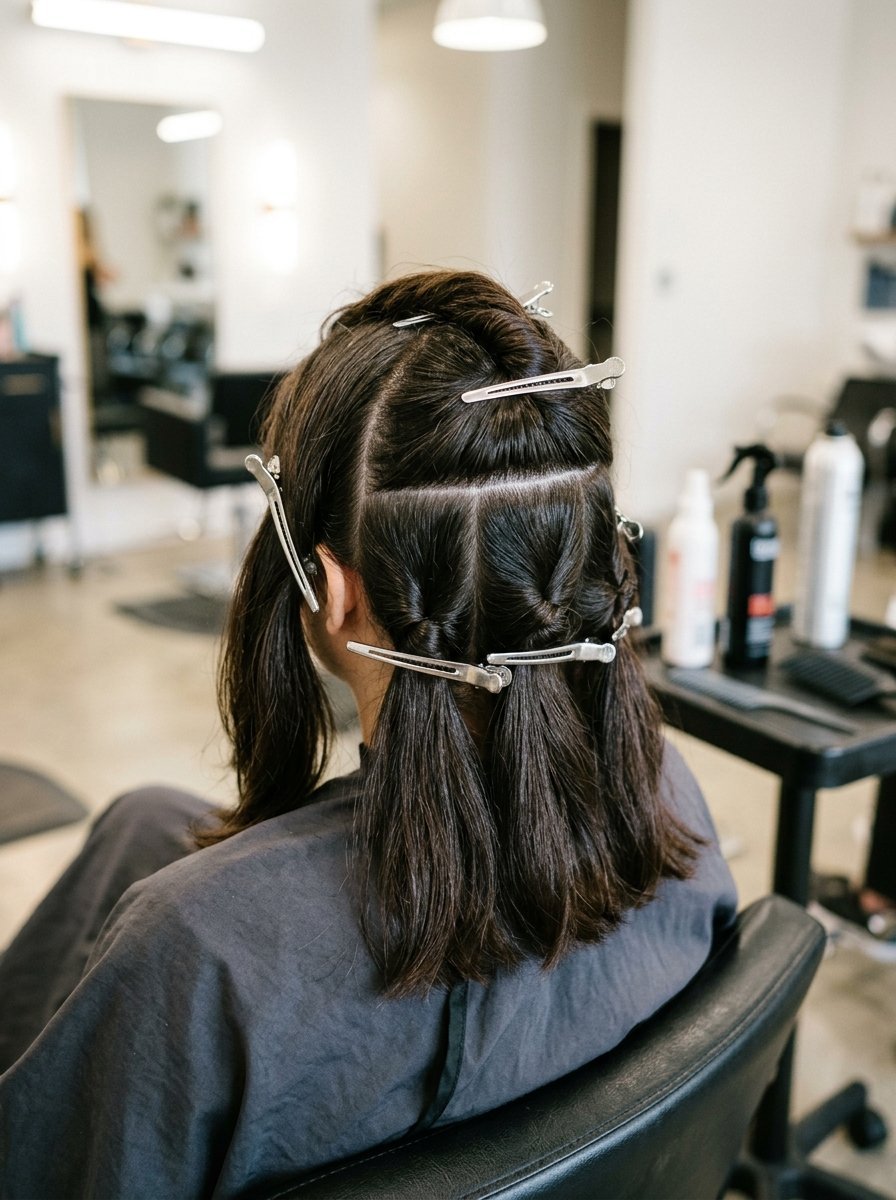
Sectioning hair for curling controls the whole style. Do not grab random pieces of hair. You will miss spots. You will create uneven texture. Start by parting your hair exactly how you want it to sit. Draw a line with a comb from ear to ear. Clip the top half of your hair out of the way.
Focus on the bottom layer near the nape of your neck. Take vertical slices of hair. Each slice should be one inch wide. Too much hair will not heat evenly. Too little hair will look like tight ringlets. Once you finish the bottom layer let down another horizontal section.
Move from the bottom up to the crown. Pin up the curled pieces as you work. This keeps the hot hair out of your face. It stops you from accidentally ironing the same piece twice. I have seen brides burn their hair by overlapping sections. Work cleanly and neatly. Clip away everything you are not actively holding.
Step 2: Choosing Your Curling Technique
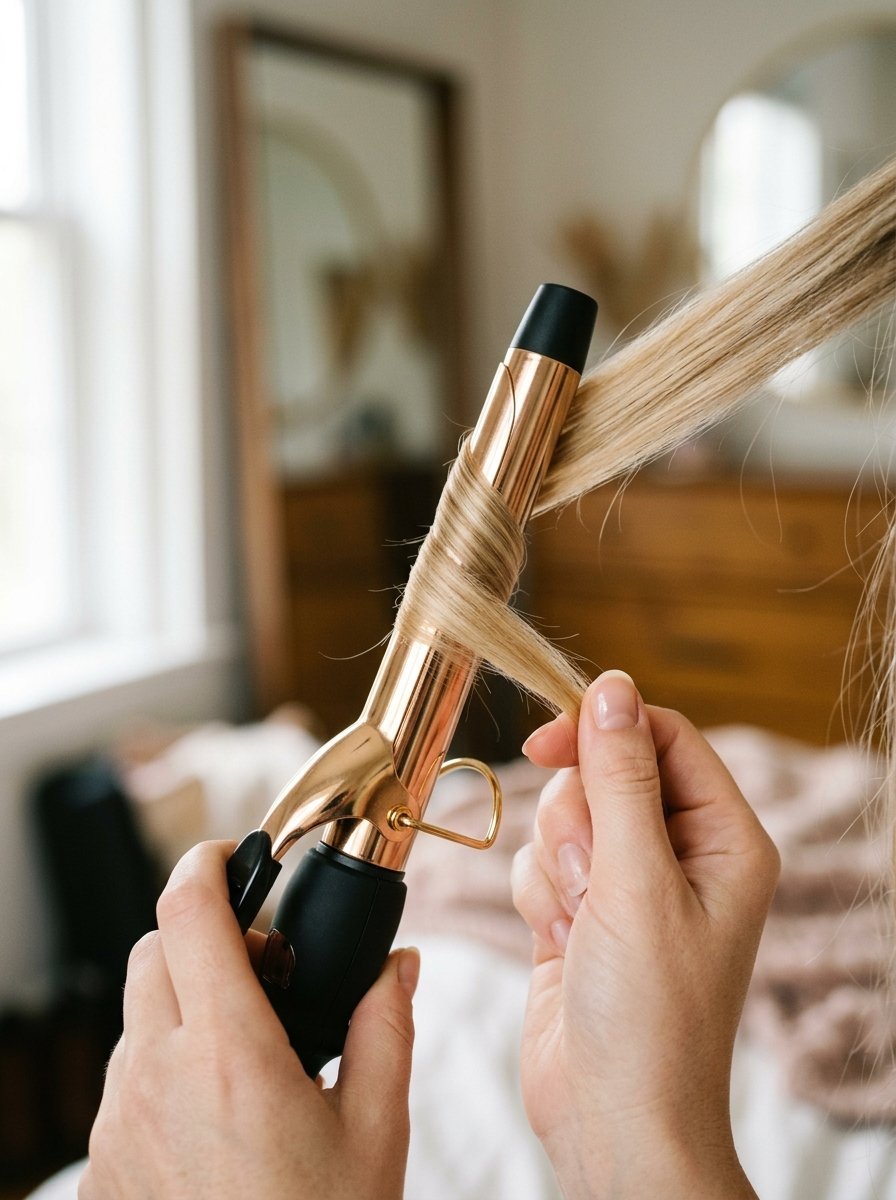
The Classic Barrel Curling Iron Method
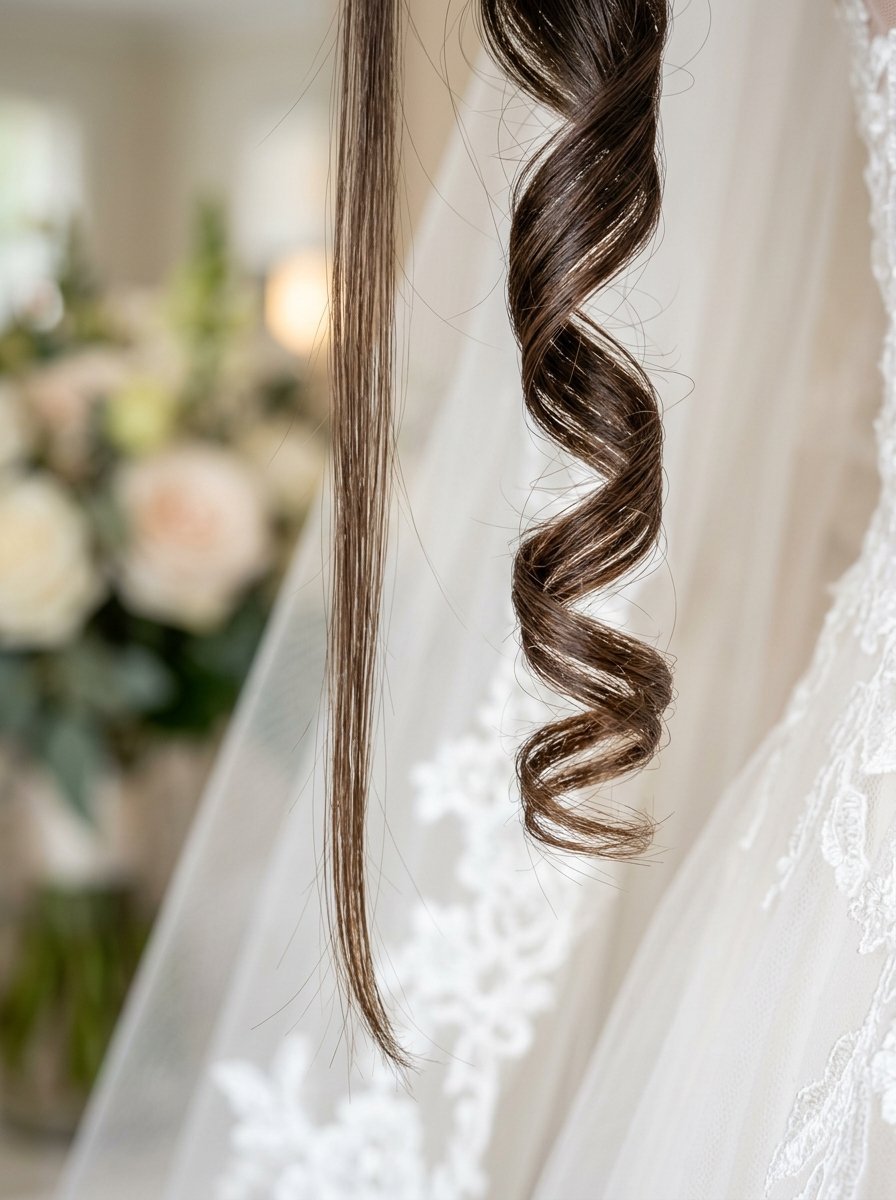
Use a one inch or one and a quarter inch barrel curling iron. A larger barrel creates waves that fall out too fast. Clamp the hair near the root. Roll the iron downward. Leave the last inch of your hair out of the clamp. This creates a modern finish. Hold the heat on the hair for eight to ten seconds. Open the clamp gently. Catch the hot curl in your palm. Do not let it drop immediately.
Creating Flat Iron Waves
Flat iron waves give a very effortless and beachy look. Take a one inch section of hair. Clamp the flat iron near the root. Bend your wrist away from your face. Pull the iron down one inch. Bend your wrist back toward your face. Pull down another inch. Repeat this rocking motion all the way down the hair shaft. This creates a soft bend rather than a round spiral.
Heatless Curls Overnight Prep
You can protect fragile hair with heatless curls. Start with slightly damp hair the night before. Wrap your hair tightly around a silk curling ribbon. Secure the ends with silk scrunchies. Sleep on a silk pillowcase to prevent frizz. In the morning unwrap the hair slowly. You get massive bouncy volume. You avoid all heat damage. This works perfectly for brides with bleached or brittle hair.
Step 3: Setting And Cooling The Hair
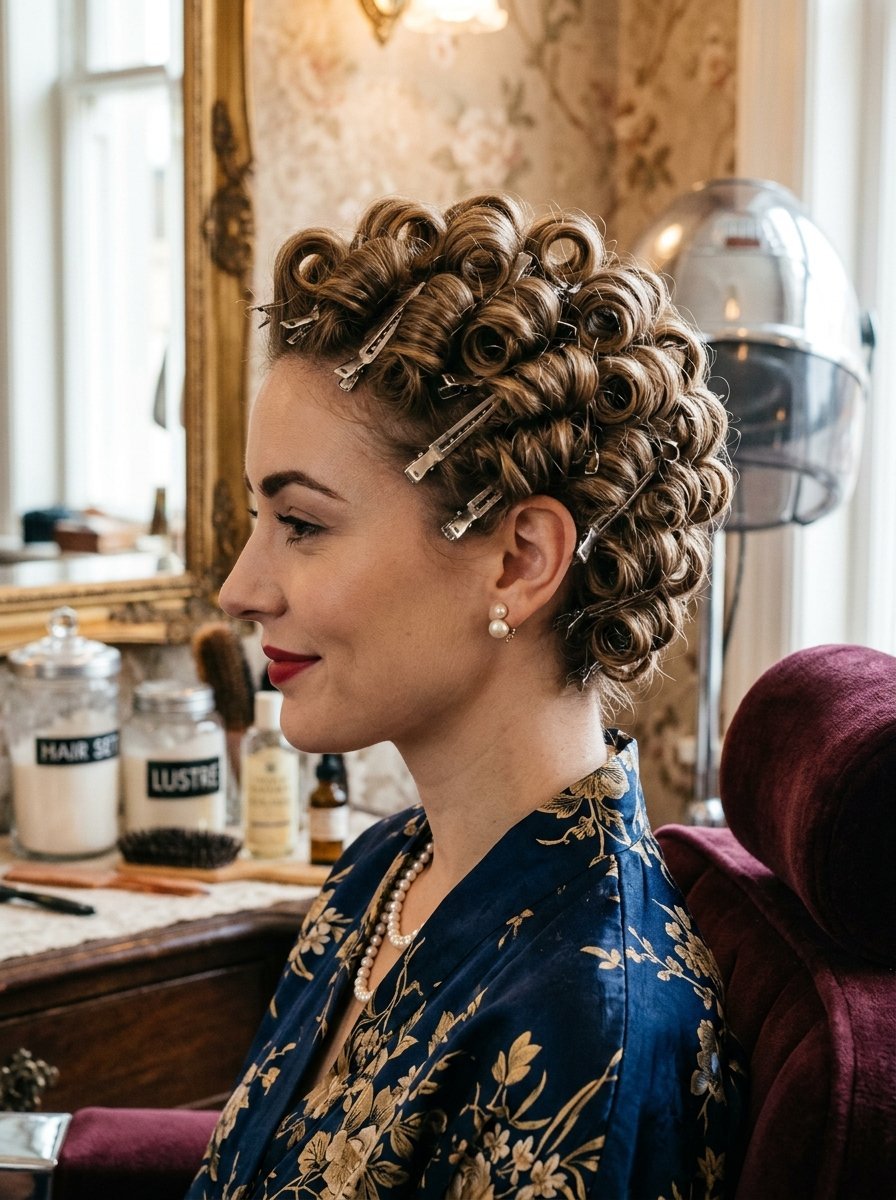
This phase locks in your hard work. Hair sets its shape entirely as it cools. Take every hot curl in your hand. Roll it back up to your scalp. Slide a metal pin curl clip through the circle of hair. Pin every single section to your head. Your head will be covered in metal clips.
Leave these clips in place for at least forty minutes. Do your makeup while your hair cools. I have watched impatient brides pull pins out after five minutes. Their hair fell flat instantly. You must wait until the hair feels completely cold to the touch.
Spray a light layer of hairspray over the pinned curls. This creates a firm cast around the hair. Once everything is cold start removing the clips. Start at the bottom of your head. Work your way to the top. Let the tight ringlets fall naturally around your shoulders.
Step 4: Brushing Out For Soft Curl Hairstyles
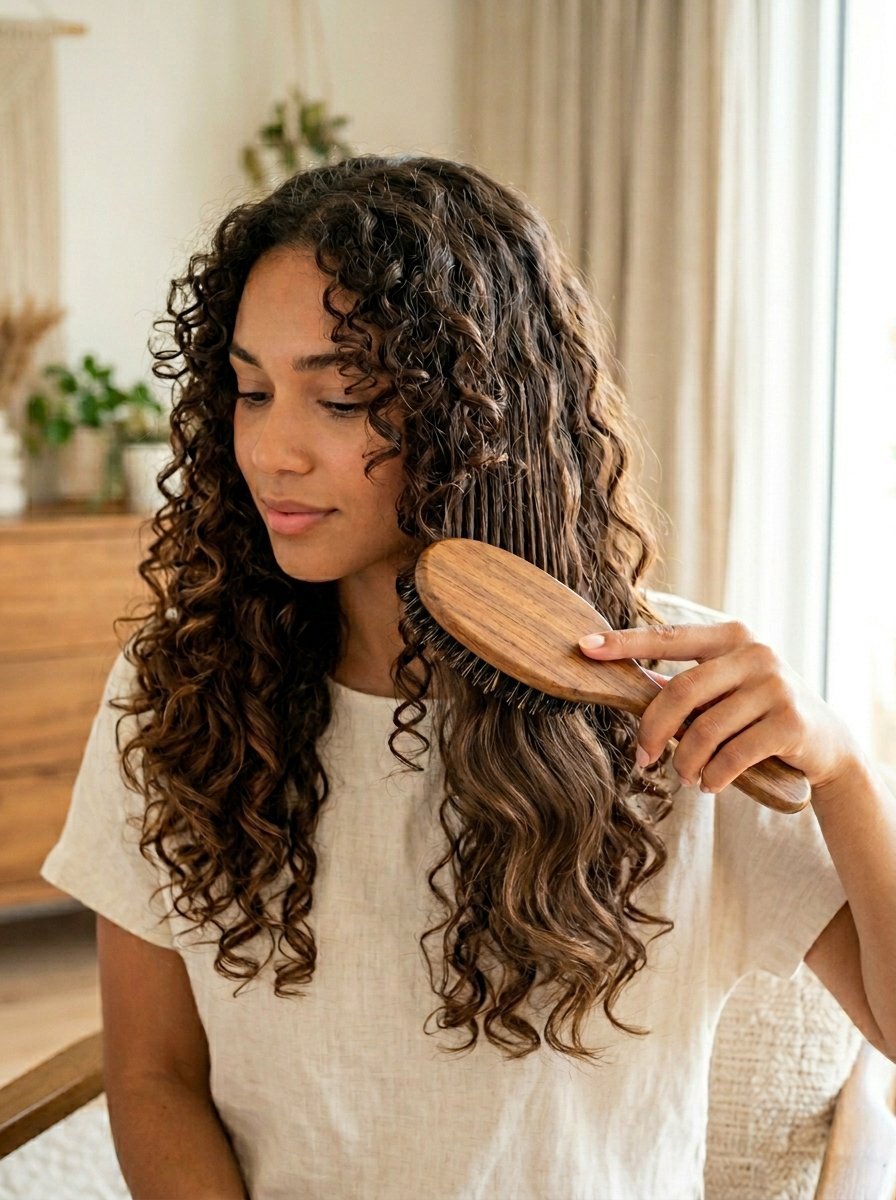
You will look like a historical doll when you first remove the pins. Do not panic. Soft curl hairstyles require a proper brush out. Grab a wide tooth comb. Starting at the very bottom ends gently rake the comb through your hair. Move upward slowly.
Switch to a boar bristle brush. Spray a tiny bit of hairspray directly onto the brush bristles. Run the brush smoothly through the top layers of your hair. This melts the individual ringlets into one continuous wave pattern. The bristles smooth down tiny frizz pieces.
Use your fingers to separate any clumps. Twirl the pieces around your face away from your eyes. I always tell brides to stop brushing when they reach their desired volume. The more you brush the softer the hair becomes. You can easily control the final texture with your hands.
Step 5: Locking In The Style For Photos
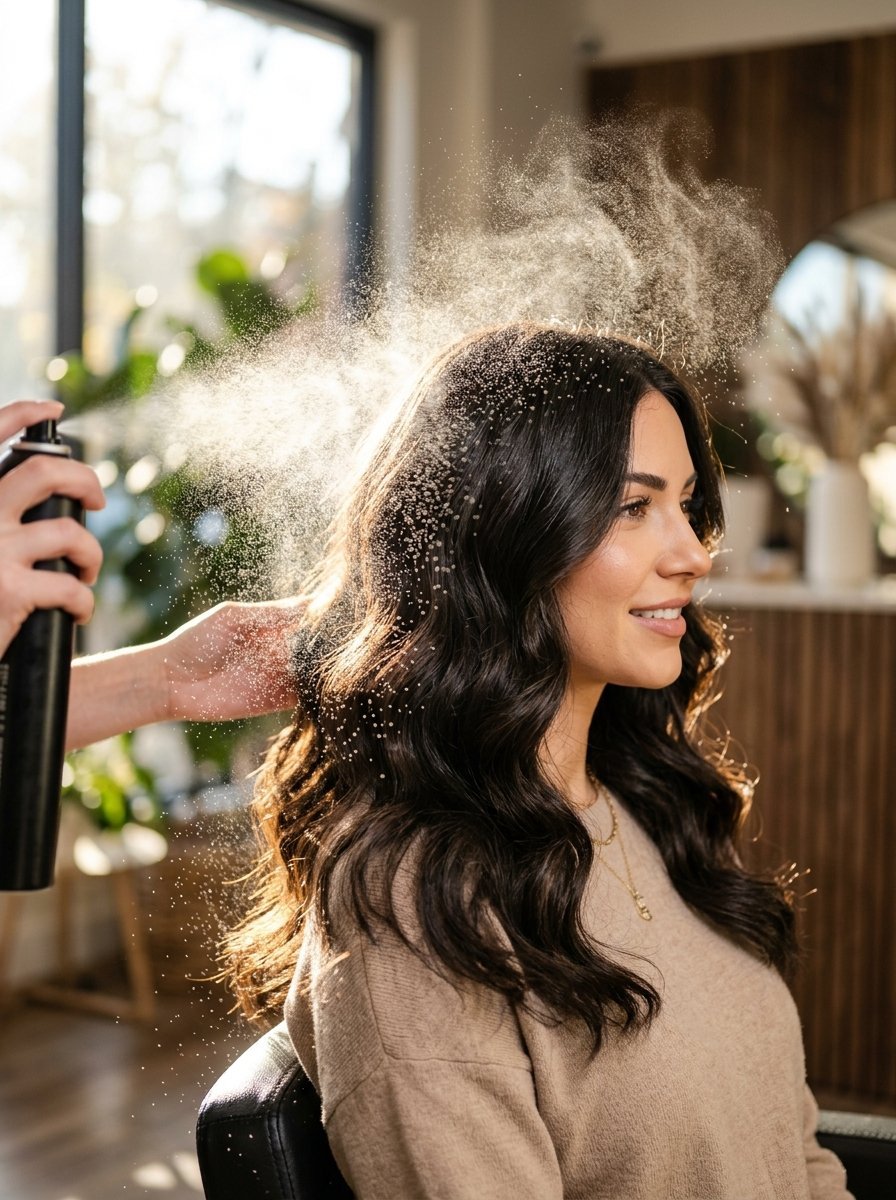
You need a strong finishing routine. Grab an aerosol dry texture spray. Lift sections of your hair up. Spray the texture spray underneath the waves. This props the hair up from the inside. It gives the hair an airy and full look.
Take a strong hold hairspray. Hold the can ten inches away from your head. Spray in a continuous sweeping motion. Never point the nozzle at one spot for too long. You will create sticky wet patches. Let the first layer of hairspray dry completely. Add a second very light layer.
Warm a tiny drop of smoothing pomade between your fingertips. Gently pinch the very ends of your hair. This seals the ends and stops them from looking fuzzy. Spray your parting one last time. Your hair is now locked in place. It will survive wind, dancing, and endless photographs.
Adapting The Style For Different Lengths
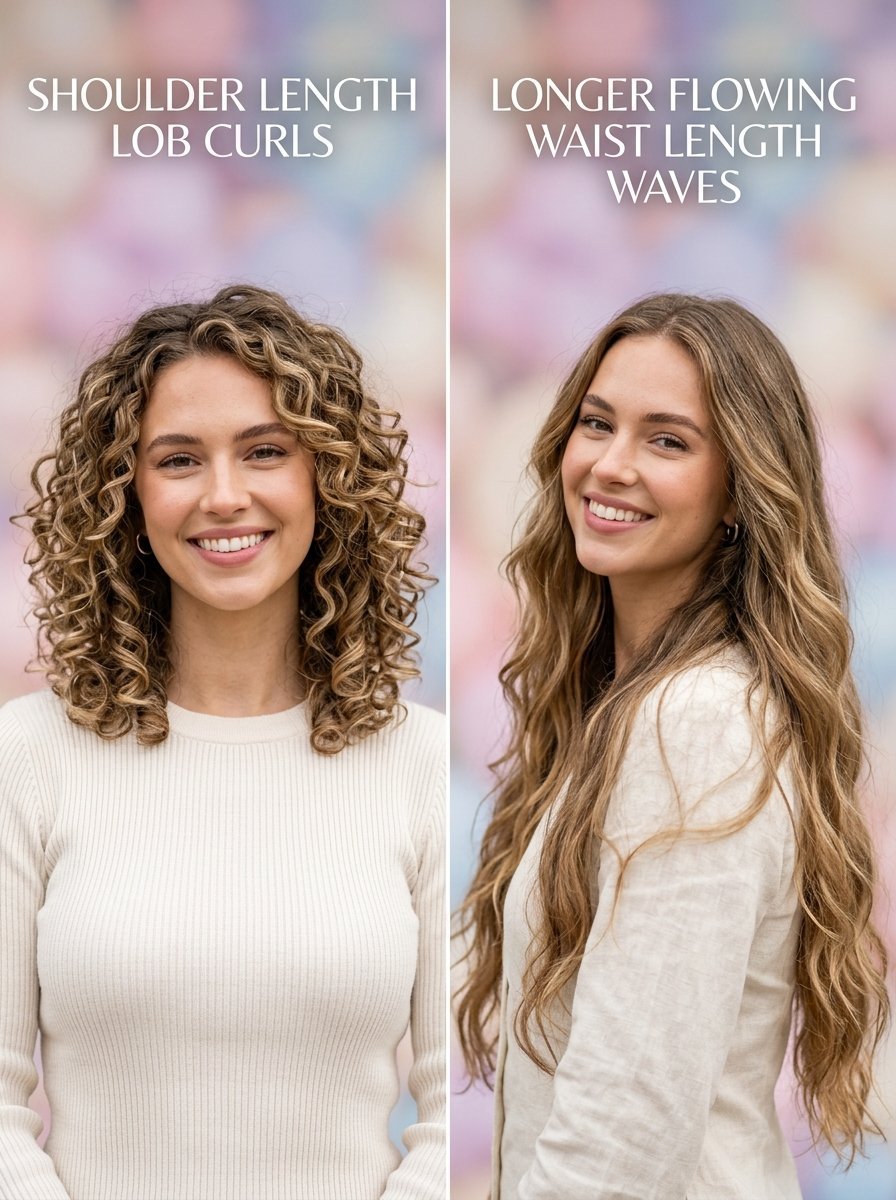
Easy Hairstyles For Medium Hair
Medium hair holds shape exceptionally well. Easy hairstyles for medium hair focus on movement. When working with shoulder length hair do not curl all the way to the scalp. Start curling two inches down from the root. This keeps the hair from looking too wide. Leave the bottom inch straight. This gives a lob haircut a very edgy and current look.
Curled Hairstyles For Medium Hair Transitions
You can transition curled hairstyles for medium hair easily for the reception. Pull the top half of your hair back. Twist it gently. Secure it with decorative bobby pins. This keeps hair out of your face while eating. It leaves the romantic curls flowing down your back. You get two distinct looks with minimal effort.
Adding Romantic Details To Your Curls
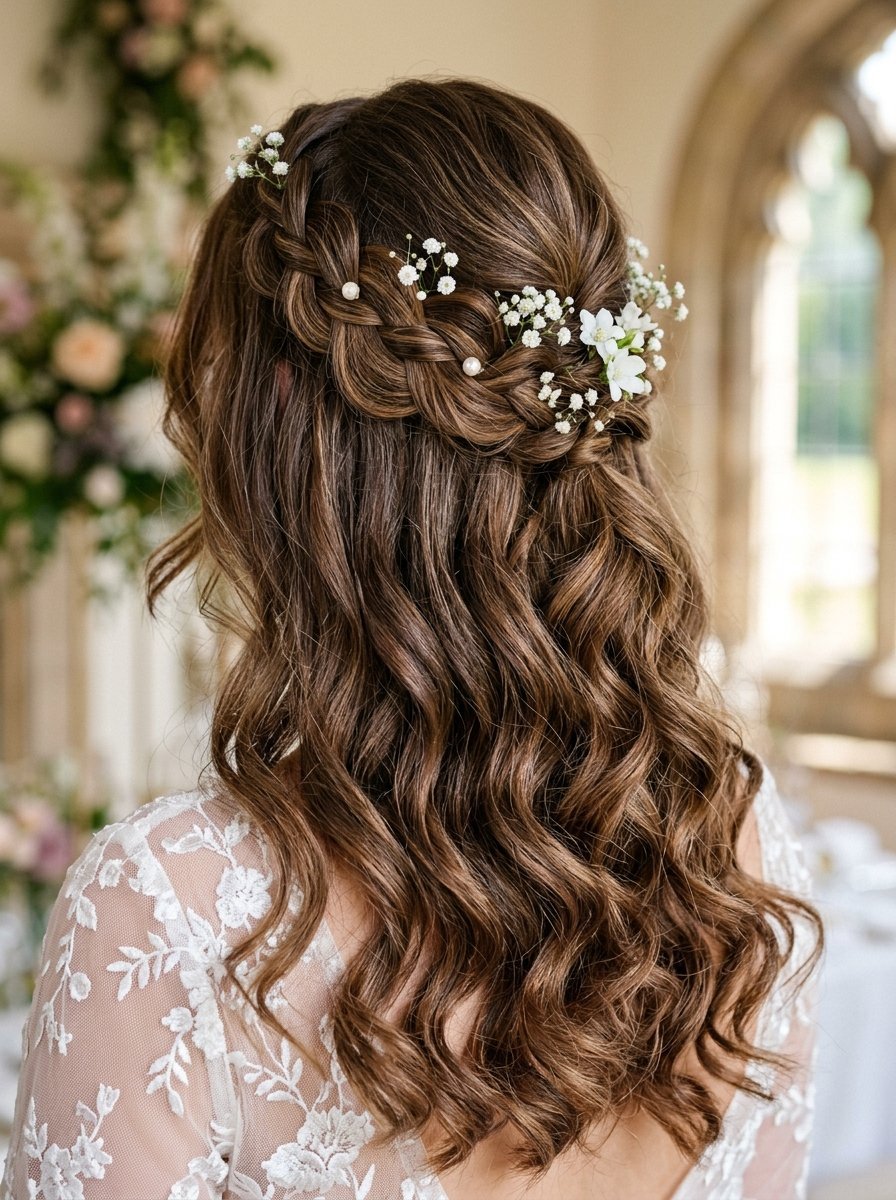
Integrating A French Braid
A French braid adds beautiful texture to a curled down style. Take a section of hair near your part. Begin braiding loosely down the side of your head. Secure the end with a tiny clear elastic. Hide the elastic under a section of curled hair.
Gently pinch the edges of the braid. Pull them outward slightly. This makes the braid look thick and full. It creates gorgeous romantic hairstyles effortlessly. The braid acts like a natural headband. It keeps flyaways out of your face during windy outdoor photos.
Securing Veils And Accessories
Veils can drag down your style if placed poorly. Find the spot where you want the comb to sit. Lift a small section of hair at that spot. Backcomb the underside of that section firmly with a fine comb. Spray it with strong hairspray.
Push the veil comb down into that teased cushion of hair. It will not move. You can add decorative pearl pins around the comb for extra security. When removing the veil later hold the hair down flat. Pull the comb straight up slowly. This prevents the veil from ripping your curls apart.
Frequently Asked Questions About Bridal Curls
How do I keep my curls intact outdoors?
Outdoor weddings expose your hair to wind and moisture. You must use an anti-humidity spray as your final step. Look for sprays that block moisture specifically. Pin the front pieces of your hair back lightly. This stops the wind from whipping your hair across your lip gloss.
Can I do this on freshly washed hair?
Freshly washed hair feels too soft. It slips out of styles quickly. Wash your hair the evening before your wedding. Sleep on it to let your natural oils settle. If you must wash it that morning you have to add extra mousse and texture spray to recreate that needed grip.
What is the best heat setting for bridal waves?
Keep your iron around 350 degrees for fine or color treated hair. Thick or coarse hair needs 400 degrees. Never turn the iron to the highest setting immediately. You risk burning the hair. Test a piece underneath first. Hold the heat evenly rather than relying on extreme temperatures.
How long before photos should I curl my hair?
Finish your hair two hours before your first photos. Curls need time to settle and drop naturally. They will relax into their final shape during this window. If you style your hair right before walking out the door the curls will look too tight and rigid in your initial pictures.
Do I need professional products?
Yes. Drugstore hairsprays contain high amounts of water and alcohol. They wet the hair and dry it out simultaneously. Professional products use finer aerosol sprays. They hold the hair weightlessly. You only get married once. Spend the extra money on high quality setting sprays.
How do I fix a fallen curl mid-wedding?
Ask a bridesmaid to keep a small cordless curling iron in her purse. You can also carry a tiny travel size hairspray. Excuse yourself to the restroom. Recurl the front two pieces framing your face. The rest of the hair will blend in beautifully once the front pieces look fresh.
Will extensions help my curls hold?
Absolutely. High quality clip-in hair extensions hold a heat style perfectly. They rarely lose their shape. You can curl the extensions the night before the wedding. Clip them in the next morning. They provide a sturdy foundation for your natural hair to blend into.
How do I sleep on my curls without ruining them?
Gather all your hair to the very top of your head. Twist it very loosely. Secure it with a soft silk scrunchie. Do not use tight elastic bands. Sleep on a silk pillowcase. The silk prevents friction. In the morning let the bun down. Shake your head upside down gently.
Can I touch up my hair during the reception?
Yes. Keep a boar bristle brush in your bridal suite. Brush your hair gently from the middle to the ends. Spray a light mist of shine spray. Use your fingers to twirl the face framing pieces back into shape. Avoid adding more sticky hairspray late in the evening.
What if it rains on my wedding day?
Rain destroys hot tool styling instantly. Buy a large clear umbrella for photos. Keep your hair pinned up in a loose twist while walking between venues. Let it down only when you are safely inside. Use extra strong anti-humidity spray before leaving your hotel room.
How much hairspray is too much?
If your hair looks wet or feels crunchy you used too much. You want to layer the spray. Mist lightly. Let it dry for thirty seconds. Mist again. This builds a flexible web of hold. Your hair should still sway when you move your head.
Should I use a styling cream or mousse?
Always use mousse for volume and hold. Styling creams contain heavy oils and silicones. They coat the hair strand and make it heavy. Mousse contains polymers that puff up the hair cuticle. It provides the exact airy texture you need for long-lasting volume.
Final Thoughts On Your Bridal Hair
You have all the steps ready to go. Styling your own hair takes practice and patience. Do not try these steps for the very first time on your wedding morning. Practice the routine three times before the big day. Take photos of your practice runs in different lighting.
I have seen countless brides look absolutely stunning doing their own styling. Trust the cooling process. Rely on good pinning techniques. Invest in the right aerosol sprays. Your hair will look thick and bouncy from your first step down the aisle to your final exit.
Have you decided between a classic iron or a flat iron for your styling? Share your styling plans below.

Sarah Mitchell — Founder & Editor-in-Chief
Sarah Mitchell is the founder and editorial voice behind Hair Level Up. A licensed cosmetologist with more than 15 years of experience, she has styled A-list celebrities for editorial shoots and red carpets, with work featured in Vogue, Elle, and Harper’s Bazaar. Early in her career, she trained under the legendary hairstylist Oribe in New York, an apprenticeship that still shapes her editorial eye today. Sarah founded Hair Level Up in 2020 after one bad haircut convinced her that women deserved a destination that felt like a magazine, taught like a stylist, and inspired like an art gallery. She oversees every story from concept to publication, guided by a simple belief: a good story teaches you something, but a great one makes you feel beautiful while it does.