
15 Rules for How to Grow Out a Pixie Cut Without Looking Awkward
You chopped your hair off. You loved it for a month. Now you want your long hair back. The mirror shows an awkward shape. You feel stuck in a styling nightmare. I have seen this happen countless times. I tried ignoring my own hair during this phase. It ended in tears and another short haircut. You need a clear plan to survive the awkward months. The journey from short to long takes extreme patience. You face weird cowlicks and random fluffy patches. I know exactly how frustrating those middle months feel. You stare at old photos and regret the scissors. Stop worrying about the length right now. You can style your way through every single stage. Your hair will look great every single day.
This post details exact steps to transition from short to long hair smoothly. You will read exact timelines and daily styling routines. You will see which holding products actually work. I detail exact trims you need to ask for at the salon. You will get past the mullet phase without hiding under a hat. You will find real ways to make short hair lay flat. I share exact bobby pin tricks for stubborn layers. You will get clear answers for managing thick or thin textures. The information here comes from real salon experience. You will finally master how to grow out a pixie cut without looking awkward.
1. Trim the Back Consistently
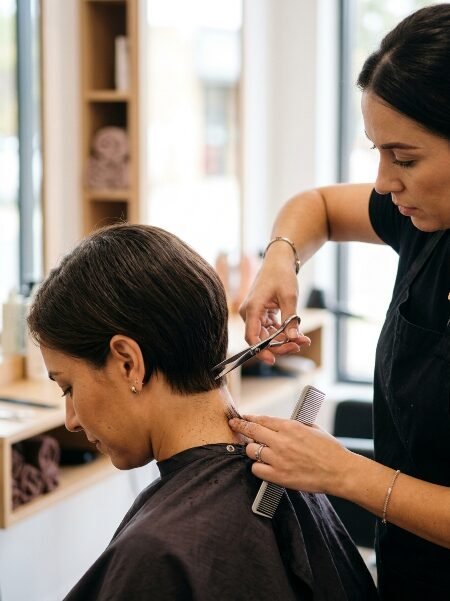
You must trim the nape of your neck every four weeks. The back of your head gets longer much faster than the top. I have noticed this creates a terrible shape fast. A tight neckline keeps the style looking intentional.
Ask your stylist to buzz or fade the very bottom. This simple action makes the front sections look longer. It gives the illusion of a polished shape immediately. I tell all my clients to keep the back short.
The top needs time to catch up to the neckline. You prevent a bad pixie cut from getting worse. This stands as the number one rule of hair length. Never let the hair touch your shirt collar.
Keep the sides long and the back clipped tightly. You will feel much more confident this way. It stops the hair from flipping up in the back. Your shape remains sleek and feminine every single week.
Do not try to trim the back yourself at home. Go to a professional barber or your regular stylist. They can blend the short back into the heavy top. You save money by only asking for a neck trim. Many salons offer these specific trims for a low price. This action completely fixes the growing out a pixie cut stages.
2. Let the Top Grow Heavy

Stop thinning out the top layers completely. You need weight on the top of your head. Growing short hair requires extreme patience with top volume. The top sections must cover the crown eventually.
I tried texturizing my top layers while growing them out. My hair stood straight up for three whole weeks. Tell your stylist to leave the top completely alone. Heavy top layers push the underneath hair down flat.
This creates a smoother shape as the hair gets longer. You will tame the volume much easier this way. Short spiky layers look outdated and extremely messy. Long top layers give you styling versatility every morning.
You can part heavy hair much easier than thinned out hair. The weight acts as a natural control mechanism. You avoid the fluffy dandelion look entirely. Your hair falls into a natural bob shape naturally over time.
Do not let anyone use thinning shears on your head. Those shears create tiny short hairs that push long hairs up. You want every single strand to get heavy and thick. You will thank yourself when the top covers your ears.
3. Play with Deep Side Parts

Change your part line to hide uneven growth immediately. A deep side part fixes awkward lengths in seconds. Move your part far to the left or the right. This creates an asymmetrical look that feels very modern.
I use this trick for every pixie to bob transition. It hides the bulky sections near your temples perfectly. You force the hair to lay flat across your forehead. Secure the heavy side with a small metal clip.
This diverts attention from the shorter opposite side. You look styled in under five flat minutes. A center part shows off every single uneven hair strand. Side parts camouflage the strange transition lengths brilliantly.
You can flip the part throughout the day for volume. It takes zero styling skills to execute this well. I rely on this trick when my hair refuses to cooperate. You completely change your look without cutting anything.
Try parting the hair completely over one eyebrow. Tuck the less heavy side tightly behind your ear. This balances the face and slims the jawline visually. You feel glamorous instead of awkward and unkempt.
4. Use Matte Pomade Daily
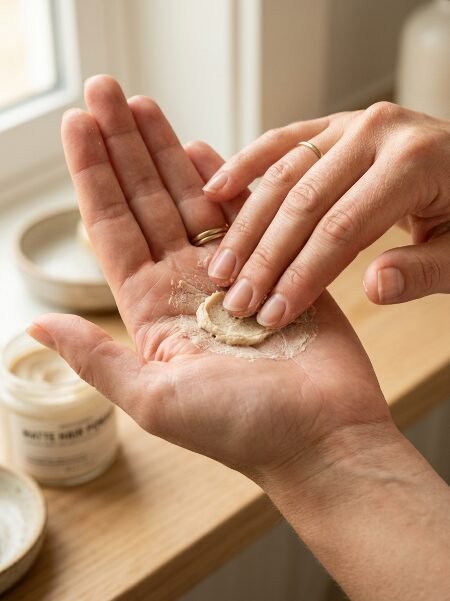
Drop your soft creams and shiny gels right now. You need strong hold products during this difficult phase. I use Ouai Matte Pomade for stubborn short hairs. Rub a dime sized amount aggressively between your palms.
Press it directly into the ends of your hair. This stops the ends from flipping out randomly outside. Matte products make the hair look thick and completely natural. I have tried shiny gels and they look terrible dry.
You want texture without a wet or greasy finish. Pomade keeps the hair exactly where you put it all day. It adds definition to the choppy uneven layers. You avoid the fluffy helmet hair look entirely.
I buy three jars at a time to never run out. Styling grown out pixie hair demands heavy duty products. Lightweight serums will do absolutely nothing for you. They make the hair slip out of clips and pins.
Warm the pomade up until it turns invisible on your hands. Push it into the roots for extra lift and grip. Pinch the very ends to create a piecy look. You gain total control over every single strand.
5. Master the Wet Look

Sometimes your hair refuses to cooperate at all. The wet look saves you on terrible hair days. Comb firm gel through soaking wet hair straight from the shower. Slick every strand straight back away from your face.
I have seen this work for formal events beautifully. It hides every uneven layer completely from view. Use a strong hold gel like Eco Style Olive Oil. It stops flyaways from popping up as the hair dries.
This trick works perfectly for dealing with awkward lengths. It gives you a sleek and polished appearance instantly. You look like you walked off a fashion runway. Nobody knows you are hiding a terrible haircut underneath.
Apply a glossy shine spray over the gel for drama. You bypass the styling frustration entirely. It takes two minutes and lasts until you wash it out. You never have to worry about the wind ruining it.
Keep a fine tooth comb in your bathroom for this style. Push the hair tight against your scalp on the sides. Leave a little volume right at the front hairline. You look fierce and incredibly put together.
6. Hide the Awkward Ear Phase
The hardest part is growing hair over your ears. The hair flips out and looks extremely messy. You must learn the tight tuck action. Flat iron the sections right above your ears straight down.
Tuck them tightly behind your earlobes right away. Spray the tucked pieces with strong aerosol hairspray. I use L’Oreal Elnett for this exact daily trick. It keeps the hair glued behind the ears all day long.
This creates a faux bob shape from the front view. You bypass the worst part of a growing buzz cut entirely. The hair stays out of your face while you work. You look professional instead of totally disheveled.
I kept my hair tucked like this for four straight months. It trains the hair to lay flat against your scalp. You stop fighting the flips and weird cowlicks. You stop feeling the tickle of short hairs on your ears.
Use a heavy bobby pin right behind the ear if needed. The hair will eventually get heavy enough to stay put naturally. This phase requires daily hairspray and intense patience. You will get through this rough middle stage cleanly.
7. Buy High Quality Bobby Pins
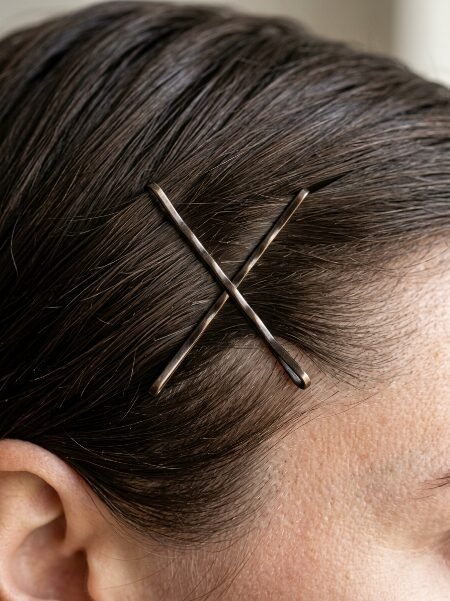
Cheap bobby pins slide right out of short hair. You need professional grade pins to hold short layers tight. I always buy MetaGrip Premium Bobby Pins in bulk. They grip the tiniest hairs without slipping once.
Pin the front sections back in a tight crisscross pattern. Two pins crossed over each other lock the hair down entirely. You can pin twisted sections away from your face cleanly. This keeps hair out of your eyes while working.
It makes the transition phase much less frustrating daily. Match the pin color to your exact hair color perfectly. They disappear into the hair and look totally invisible. I stash bobby pins in my car and my purse.
You never know when a short layer will fall loose. They save you from sudden hair disasters instantly. Try pinning back just one side for an edgy look. Slide the wavy side of the pin face down for grip.
These small metal tools become your best friends. You can create entire updos with just pins and spray. It distracts from the fact that your hair is uneven. You retain your sanity when the hair refuses to lay right.
8. Experiment with Tiny Braids
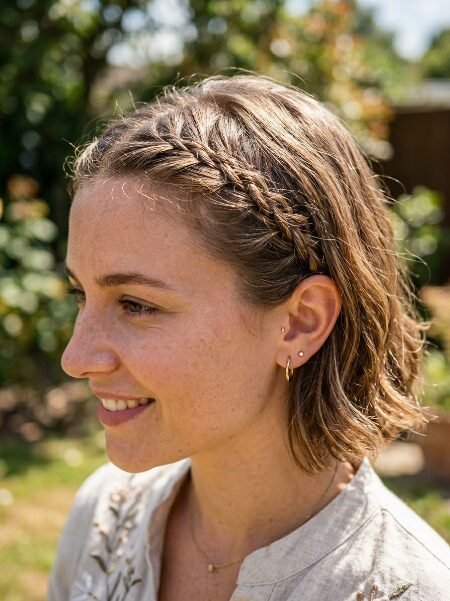
Short hair can still hold small and tight braids. Create a tiny French braid along your front hairline. This pulls all the awkward bangs away from your forehead. Secure the tiny end with a clear elastic rubber band.
Tuck the end under a longer section of side hair. Hairstyles for growing out a pixie rely heavily on small details. I use this braid trick when my bangs cover my eyes. It looks complicated but takes exactly two minutes to finish.
You get a cute style that lasts all day without moving. Braids hide the fact that your bangs are too long. You keep the hair completely out of your line of sight. It gives a feminine touch to a boyish haircut.
You can try a double braid for a fun weekend look. Twist the hair if you cannot French braid well. Twists work just as beautifully for hiding awkward lengths. Pin the twists back tightly with your premium bobby pins.
This works perfectly on second day unwashed hair. The natural oils give the braid hold and texture. You skip the hot tools and save your hair from damage. You look stylish while literally doing nothing to the back.
9. Use Dry Shampoo for Root Volume

Flat hair shows off uneven cuts and strange head shapes. You need heavy grip and volume right at the roots. Spray dry shampoo into your roots every single morning. I strictly use Batiste Bare Dry Shampoo for my clients.
Massage it in vigorously with your fingertips for one minute. It puffs up the crown of your head nicely. The extra volume disguises weird cowlicks immediately. Unruly hair behaves much better with dry shampoo in it.
It gives the perfect amount of dry texture. You can mold the hair easily after a good application. Clean hair slips around and falls completely flat. Day old hair styles much easier than freshly washed hair.
I tell people to wash their hair less often. You need the natural oils to help weigh the hair down. Dry shampoo absorbs the grease but leaves the thick texture. Spray it underneath the top layers for maximum lift.
Do not brush it out completely after you spray it. Let the white powder absorb for ten minutes first. Then use your fingers to shake it out thoroughly. You get massive root lift that distracts from short ends.
10. Start Wearing Wide Headbands

Headbands cover the messy middle section of your head beautifully. Buy thick cloth headbands in solid neutral colors. Push all your hair straight back off your face. This works incredibly well for a growing out buzzcut phase.
I wore wide black headbands for three solid months straight. Nobody knew what my actual haircut looked like underneath. They draw the eye up and away from the neckline. Choose soft bands without plastic teeth to prevent headaches.
You get a break from styling your hair entirely. Headbands instantly elevate a lazy outfit into a cute look. You can find silk ones that protect your hair from breaking. I pack five headbands whenever I travel during this phase.
They solve every single bad hair day instantly. You hide the horrible cowlick on the crown of your head. You keep the heavy bangs out of your face entirely. You can wear them to the gym or out to dinner.
Keep a few different textures like velvet or ribbed cotton. Match them to your daily outfits for a styled appearance. You completely skip the mirror anxiety in the morning. You put the headband on and walk out the door.
11. Focus Heavily on Hair Health

Damaged hair breaks off and delays your length progress. You must condition your hair deeply once a week. Use a heavy repair mask like Olaplex Number 8. Let it sit on damp hair for ten full minutes.
Healthy hair lays flatter and looks much shinier. Dry ends puff out and make the cut look terrible. I ruined my progress once by bleaching my short hair white. It broke off and I had to cut it again entirely.
Keep your hair heavily moisturized and leave the color alone. Stop using bleach while you are trying to add length. Heat styling takes a toll on short fragile ends. Always spray a heat protectant before touching a hot iron.
You want thick healthy ends when you finally get a bob. Do not use cheap drugstore shampoos with heavy sulfates. They strip the hair and make it stand straight up. Invest in salon quality moisture treatments.
Sleep on a silk pillowcase to prevent harsh friction. Cotton pillowcases rough up the hair cuticle overnight. You wake up with a bird nest on the back of your head. A silk pillowcase keeps the hair smooth and flat.
12. Ask for a Micro Dusting Trim
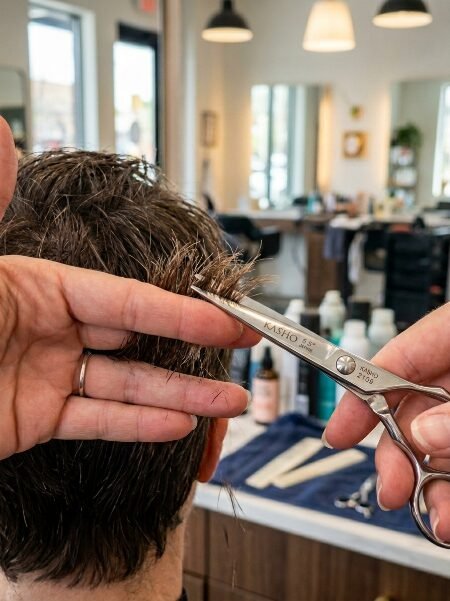
Never skip the hair salon completely for months. You need a micro trim every six weeks religiously. Ask the stylist to literally dust the very ends. This removes split ends without taking off any real length.
You keep a clean shape as the hair drops down steadily. The sides will eventually meet the back length perfectly. This regular maintenance prevents the dreaded mushroom head shape entirely. I tell people to book these appointments in advance.
You stop yourself from chopping it all off in pure frustration. Clean ends make the hair look polished and intentional. Your hair grows half an inch every single month. You only want a quarter inch removed at most.
Remind the stylist you want to grow out pixie haircuts. A good stylist respects your timeline completely. They will only snip the very transparent dead hairs. You leave the salon feeling refreshed but not shorter.
This keeps you motivated to keep pushing forward. A bad split end travels up the hair shaft quickly. You have to cut off more if you wait too long. Keep the ends fresh and the growth happens beautifully.
13. Iron the Short Ends Straight
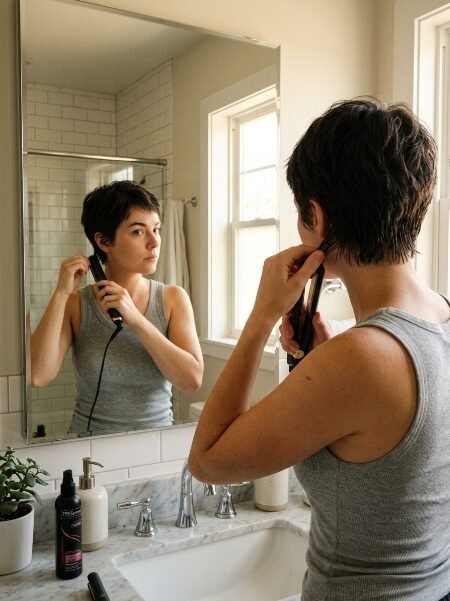
Flippy ends ruin the getting longer phase completely. A mini flat iron becomes your absolute best tool. Iron the longest pieces in the back straight down. This elongates the neck and slims the head shape visually.
I bought a half inch flat iron specifically for this task. It grabs the shortest hairs easily without burning my scalp. Curve the front pieces slightly inward towards your cheekbones. You mold the hair into a sleek shape manually.
This makes the uneven lengths look completely deliberate. Straight hair looks longer than wavy or curly hair. You get instant satisfaction seeing the hair fall lower. Keep the heat setting low to avoid frying the ends.
You want smooth sleek hair that moves nicely. Never flat iron wet or damp hair under any circumstances. You will fry the hair clean off your head. Blow dry it completely flat before using the hot iron.
Use a tiny dab of oil after you finish ironing. It seals the ends and gives a glass like finish. You conquer the weird flips that plague the middle months. Your hair behaves exactly how you want it to behave.
14. Get Strategic Fine Hair Color

Solid dark colors make harsh blunt lines stand out. Highlights break up the heavy blocks of awkward hair. Ask for very fine babylights right around your face. The dimension distracts the eye from uneven growth naturally.
The lighter pieces give the hair visual texture and depth. I have noticed this makes styling grown out pixie shapes easier. The hair looks intentional rather than neglected or forgotten. Keep the highlights subtle and very natural looking.
You hide the awkward transitions with clever foil color placement. A gloss treatment gives extreme shine over the highlights. The light catches the different tones beautifully in the sun. This step makes you feel glamorous during a tough hair phase.
Do not go completely platinum blonde during this phase. You want dimension without heavy chemical damage. Ask for colors just two shades lighter than your natural base. This paints a beautiful picture without frying your ends.
You feel like you got a whole new hairstyle. It cures the extreme boredom of the growing phase. You get a fresh look without losing a single inch. You walk out of the salon feeling completely renewed.
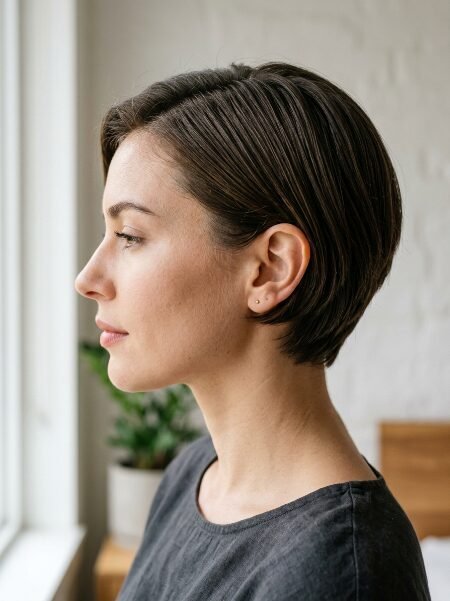
15. Celebrate the French Bob Finish Line

Your first big milestone is the classic French bob. The front pieces finally get down to your chin. The back lines up precisely with the bottom of your ears. Stop trying to make it a long shaggy pixie.
Start treating it like a very short chic bob. Use a round brush to blow it out smoothly. Put some loose waves in with a small curling wand. The pixie to bob transition is finally complete.
I remember feeling massive relief hitting this exact stage. You can now let it drop to your shoulders easily. The daily struggle of hiding awkward lengths is over. You survived the hardest hair transition possible.
Your patience completely paid off in the end. You can finally put the top half into a tiny ponytail. You look in the mirror and see actual length again. You no longer have to trim the back every four weeks.
The hair all grows at the exact same pace now. You throw out the heavy pomades and use light serums. You wear a center part proudly without it looking strange. You finally get to enjoy your long hair again.
Frequently Asked Questions
How long does a pixie to bob transition take?
Hair gets roughly half an inch longer every single month. A complete change usually takes six to nine months. The exact timeline depends entirely on your starting length. I have seen clients hit a bob in five months. You must stay patient during the middle months. Trimming the back extends the timeline slightly. It keeps you sane and looking polished. Do not measure your hair every single day.
Can I speed up growing out a pixie cut stages?
You cannot change your genetic hair growth rate at all. You can prevent breakage by doing deep conditioning treatments. Take a daily multivitamin to keep your body healthy. I tell clients to drink more water daily. Massage your scalp nightly to stimulate blood flow. Gentle scalp care keeps the hair follicles happy. Avoid tight rubber bands that snap the ends off completely.
What are the best hairstyles for growing out a pixie?
Slicked back wet looks hide all uneven layers instantly. Deep side parts disguise strange patterns beautifully. Tiny front braids keep the bangs out of your eyes completely. Headbands cover the messy crown sections effortlessly. I personally love pinning the sides back tight. You mix these styles up to prevent pure boredom. Keep playing with different accessories weekly.
How do I fix a bad pixie cut during growth?
Go to a highly rated stylist immediately for a reshape. Do not try to cut the mistakes out yourself. They can blend the harsh lines with a razor tool. Let the top grow heavy to cover the bad layers underneath. I rely on matte pomade to glue down weird sections. Wear a headband until the bad cut gets slightly longer.
What products help with styling grown out pixie hair?
You need a strong matte pomade for the ends right away. Buy a dry shampoo to put grit and root volume in. Get a firm hold hairspray to lock down side flyaways. I strongly advise a heat protectant spray for ironing. Stop using heavy oils that make short hair look greasy. Stick to texturizing pastes and strong holding gels entirely.
Is growing out a buzzcut harder than a pixie?
A growing buzz cut feels very hard to manage daily. All the hair gets longer at the exact same time. This creates a literal tennis ball shape quickly. You must trim the sides and back immediately. Turn the old buzz cut into a pixie cut first. Then follow the exact steps to get to a bob. It puts three more months on the entire timeline.
How often should I cut my hair when growing buzz cut?
You need a shape up every four weeks exactly. The sides will puff out and look like fuzzy earmuffs. Have a barber fade the sides tight to your head. Leave the top completely untouched. I have trimmed buzz cuts for years safely. Frequent trims prevent the fuzzy ball stage. It looks like a stylish fade haircut instead.
Should I wear hats while I grow out pixie cuts?
Hats save you on the days you refuse to style it. Baseball caps look very cute with short side pieces. Beanies flatten the hair and cause static electricity problems. I wore hats every weekend for three solid months. Take the hat off inside to let your scalp breathe. Do not rely on hats every single day of the week.
How to grow out a pixie haircut with thick hair?
Thick hair requires aggressive thinning underneath the top layers. Your stylist must remove the bulk from the sides deeply. Do not thin the top or it will stand straight up. Use heavy creams to weigh the thick hair down. I clamp thick sides down with strong bobby pins tightly. Thick hair gets very wide during the awkward phase.
How to grow out a pixie haircut with curly hair?
Curly hair shrinks up and takes twice as long. You must use heavy leave in conditioners daily. Pin the sides back while the hair dries wet. This stretches the curls and adds visual length. I tell curly clients to avoid the flat iron entirely. Embrace the messy curly shag phase proudly. Keep the back trimmed short to avoid a triangle shape.
When will the back of my hair stop flipping out?
The back stops flipping when it touches your shoulder blades. Short hair hits your neck and flips up naturally. You cannot fight this daily with a flat iron. You must trim the back short until the front catches up. I learned this lesson the hard way. A short tight neckline fixes the flipping problem instantly.
Can extensions help me skip the awkward phase?
You need at least four inches of hair for extensions. Tape in extensions show clearly through very short layers. I warn against extensions until you get a short bob. They pull on fragile hair and cause severe breakage. Save your money and buy cute hair accessories instead. The awkward phase passes faster than you actually think.
Next Steps for Your Hair Journey

You now possess the exact blueprint for hair length. The awkward phase no longer has to control your mornings. You know how to grow out a pixie cut without looking awkward at all. Keep your salon appointments booked for regular nape trims. Stock your bathroom with matte pomade and quality bobby pins. I promise the months will pass by faster than expected. Take photos every month to see the actual visual progress. You will wake up one day with a perfect short bob. Stay away from the scissors when you feel extremely frustrated. Put on a wide headband and walk away from the mirror. Your long hair is waiting for you at the finish line.

Sarah Mitchell — Founder & Editor-in-Chief
Sarah Mitchell is the founder and editorial voice behind Hair Level Up. A licensed cosmetologist with more than 15 years of experience, she has styled A-list celebrities for editorial shoots and red carpets, with work featured in Vogue, Elle, and Harper’s Bazaar. Early in her career, she trained under the legendary hairstylist Oribe in New York, an apprenticeship that still shapes her editorial eye today. Sarah founded Hair Level Up in 2020 after one bad haircut convinced her that women deserved a destination that felt like a magazine, taught like a stylist, and inspired like an art gallery. She oversees every story from concept to publication, guided by a simple belief: a good story teaches you something, but a great one makes you feel beautiful while it does.