
The Step-by-Step Guide to Cutting Your Own Bangs at Home
You stand in front of your bathroom mirror. Scissors rest in your right hand. Your heart beats very fast. You want a fresh look right now. Going to a salon takes too much time. It costs money you would rather keep. You wonder if you can just snip your hair yourself. In my experience, you absolutely can do this. I have cut my own hair for five years. I made plenty of mistakes early on. I cut my fringe too short one time. I cried for a whole week. Then I found the right way to hold the shears. I figured out the exact finger angles. I tested different shears and combs. Today I will show you exactly what to do. You get the exact steps for a beautiful look in your bathroom. This article covers everything you need. We talk about tools and exact finger placements. We cover classic styles and soft framing looks. You save money and time when you master this skill. Grab your mirror. Let us start this fun project today.
You will read about exact steps to style your hair at home. I share my exact blueprint for five specific styles. You get exact costs for tools you need. I rate twelve popular brands for home haircutting. You will read stories from real people who tried this. Some failed and some succeeded. I share exact reasons why they failed. You get a massive troubleshooting section today. You will read exactly how to fix a bad cut. I detail the exact way to hold your scissors. You will read eighteen common questions people ask. By the time you finish reading, you will feel confident. You will know exactly where to make the first cut. You will save hundreds of dollars a year. You skip the salon waiting room completely. You get a fresh look in twenty minutes. We cover exact costs ranging from twenty dollars to two hundred dollars. You will see a clear comparison table for different styles.
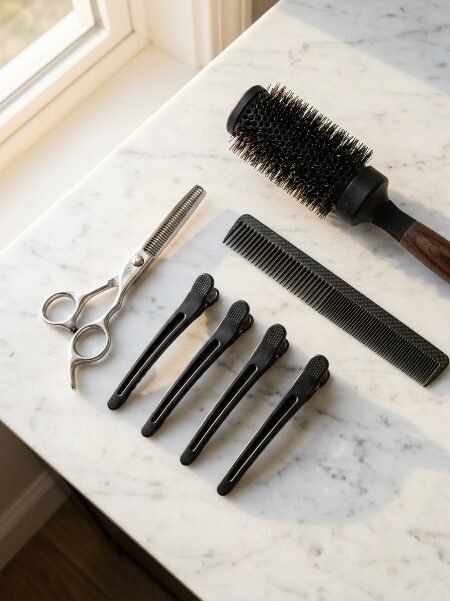
The Must-Have Tools For Cutting Hair At Home
You cannot cut beautiful hair with dull blades. Kitchen scissors ruin your hair instantly. They push the hair away from the cutting edge. This creates a jagged line you will absolutely hate. You need proper tools for a clean cut. I have tested dozens of brands over the years. Here is my honest rating of twelve popular tools.
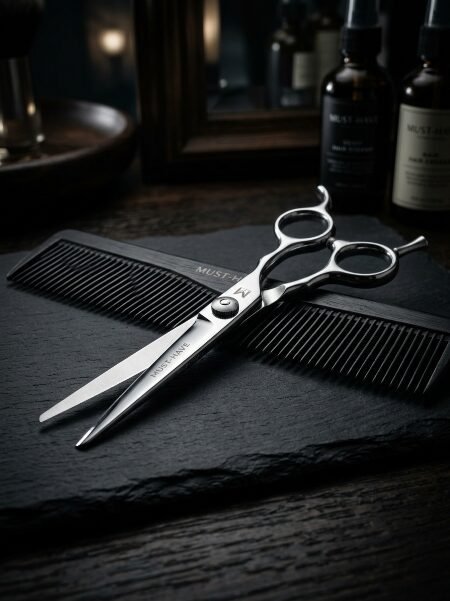
Finding The Right Shears
You need professional shears for this job. Equinox Professional Shears cost about twenty dollars. They feature a very comfortable grip. The blades come extremely sharp straight out of the box. I used these for my first successful cut in 2021. They fit small hands perfectly. Tweezerman Stainless 2000 shears cost thirty dollars. They feel much heavier in your hand. The extra weight gives you total control. I love the finger rests on these specific shears. They glide through thick hair smoothly.
Choosing The Perfect Comb
A good comb gives you exact measurements. The Cricket Silkomb costs around ten dollars. The teeth spacing works perfectly for fine hair. It grips the hair tightly without pulling. You need a good comb to section your hair evenly. Professionals really love the YS Park 339 Comb. It costs twenty dollars. The holes in the spine act as a measuring tape. Each hole sits exactly one centimeter apart. This helps you measure your cuts perfectly.
Essential Sectioning Clips
You must separate your hair before cutting. Framar Sectioning Clips cost fifteen dollars for a pack. These clips hold heavy sections tightly. They never slip out of your hair. You must section your hair perfectly before cutting. These clips make that job extremely easy. Drybar Hold Me Hair Clips cost nineteen dollars. They feature a strong alligator jaw design. I use these when I cut very thick hair. They hold everything flat and secure.
The Best Styling Products
You must style your hair to see the final shape. The Dyson Supersonic Hair Dryer costs four hundred dollars. It dries hair fast without extreme heat. You must style your hair immediately after cutting to check the shape. The Parlux Alyon Dryer costs two hundred dollars. This dryer packs massive power. It smooths frizz instantly. I use this when I want a sleek finish. The Olivia Garden Round Brush costs twenty-five dollars. The ceramic barrel heats up beautifully. You need a round brush to give your cut that perfect bounce. Moroccanoil Treatment costs sixteen dollars for a small bottle. Just one drop tames wild flyaways. Living Proof Dry Shampoo costs thirty dollars. Clean hair slips through your fingers too easily. A quick spray gives your hair grip. Ouai Texturizing Hair Spray costs twenty-eight dollars. This gives your fresh cut a messy texture.
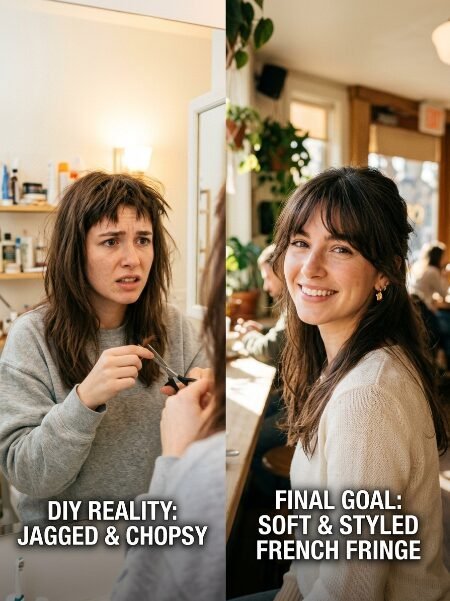
How To Cut French Bangs Tutorial

French girls always look incredibly effortless. Their hair falls perfectly around their eyes. The secret lies entirely in the shape. The center sits much shorter. The edges blend seamlessly into the rest of the hair. Here is your How To Cut French Bangs Tutorial.
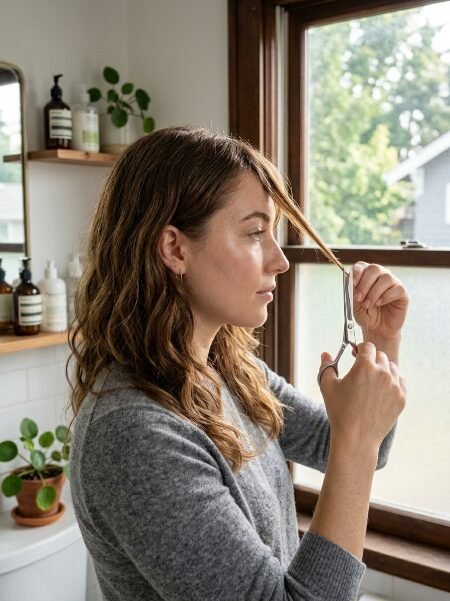
Setting Up Your Space
You need excellent lighting for this task. Stand facing a window if possible. Natural daylight shows you every single stray hair. Set up a large mirror at eye level. Keep your tools on a clean towel right in front of you. Keep your feet flat on the floor. Stand up perfectly straight.
Preparing The Front Sections
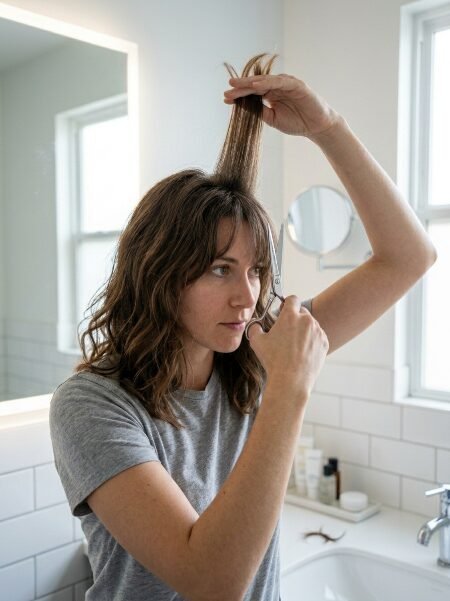
Start with completely dry hair. Wet hair stretches downwards. If you cut wet hair, it shrinks and looks too short. Wash your hair normally. Dry it completely. Style it exactly how you wear it daily. Find the highest point of your head where it starts curving down. Place your comb there. Draw a line down to the outer corner of your right eye. Do the exact same thing for the left eye. You now have a triangle of hair.
The Initial Cutting Technique
Take your clips and secure all other hair behind your ears. You want absolute focus on the front section. One stray piece of hair ruins the whole shape. Take a tiny piece of hair from the exact center of your triangle. Pinch it securely between your index and middle fingers. Slide your fingers down exactly to the bridge of your nose. Hold your scissors vertically. Point the tip straight up into the hair. Snip tiny pieces away slowly. Do not cut straight across horizontally. Cutting upward creates a very soft edge.
Softening The Harsh Lines
Take the center piece and some hair from the right side. Slide your fingers down at a sharp downward angle. Cut upward into the hair carefully. Follow that angle down past your cheekbone. Repeat this exact step on the left side. Look in the mirror closely. Shake your head side to side. Check how the pieces fall around your eyes. Make tiny adjustments by point cutting any heavy spots. I’ve seen this work wonderfully for oval faces.
Diy French Bangs Real Stories
I love hearing from people who try this at home. Sometimes they succeed beautifully. Sometimes they make massive mistakes. Here are four real stories about cutting hair at home.
The Beginner Approach Success
Emma bought professional shears for twenty dollars online. She watched three different videos before starting. She cut her hair completely dry. She used the point-cutting method I explained above. She took her time and never rushed. She only cut a quarter inch at a time. Her hair looked like she stepped right out of a Paris salon. She now cuts her friends’ hair too.
The Kitchen Scissor Failure
Sarah wanted a fresh look for a big party. She grabbed her heavy kitchen scissors from a drawer. She pulled her wet hair tightly down her face. She cut perfectly straight across her forehead. When her hair dried, it bounced up two full inches. She spent six months wearing thick headbands. She learned that tension and wet hair ruin everything.
Advanced Styling Triumphs
Jessica has very straight and very fine hair. She wanted a solid line just above her brows. She used a YS Park comb to measure exactly. She cut it perfectly straight using tiny snips. Her intense precision paid off beautifully. She now trims her own hair every three weeks. She saves nearly four hundred dollars a year.
The Quick Fix Reality
I wanted a quick change before a long vacation in 2023. I rushed the sectioning step completely. My starting triangle was noticeably crooked. I ended up with heavy hair on one side. I had to go to a local salon to fix it. The stylist told me to always check my sections twice in a mirror. I never forgot that exact advice.
How To Cut Face Framing Bangs
Face framing pieces soften your harsh jawline. They highlight your high cheekbones beautifully. You can wear your hair up while these pieces fall softly down. This is the absolute safest style to try at home. If you mess up, they just look like regular layers.
Finding Your Natural Part
Part your hair exactly where it falls naturally. Do not force a center part if you normally wear a side part. The hair needs to lay in its natural position. Brush it straight back first. Gently push the hair forward. Let it split exactly where it wants to split.
Separating The Side Sections
Take a one-inch section of hair right at your hairline on both sides of your part. Clip the rest of your hair completely out of the way. You only want these two small sections hanging down. Comb them until they look perfectly smooth.
The Cross-Face Cutting Method
Most people like these pieces to hit right at the cheekbone. Look in the mirror. Point to the feature you want to highlight. That is your exact target length. Take the right section of hair. Pull it tightly across your face toward your left shoulder. Pinch it where you want the cut. Point your scissors upward. Make tiny snips. Pulling it across your face naturally creates a soft angle when it falls back.
Balancing Both Sides Properly
Take the left section. Pull it across your face toward your right shoulder. Use a tiny piece from the finished right side to measure the exact length. Snip upward again slowly. Pull both sides straight down. Check if they meet at the exact same spot on your face. Make tiny adjustments if one side feels heavier than the other. I’ve noticed this step takes extreme patience.
How To Cut Layered Bangs
Layers give your hair massive movement. They stop your hair from looking like a solid block on your forehead. This style blends smoothly into the rest of your hair. You need to focus intensely on lifting the hair for this cut.
Sectioning The Top And Bottom
Create your main triangle section first. Now divide this triangle into two perfectly horizontal sections. Clip the top half up securely. You will cut the bottom half first. Keep your comb handy for clean lines. The bottom section dictates your overall length.
Setting The Base Length
Pinch the bottom section gently. Decide your exact length. Point cut straight across carefully. Keep this piece very low against your forehead while you cut. Do not pull it outward. You want it to lay perfectly flat against your skin. This creates your solid foundation.
Creating The Lifted Layers
Unclip the top section slowly. Let it fall completely over the freshly cut bottom section. You will see the bottom hair sticking out underneath. Instead of pulling the hair straight down, lift the entire section straight up toward the ceiling. Pinch the hair firmly between your fingers. Slide up until you see the bottom hairs drop out completely.
Blending Everything Together
Point your scissors down into the lifted hair. Snip the ends carefully. When you drop this section, it will fall slightly shorter than the bottom piece. This creates a beautiful and incredibly soft layer. Take your thinning shears if the ends look too thick. Give the bottom quarter-inch one quick squeeze with the thinning shears.
Full Bangs Tutorial
A full and heavy fringe makes a massive statement. This look requires absolute precision. You cannot hide silly mistakes with this bold style. You must take your time. Here is your Full Bangs Tutorial.
Measuring The Width Correctly
You need a lot of hair for this specific look. Your triangle needs to start much further back on your head. Look directly in the mirror. Ensure the section is perfectly symmetrical on both sides. Use the outer edges of your eyebrows as your outer boundary. Clip all other hair tightly away.
Managing Hair Tension
Take a one-inch piece directly in the center. Ignore the side pieces for now. Decide on your exact length. Most people aim for just below the eyebrow line. Do not pull the hair down. Just hold it gently between your relaxed fingers. If you pull tight, it will jump up when you let go.
The Horizontal Point Cut
Point cut the center piece carefully. You want a heavy line, but you do not want it bluntly chopped. Point cutting gives the heavy line a slight softness. Take a tiny bit of the finished center piece. Bring in some hair from the right side. Hold them together loosely. Use the center piece as your ruler. Point cut the new hair to match exactly.
Checking Your Work In Daylight
Work your way slowly to the outer edges. Bathroom lighting sometimes casts weird shadows. Step into a room with bright natural daylight. Shake your head slightly. Look at the crisp line. Fix any stray hairs that drop down past your boundary. I’ve tried doing this at night and I always regret it. Daylight shows you the absolute truth.
How To Cut Your Bangs At Home Without Crying

You can mess this up very easily. I have seen every possible mistake. I have made most of them myself. You need strict rules to avoid crying over a bad haircut. Follow these specific rules closely.
Managing Your Emotions First
You might feel tempted to change your look after a really bad day. Stop right there. Haircutting requires immense patience. Emotional decisions lead to extremely short hair. Wait until you feel totally calm. Never pick up scissors when you feel angry or sad.
Dealing With Unexpected Cowlicks
Look very closely at your hairline. Does your hair naturally swirl or jump up in one specific spot? That is a stubborn cowlick. Leave that area slightly longer. It will bounce up much higher than the rest of your hair. You can trim it dry once it settles into its natural resting place.
Maintaining Perfect Body Posture
Do not lean closely into the bathroom mirror. Sit or stand up perfectly straight. Keep your chin totally level. If you tilt your head down while cutting, your line will be totally crooked when you look up. Keep your shoulders relaxed. Breathe slowly while you make your snips.
Knowing When To Stop Cutting
You might finish cutting and see one tiny long hair. You trim it. Then the other side looks slightly long. You trim that. Suddenly you have a terrible micro-fringe. Learn to put the scissors down and walk away. Accept tiny imperfections. Nobody looks at your hair with a magnifying glass.
Fringe Bangs Tutorial
A soft fringe gives you a cute and very wispy look. This style does not require a deep section of hair. You want this to look very light and incredibly airy. It frames the face without taking over your features.
Gathering A Thin Section
Create a very shallow triangle at the absolute front of your hairline. You only want a tiny bit of hair for this style. Clip everything else away securely. If you take too much hair, it turns into a heavy block. Keep the section less than an inch deep.
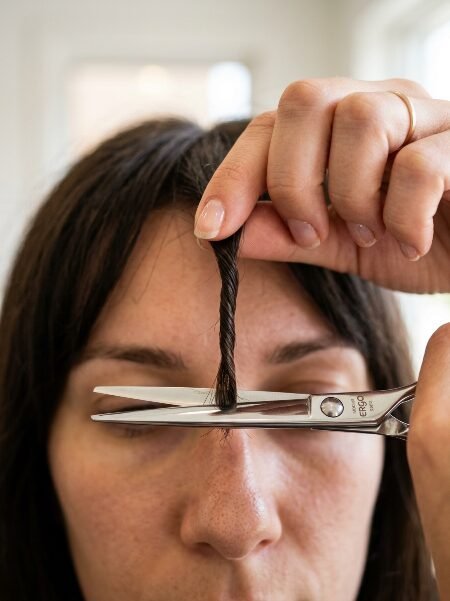
The Center Twist Method
Gather the entire thin section in the absolute center of your forehead. Twist the hair exactly one full rotation. Pinch the twist very firmly between your fingers. Keep your fingers resting right on your nose bridge. Make sure the tension feels even on both sides of the twist.
Releasing And Texturizing
With the hair twisted, cut straight across the bottom. Because the hair is twisted, the center will drop shorter. The sides will naturally fall much longer. Untwist the hair slowly. Let it fall naturally over your forehead. It will look like a soft, inverted U-shape. Take your scissors and point cut any harsh spots.
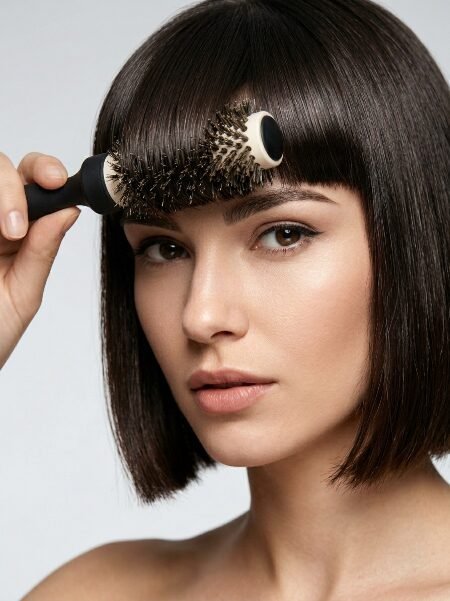
Daily Styling Needs
Use your round brush and your hair dryer. Pull the hair straight out away from your forehead. Roll the brush downward gently. This gives the fringe that perfect soft bend. Spray a tiny bit of texturizing spray on your fingertips. Pinch the ends lightly to give them definition.
Comparing Bang Styles Side By Side

You need to pick the right style for your exact face. Different styles require different maintenance levels. Here is a clear look at your styling options.
Best Choices For Beginners
Face framing layers are the safest choice for complete beginners. You can easily hide them if you make a mistake. The twist method fringe is also incredibly forgiving. You do not need perfect precision to make these styles look good. I’ve noticed beginners always succeed with face framing pieces.
High Maintenance Versus Low Maintenance
A heavy, full line requires a trim every three weeks. You must style it with a brush every single morning. French styles look better when they get slightly messy. You can go two months without trimming a soft layered style. Choose a low maintenance option if you hate styling your hair daily.
Face Shape Considerations
Round faces look amazing with sweeping side styles. Oval faces can pull off literally any shape. Square faces look softer with long, textured layers. Heart faces look beautiful with wispy fringe styles.
The Growing Out Phase
You will eventually want to grow your hair out. Soft layers grow out seamlessly into the rest of your hair. A heavy, blunt line takes months to blend in. You will spend months pinning it back with bobby pins.
Frequently Asked Questions
People ask me the exact same questions repeatedly. You probably share these exact worries. Here are eighteen clear answers to put your mind at perfect ease today.
1. Can I use regular house scissors to cut my hair?
Absolutely not. House scissors have very dull and incredibly thick blades. They push the hair away rather than slicing it cleanly. This leaves a terrible, jagged edge on your hair. Buy professional shears immediately.
2. Should I cut my hair wet or dry?
Always cut your hair dry. Wet hair stretches significantly. When it dries, it shrinks right back up. If you cut wet hair at your eyebrows, it will dry in the middle of your forehead.
3. How often do I need to trim this style?
Heavy styles require fresh trims every three weeks. Soft, messy styles look great for six to eight whole weeks. Face framing pieces can grow for several months without looking strange at all.
4. What if I have really curly hair?
Curly hair shrinks massively. You must cut curly hair completely dry. Let your curls sit exactly as they naturally fall. Cut ringlet by ringlet slowly. Never pull the curl straight while you cut.
5. How do I fix a totally crooked line?
Stop cutting horizontally right now. Point your scissors straight up into the hair. Make tiny vertical snips to soften the harsh, crooked line. Do not try to level it horizontally. You will just make it shorter.
6. Why does my hair stick straight out?
You probably pulled the hair extremely tight against your forehead while cutting. Next time, lift the hair slightly away from your face. A round brush and a hot dryer will fix the sticking out instantly.
7. How do I hide a bad cut while it grows?
Buy some cute headbands. Use strong bobby pins to twist the hair back. Learn to do small braids along your front hairline. It takes about two months to grow past the awkward phase completely.
8. What exactly is point cutting?
Point cutting means holding your professional scissors completely vertically. You snip strictly up into the ends of the hair instead of cutting a straight horizontal line. It creates a soft, natural edge.
9. How do I easily find my natural part?
Brush all your hair straight back while it is completely wet. Gently push the hair forward on the top of your head. The hair will naturally split open exactly at your true part.
10. Can fine hair pull off a heavy style?
Yes, but you must start your triangle much further back on your head. You need to gather far more hair from the crown to create that heavy, solid look you want.
11. Does a bad cowlick ruin my chances?
No. You just have to leave the specific cowlick area slightly longer. Do not fight it with heavy products. Let it bounce up naturally. Then trim it completely dry to match the rest.
12. How do I correctly clean my new shears?
Wipe the metal blades with a totally dry cloth after every single use. Never leave them sitting wet on the counter. Put a tiny drop of mineral oil directly on the joint once a month.
13. What is the difference between French and curtain styles?
French pieces sit perfectly across the forehead with longer sweeping sides. Curtain styles part entirely down the exact middle and sweep away from the face completely on both sides.
14. Should I watch videos before starting this?
Yes. Watch at least three completely different videos. Pay close attention to how they hold their hands. Notice exactly how they hold the comb while they cut.
15. How do I safely thin out bulky ends?
Use professional thinning shears carefully. Grab a tiny section of hair. Clamp the thinning shears horizontally across the bottom half-inch of the hair one time. Do this very sparingly.
16. Will this style make my round face look wider?
A heavy, straight line definitely makes a round face look much wider. Choose long, face-framing pieces instead. They elongate the face beautifully and add great dimension.
17. How long does the actual cutting take?
The literal cutting takes about five short minutes. The prep work, sectioning, drying, and checking takes a full twenty minutes. Never rush the initial prep work. It dictates everything.
18. When should I just go to a salon?
Go to a salon if you feel extremely anxious right now. Go to a salon if you want a massive change. Go to a salon if you completely ruined your first attempt at home.
Final Thoughts On How To Cut The Perfect Bangs

You now possess the exact knowledge to totally change your look. The Step-by-Step Guide to Cutting Your Own Bangs at Home saves you time and keeps money in your pocket. You control your own daily style completely. Remember to always use extremely sharp shears. Never cut your hair wet. Always take your sweet time with sectioning. Start much longer than you actually want. You can easily trim more tomorrow. Practice holding your scissors properly before you make the first cut. When you master these small details, you get perfect hair every single time. Grab your comb today. Trust your bathroom mirror. Take a deep breath and make that first careful snip. You will absolutely love your fresh, new look. Have you ever tried to cut your own hair before reading this?

Sarah Mitchell — Founder & Editor-in-Chief
Sarah Mitchell is the founder and editorial voice behind Hair Level Up. A licensed cosmetologist with more than 15 years of experience, she has styled A-list celebrities for editorial shoots and red carpets, with work featured in Vogue, Elle, and Harper’s Bazaar. Early in her career, she trained under the legendary hairstylist Oribe in New York, an apprenticeship that still shapes her editorial eye today. Sarah founded Hair Level Up in 2020 after one bad haircut convinced her that women deserved a destination that felt like a magazine, taught like a stylist, and inspired like an art gallery. She oversees every story from concept to publication, guided by a simple belief: a good story teaches you something, but a great one makes you feel beautiful while it does.