18 Cute Braids for Short Hair That Stay Put
Short hair often feels like a trap. You want that Pinterest-ready look. You try a braid. Halfway through the day, the bottom layers slip out. Tiny strands tickle your neck. You end up reaching for a hat. I spent years in this cycle. I thought braids belonged only to those with long locks. That is a total lie. You just need the right grip. You need styles that work with your length rather than against it. These 18 short braided hairstyles stay put from morning coffee until your late-night skincare routine. I have tested these in humid weather and during gym sessions. They do not budge. You can finally stop envying long hair. Your short hair has its own magic.
You will see exactly how to secure short braids. I will walk you through 18 specific styles. These include Dutch braids and fishtails. I will mention the exact products that prevent slipping. You will find ways to style a bob or a pixie cut. These looks work for weddings or grocery runs. I noticed that most guides focus on long hair. This guide is different. It is for those of us with chin-length hair or shorter. You will see why clear elastics are your best friend. You will see how to use texturizing powder. This article covers tools and costs. It covers common mistakes I made so you don’t have to. You will walk away with a week of new hair ideas.
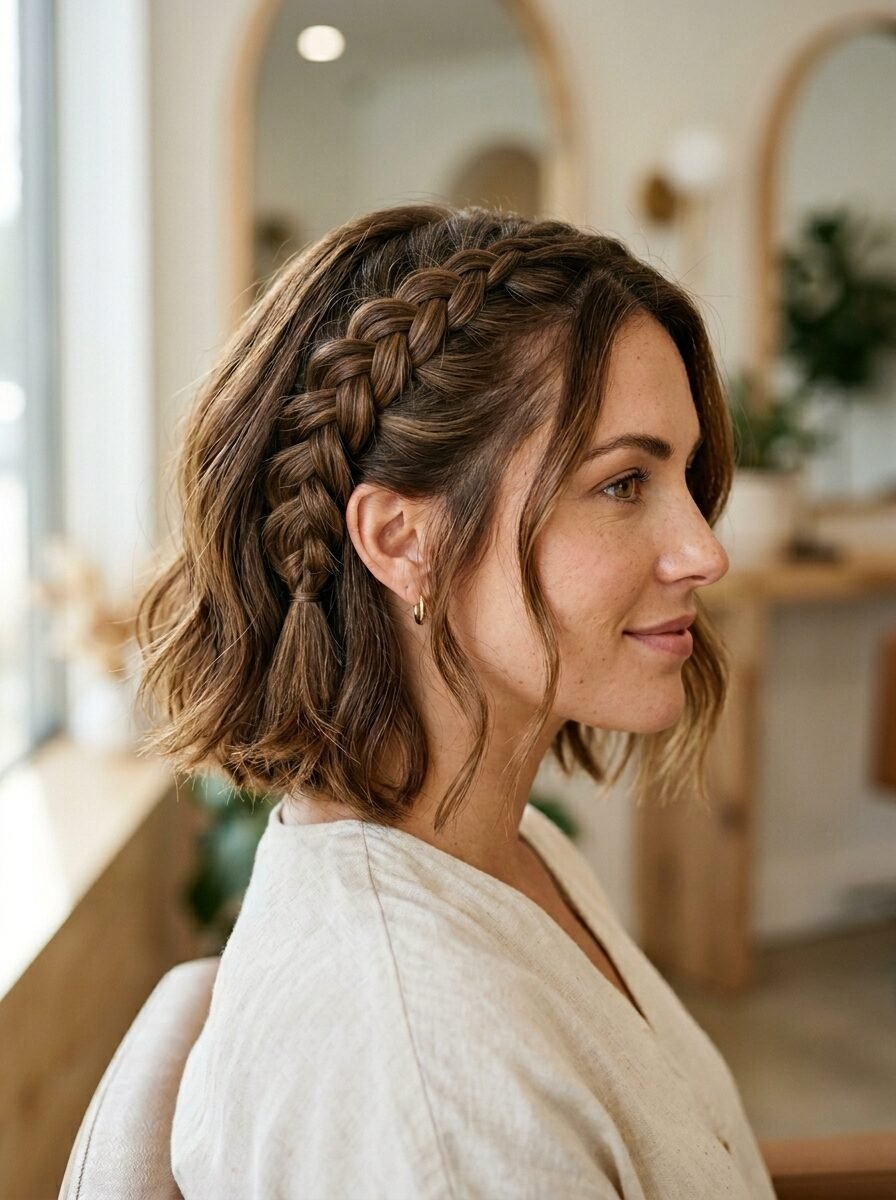
1. The Deep Side Dutch Braid
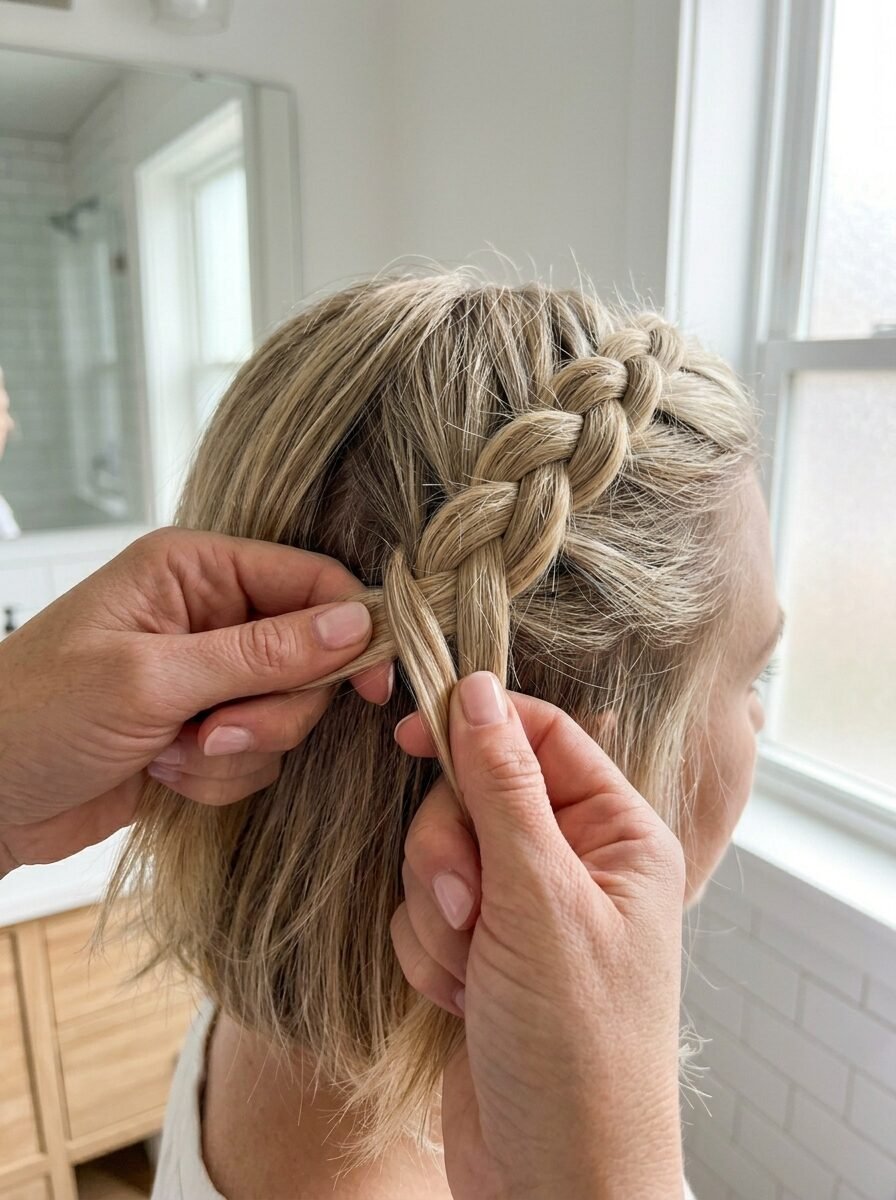
Short hair needs a strong foundation. A side braid is the best place to start. I always recommend the Dutch style for this. You cross the strands under each other. This makes the braid sit on top of the hair. It looks thick and intentional. I have tried doing this with a French braid. The layers usually fall out faster. The Dutch method anchors the hair to your scalp. Use a side part that starts right above your eyebrow. This creates a dramatic sweep. It keeps hair out of your eyes while you work. I saw this work wonders for a friend with a blunt bob. She wore it to a summer wedding. It stayed tight through five hours of dancing.
Pick up small sections as you go. Large sections are heavy. They pull the braid down and cause gaps. My trick is to use a tiny bit of hair wax on my fingers. This gives the strands a tacky grip. It stops the slippery feeling of freshly washed hair. This look works best if you have at least four inches of hair on top. It creates an asymmetrical silhouette. It is one of those cool braids that looks harder than it is. You only need one clear elastic at the end. Tuck the tail behind your ear with a bobby pin.
2. Double Dutch Pigtail Short Braids
People often think pigtails are for kids. That is not true for short braided hairstyles. When you do double Dutch braids on short hair, it looks edgy. It looks like a purposeful fitness look. I wear this when I know I have a busy day. I start the braids right at the hairline. This captures every tiny baby hair. I have noticed that starting further back leads to a messy front. You want these to be tight. If your hair is very short, the tails might stick out. I call these “pigtail nubs.” They are actually very trendy right now.
I once wore these to a three-day music festival. I slept in them. They still looked great the next morning. If you have layers, you might see some pieces poking out. Don’t panic. Use a light-hold hairspray to lay them flat. Do not try to tuck them back in. That just creates bumps. The key to this style is symmetry. Use a rat-tail comb to get a straight middle part. This is a classic example of easy braids that provide high security. You will need two small elastics. If you want more volume, gently pull at the edges of the braid. This makes it look fuller without loosening the grip.
3. The Waterfall Braid for Bobs

The waterfall braid is perfect for when you want some hair down. It is a hair guide favorite for a reason. You braid across the back of the head. You drop the bottom strand and pick up a new one. This lets your natural length flow underneath. I tried this on my friend who has a very short A-line cut. It looked like a crown of woven silk. It is great because it doesn’t require the bottom layers to reach the top. It only uses the top canopy of your hair. This is the secret for those who feel their hair is too short for a full braid.
I have seen this look best on wavy hair. If your hair is stick-straight, the dropped strands can look a bit limp. I suggest using a small curling iron first. Give the hair some texture. In my experience, a waterfall braid stays put better if you start it with a tight three-strand plait. Once you get an inch in, start the waterfall technique. Use two bobby pins at the end. Cross them in an “X” shape. This creates a mechanical lock. It won’t slide out even if you have fine hair. This is a gorgeous braids option for a date night.
4. Fishtail Crown Accents
Fishtail braids look intricate. On short hair, they look like jewelry. You do not need to braid your whole head. Just do two small sections at the front. I love this for hiding bangs that are growing out. I once had a fringe I hated. These braids saved my confidence. You take two thin sections of hair. You cross small pieces from the outside to the inside. It takes a bit more time than a standard braid. The result is a much tighter weave. This tightness is why it stays put so well.
Short hair often lacks the weight to keep braids down. The fishtail is heavy and dense. It stays right where you put it. I usually pin these back behind the ears. You can also join them at the back with a small clip. If you have dark hair, use colored elastics for a pop. If you have blonde hair, clear ones are invisible. I have seen this work on pixie cuts too. You just need about three inches of length on top. It is one of those short braids that looks very high-end. Use a dry shampoo before you start. It adds the grit you need for a fishtail.
5. Micro-Front Y2K Braids

This style is a total throwback. It is also the easiest way to manage short hair. You take two tiny sections right at your forehead. You braid them straight down. They frame your face. I see this all over social media. It is popular because it requires zero skill. You just need to be able to do a basic three-strand braid. I like to leave about half an inch of hair loose at the very front. This keeps the look soft. If you braid right from the root, it can look a bit harsh.
In my experience, these braids are the ultimate “stay put” style. They are so small that they don’t have enough weight to fall out. I use these when I am hiking. They keep my hair out of my lip gloss. If you want to make them look more modern, add a few tiny beads. I saw a girl at a cafe with silver rings in hers. It looked incredible. This is a great choice for those who don’t want to spend more than five minutes on their hair. It works for any texture. Even if you have a very short crop, these micro-braids add a touch of personality.
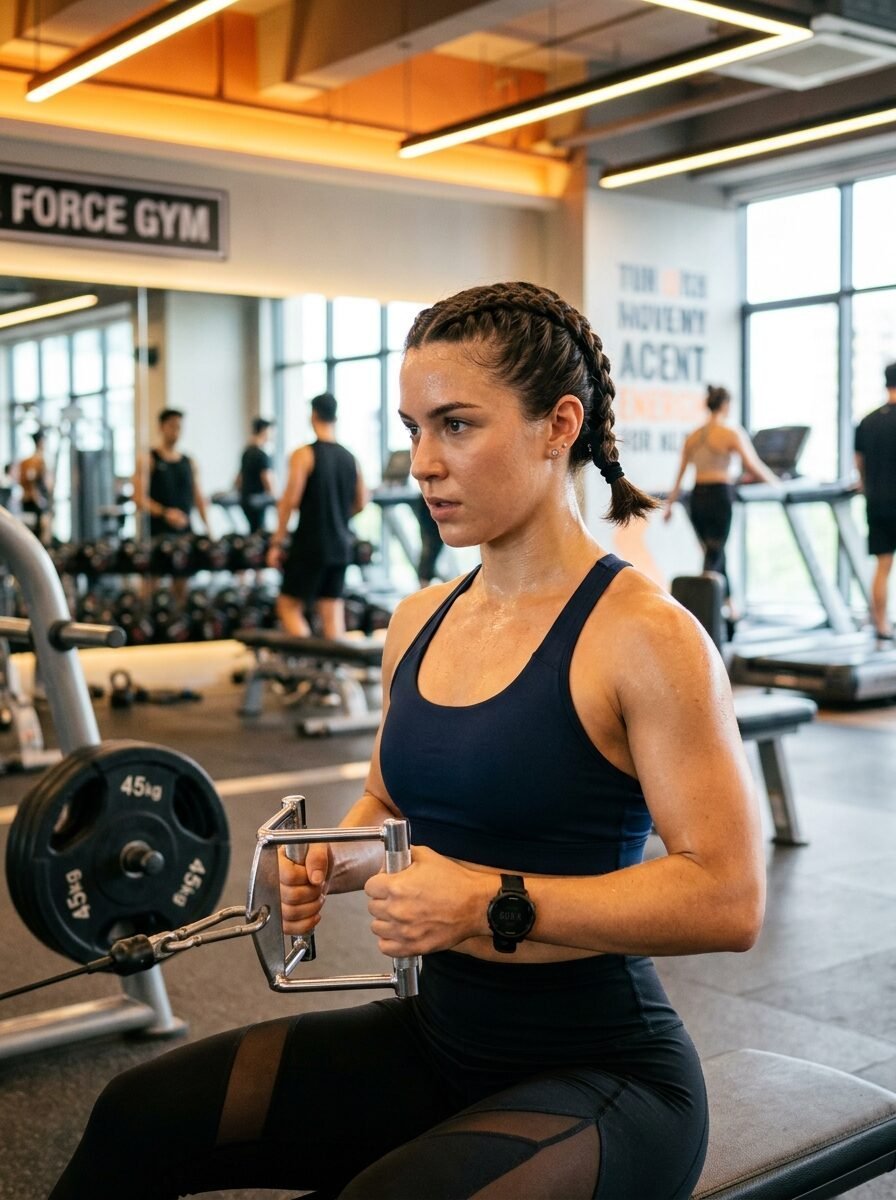
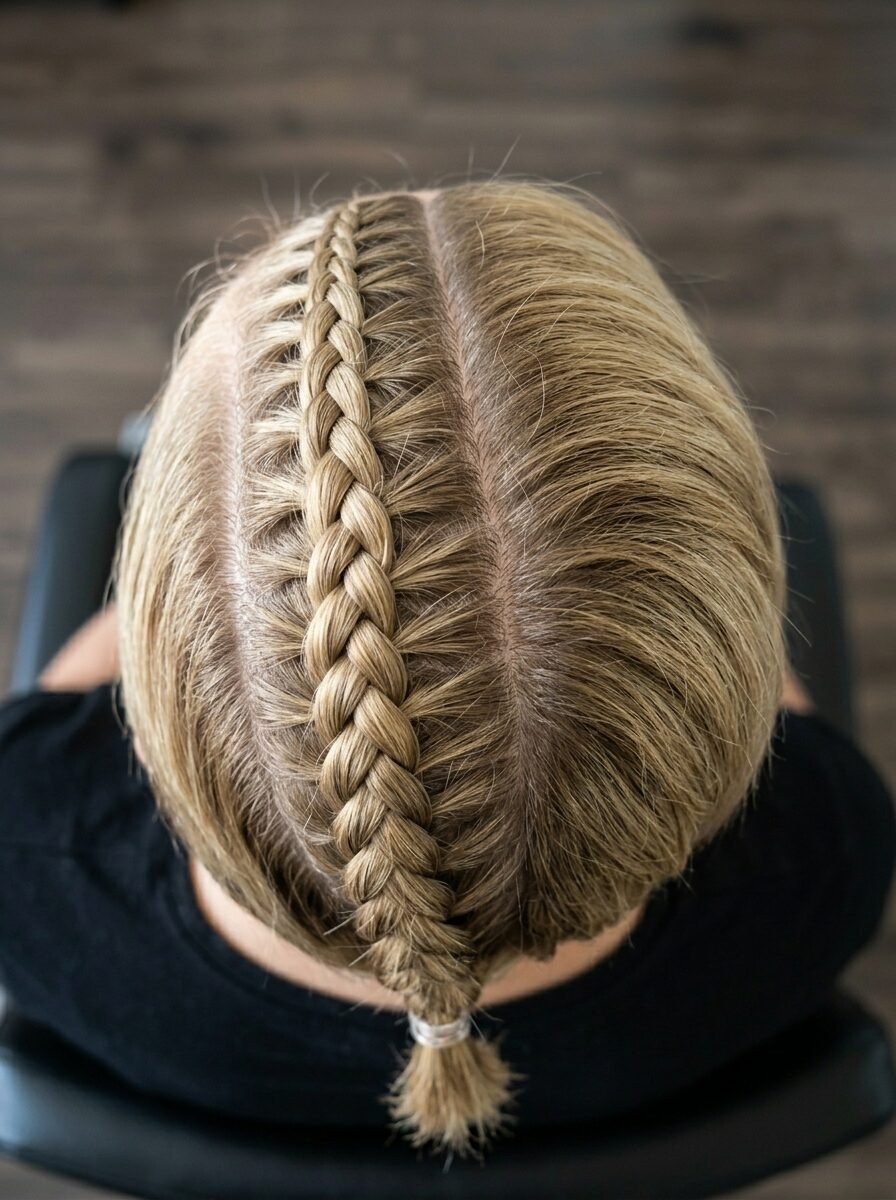
6. The Inverted French Braid Updo
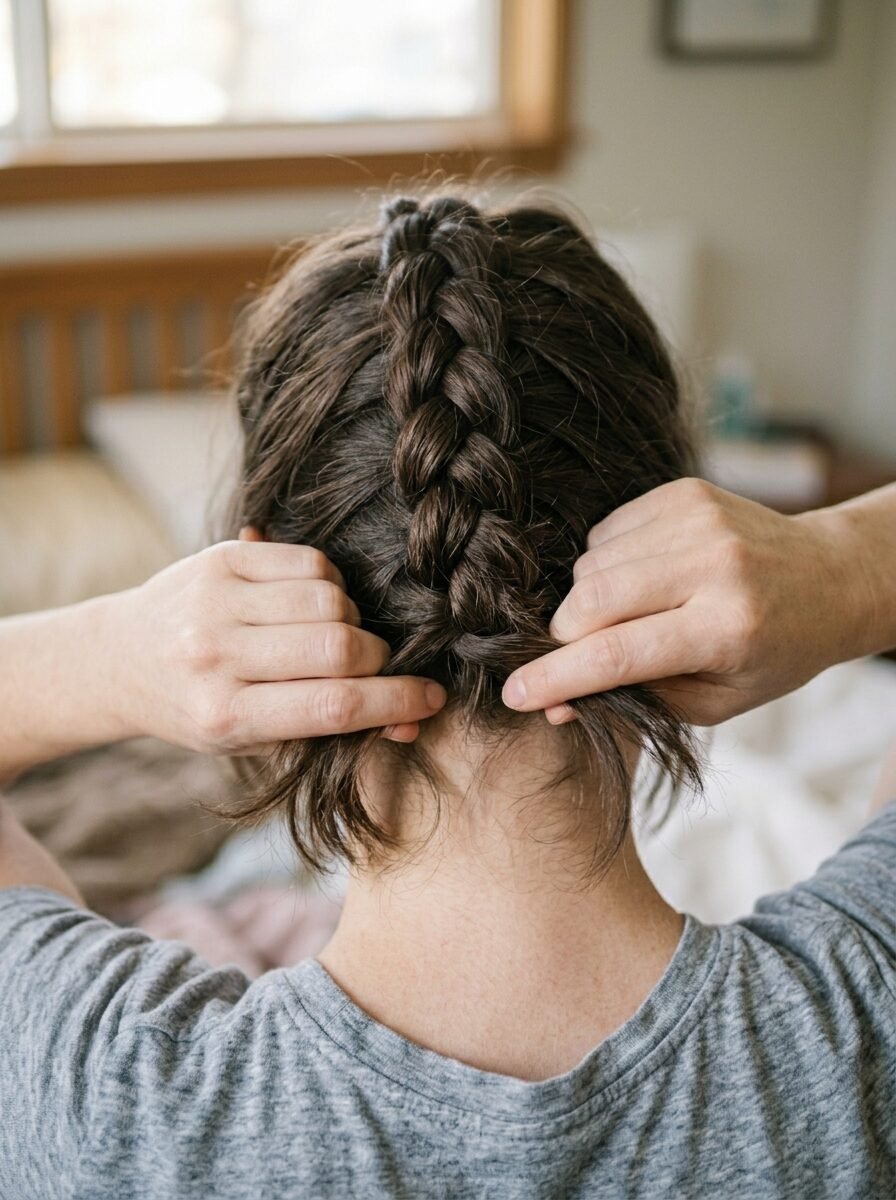
An inverted French braid is just a Dutch braid that goes from the neck up. This is for the “short hair but I want it up” crowd. I use this when I am at the gym. You flip your head over. You start braiding at the nape of your neck. You move toward the crown. Once you reach the top, you secure it into a small bun. My hair used to be too short for a ponytail. The bottom hairs always fell out. This braid catches all of them. It is a game changer for short braided hairstyles.
You need to be comfortable braiding upside down. It takes a few tries to get the tension right. I found that using a mirror helps. I set one up behind me so I can see the back of my head. If the braid feels loose at the neck, use a few U-shaped hairpins. These are better than bobby pins for the back of the head. They don’t pinch the skin. This style is very secure. I have worn it through heavy rain. The braid held the hair together like a net. It is a smart way to handle a bob that is in that awkward growing-out phase.
7. Half-Up Boho Braids with Texture

Boho styles are usually for those with long locks. You can do them with short hair too. The trick is to avoid perfection. I start by spraying my hair with a salt spray. This gives it a messy, lived-in feel. I take random sections from the top. I do one Dutch braid and one regular braid. I leave the ends messy. I secure them with small elastics. This look is meant to be a bit chaotic. If a strand falls out, it just adds to the vibe. I have seen this look amazing on a shaggy bob.
I like to use this style on day-three hair. The natural oils help the braids stay. If you try this on clean hair, it will slide. I noticed that adding a small floral clip makes this look very polished. It is perfect for a weekend brunch or a garden party. You aren’t trying to hide the short length. You are celebrating it. This is one of the most easy braids to master. You don’t need a straight part. You don’t need even sections. Just braid and go. It feels very human and relaxed.
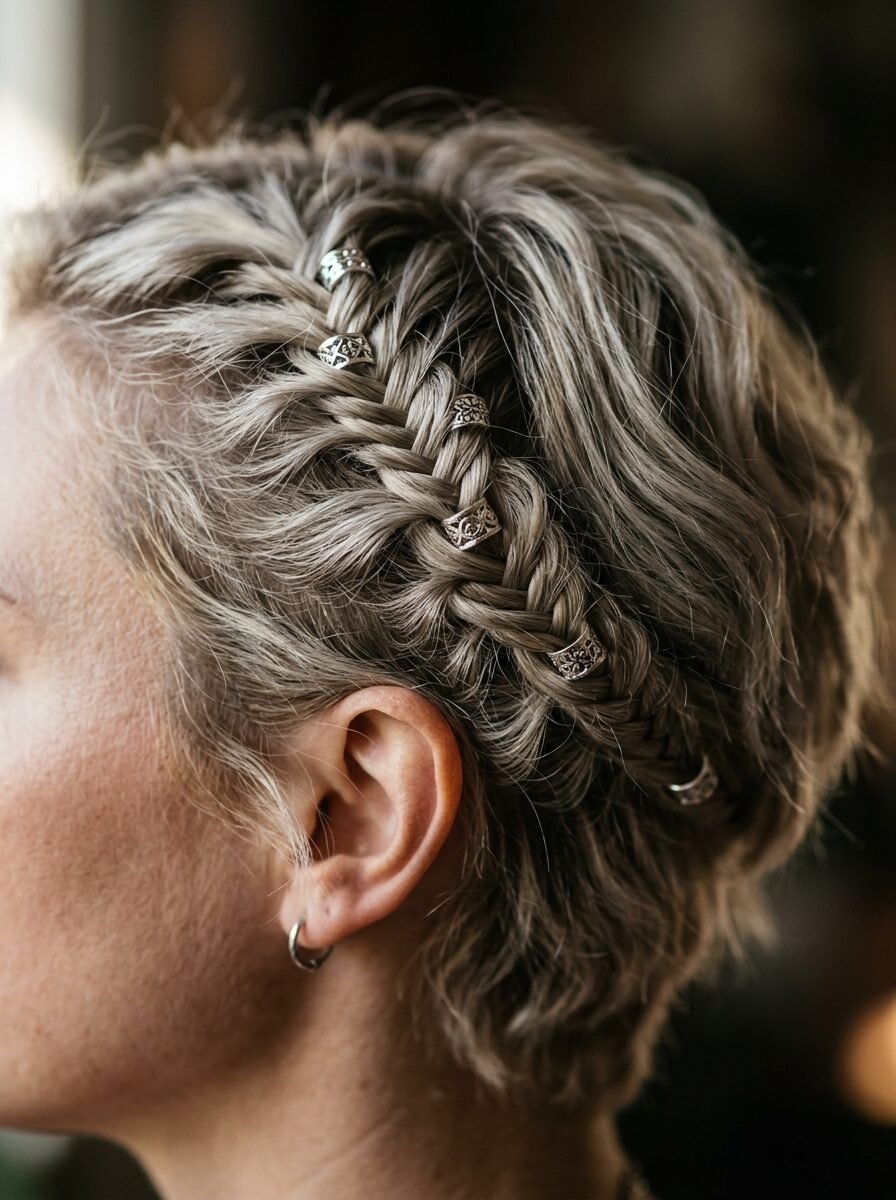
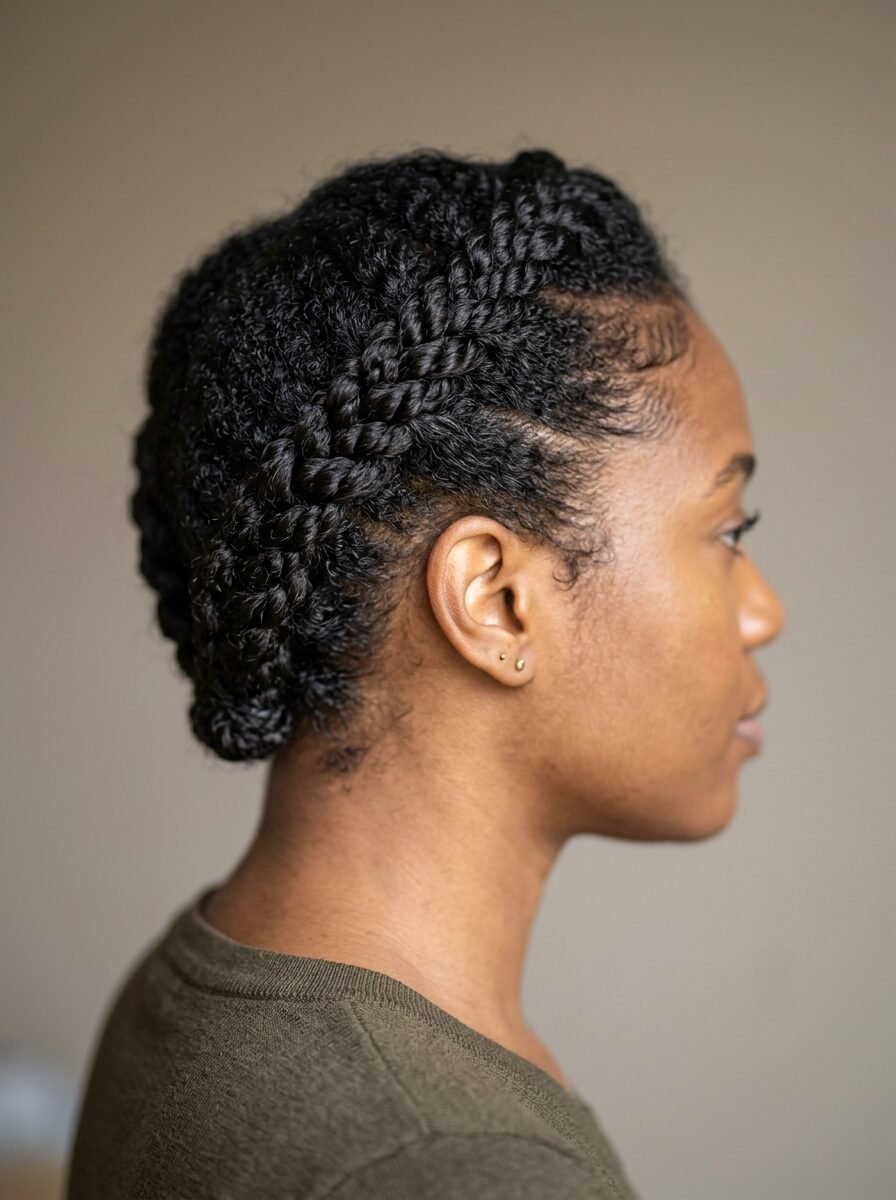
8. Tight Cornrow Side Accents
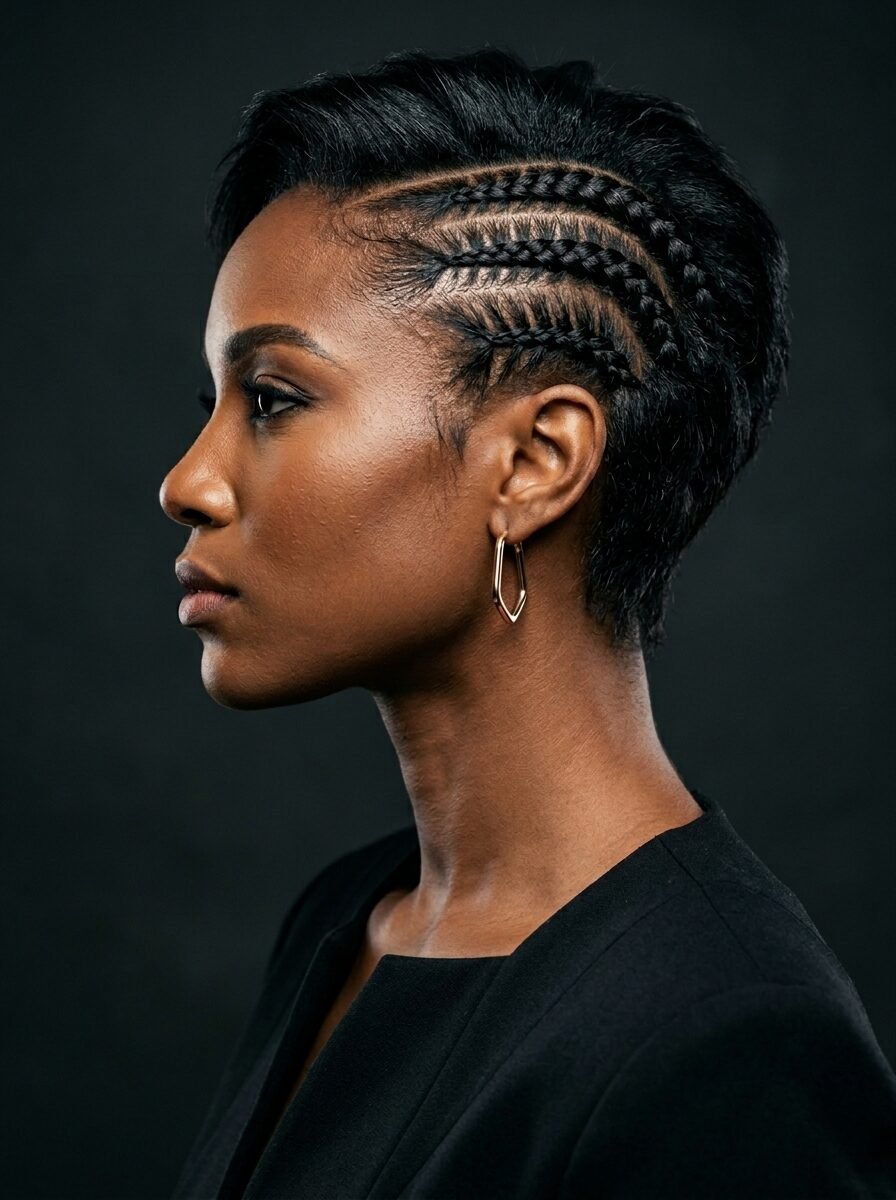
This is a very high-security look. You braid three or four very thin rows on one side of your head. You keep them extremely close to the scalp. It mimics the look of a side-shave. I love this for a night out. It gives your short hair a very sharp edge. I have tried this with different products. A strong-hold gel is a must. You want the parts between the braids to be clean and shiny. This is the most durable style on this list. It will not move for days if you want it to stay.
I suggest sleeping with a silk scarf if you want to keep these in. I saw a stylist do this for a photoshoot. The model had very fine, short hair. The cornrows gave her hair a structure it didn’t have before. It is a great way to handle hair that is too short for a full updo. You are only braiding a small area. This leaves the rest of your hair to be curled or straightened. It creates a beautiful contrast. This style reflects a real-world understanding of how to manage volume. You are flat-packing one side to let the other side pop.
9. The Messy Crown Braid for Short Hair
A crown braid usually goes all the way around. Short hair can’t always do that. My solution is the “faked” crown. You do two braids starting from the front. You bring them to the back. You tuck the ends under each other. If your hair is too short to reach, just pin them where they stop. Use plenty of bobby pins. I have seen people use up to twenty pins for this. That is fine. The goal is a crown of texture. It looks very romantic.
I tried this for a summer party. I was worried about the heat. The braid kept the hair off my neck perfectly. I noticed that pulling out a few face-framing pieces makes it look more intentional. It hides the pins better too. This is one of those braided hairstyles for short hair that people will ask you about. They will wonder how you got your hair to stay. The secret is the “X” pinning method. Never just slide a pin in. Always cross it over another one. This creates a bridge that hair cannot escape. It is a solid hair guide tip for any updo.
10. The Reverse Upside-Down Braid

This is a variation of the inverted braid. Instead of a bun, you end in a small ponytail. This is great for those with very short layers at the back. I have seen this work on a “pixie-bob” length. You start at the neck. You braid up about three inches. You tie it off. Then you let the top hair fall over it. It creates a hidden support system. It stops the “mullet” effect that happens when short hair falls down at the back. I use this when I wear high-collared shirts. It keeps the hair from matting against the fabric.
In my experience, this is a very practical style for office workers. You spend all day looking at a screen. Your head is tilted. This braid keeps the back of your hair neat. I noticed that using a tinted hair gel that matches your color helps hide any gaps. It makes the hair look thicker. This is a professional and clean look. It is one of those cool braids that people only see when you turn around. It is a nice surprise. You only need one elastic and maybe two pins. It takes about four minutes once you practice the upward motion.
11. Pull-Through Braid (The Elastic Trick)
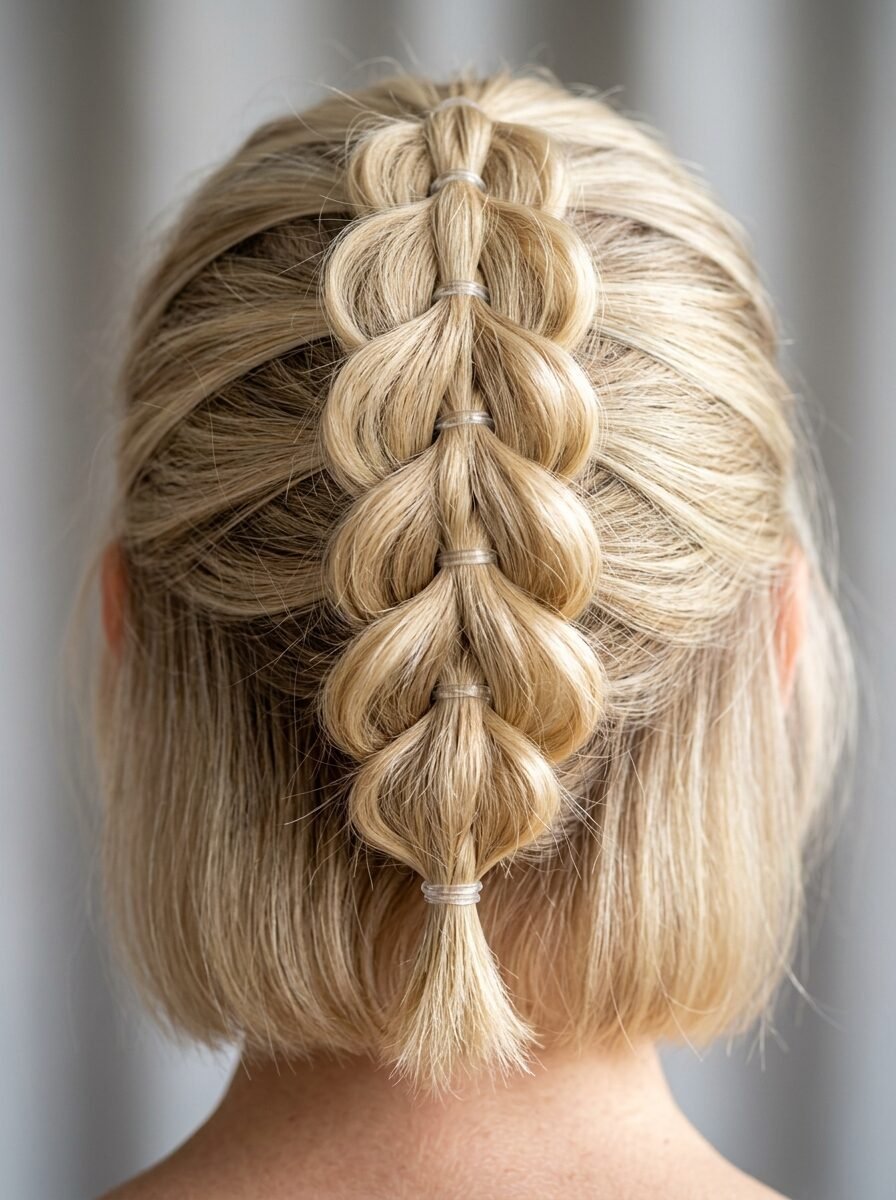
This is technically a series of ponytails, but it looks like a massive braid. It is my favorite hack for short hair. You tie a small section of hair. You split it in two. You pull the next ponytail through the middle. You repeat this down the head. Because every section is tied with an elastic, it is physically impossible for it to fall out. I have worn this to a heavy metal concert. I headbanged. The “braid” didn’t move an inch. It is the ultimate “stay put” style.
I recommend using clear elastics for this. If you use colored ones, it looks very busy. If you have blonde hair, you can find tan elastics. I saw a girl use gold rings to cover the elastics. It looked like high-end jewelry. This style gives you the volume of long locks without the actual length. You can “pancake” the sections by pulling them wide. This makes your hair look three times thicker. It is the best short braided hairstyles option for people with very fine or thinning hair. It creates a 3D effect that covers the scalp well.
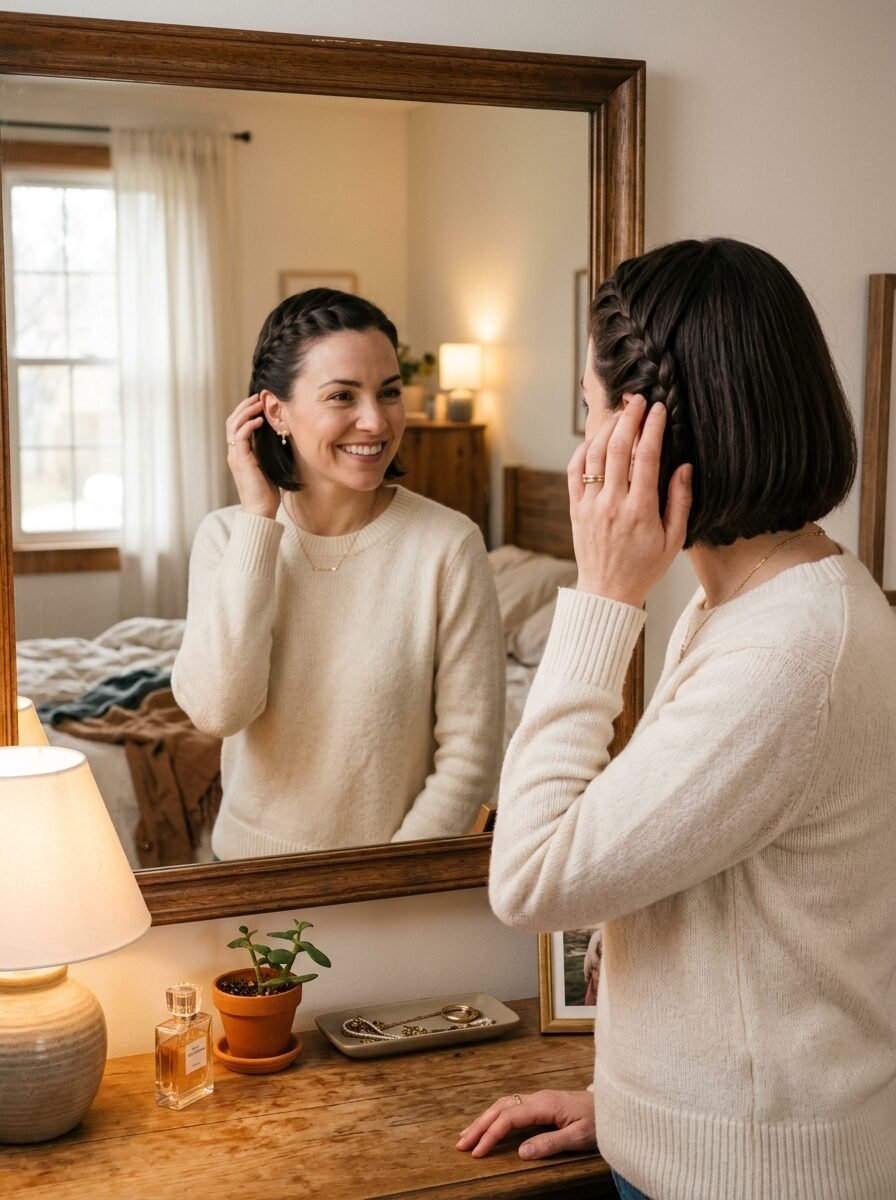
12. Tiny Side Plait with a Statement Clip
Sometimes you don’t want a full style. You just want a little detail. A tiny side plait is perfect. You take a one-inch section near your ear. You do a simple three-strand braid. Secure it with a small elastic. Then, place a large, decorative clip over the elastic. I have seen this look great with pearls or gold bars. It is a very “Pinterest” aesthetic. It takes two minutes. It keeps the hair away from your face while you eat or read.
I noticed that this works best when the rest of your hair has some wave. I use a flat iron to create “S” waves in the loose hair. In my experience, this style is the one I get the most compliments on. It is subtle but chic. It shows you put effort into your look without trying too hard. If your hair is very slippery, spray the section with hairspray before braiding. This gives the braid some “teeth” to hold onto. It is one of those easy braids that anyone can do on their first try.
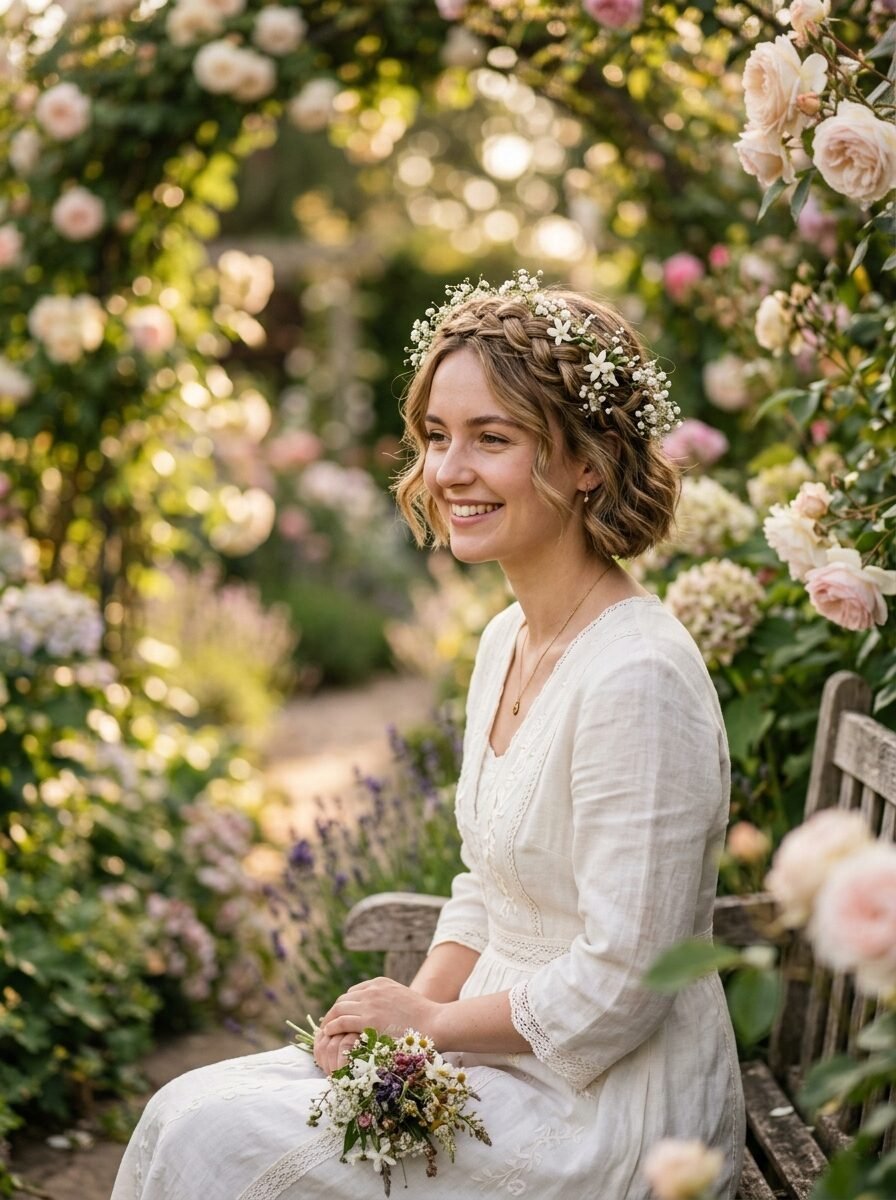
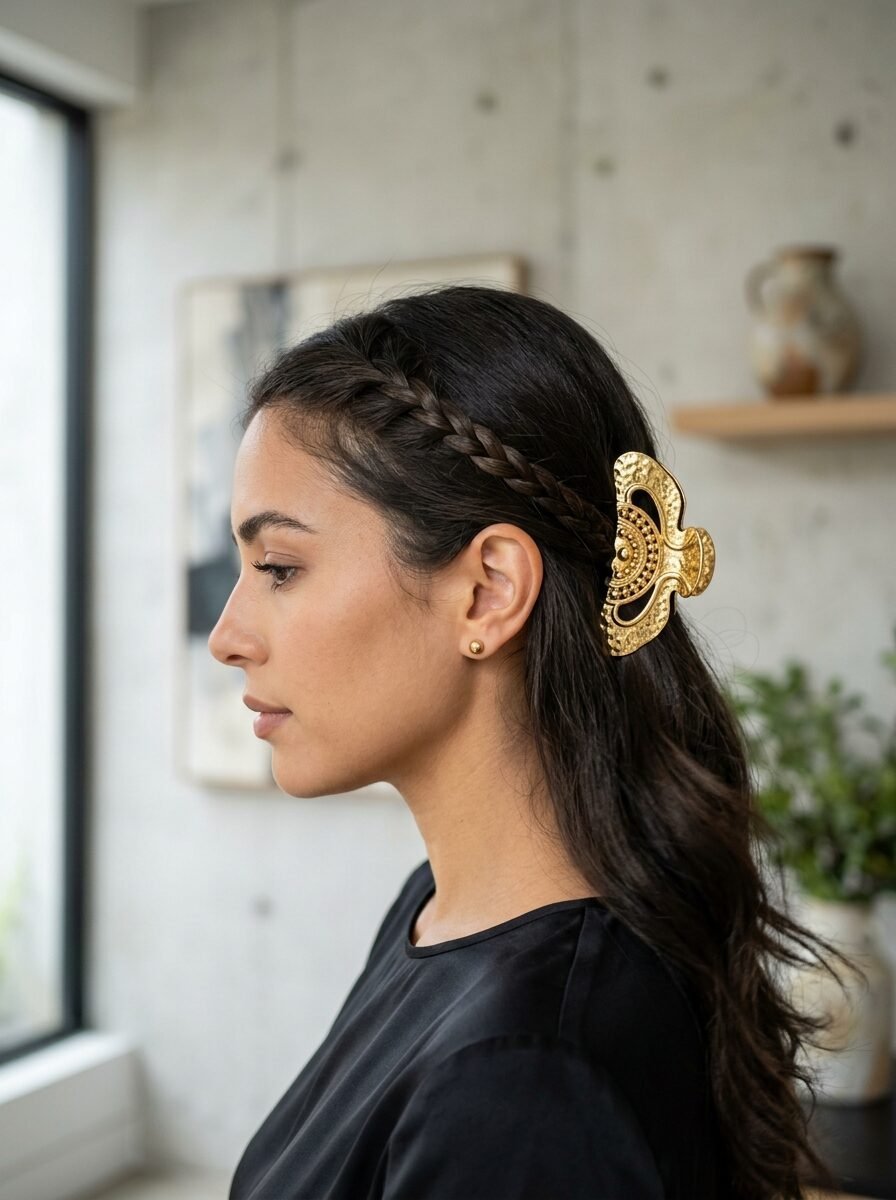
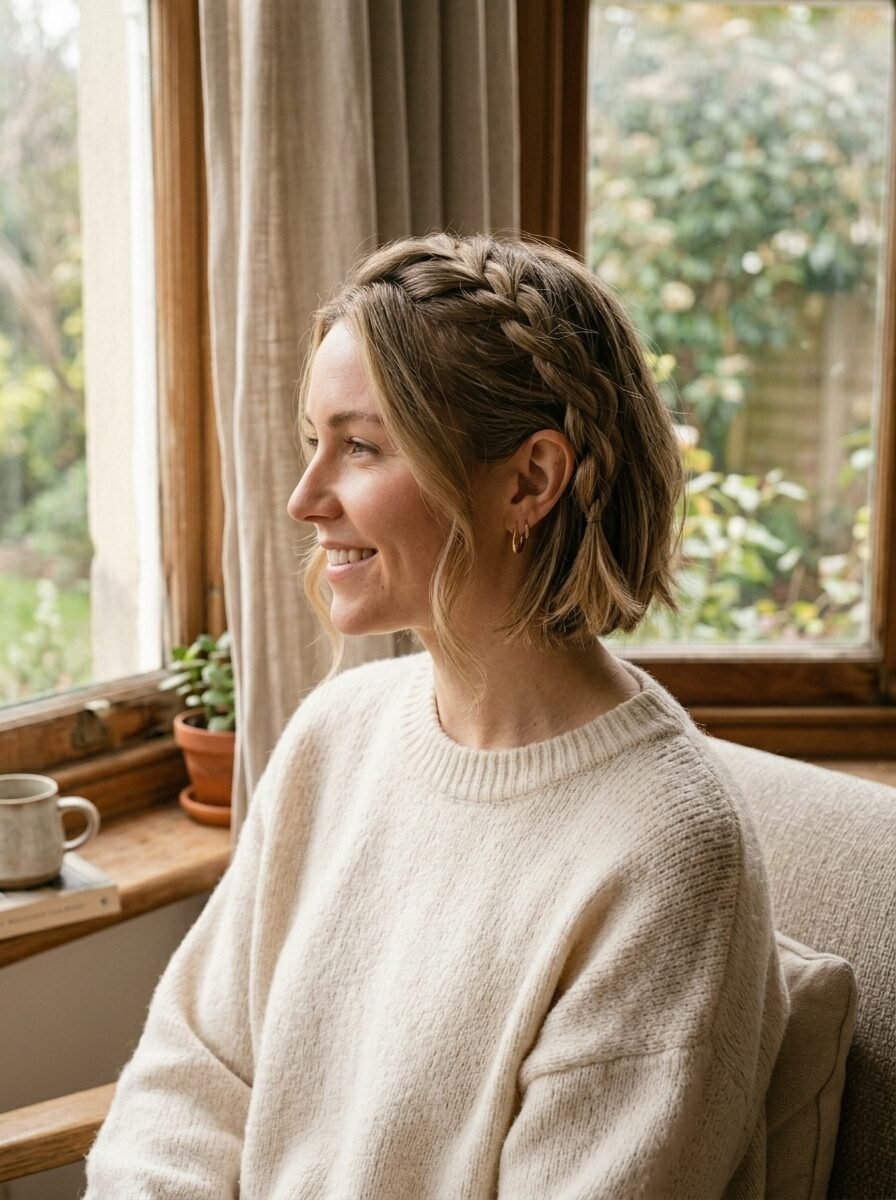
13. The Braided Headband (The Faux Halo)
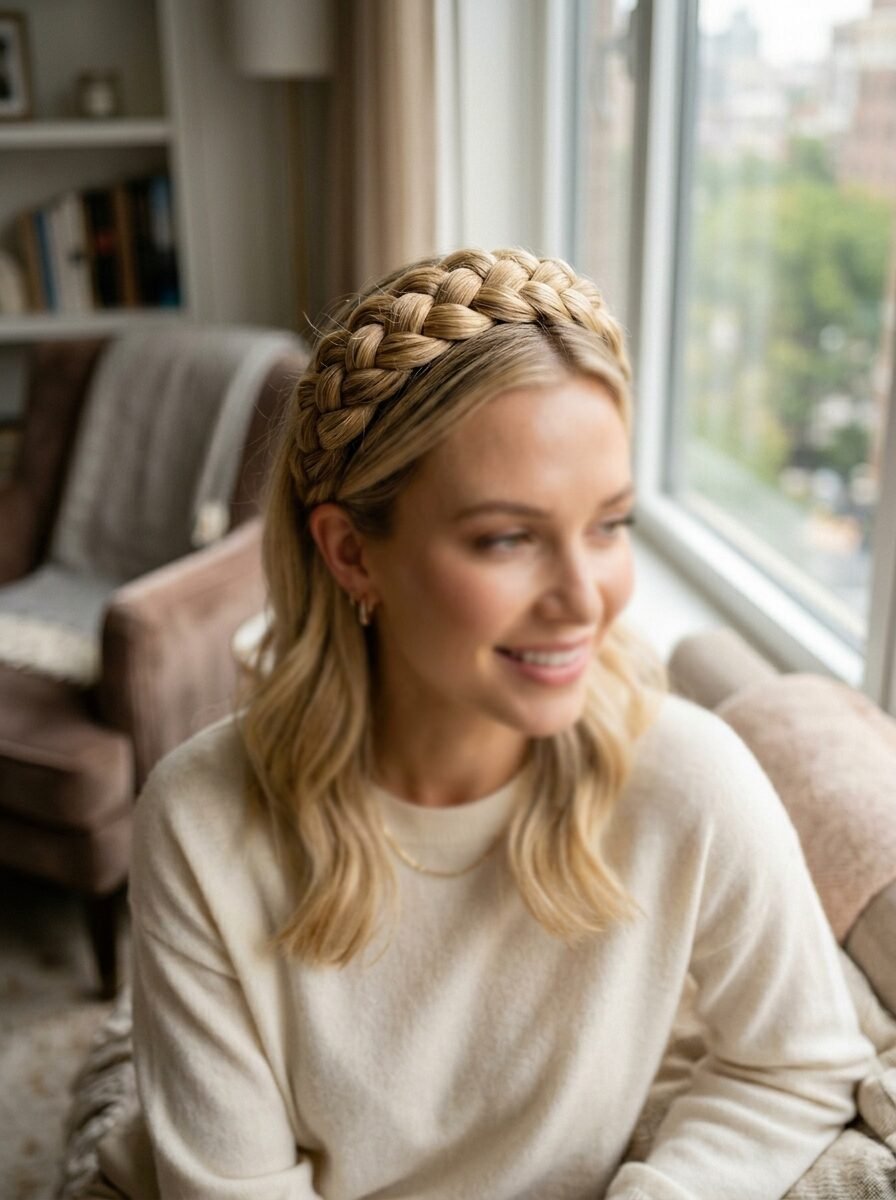
This is a classic for a reason. You braid a section from behind one ear. You pull it over the top of your head like a headband. You pin it behind the other ear. If your hair is too short to reach across, do two braids. Meet them in the middle. Hide the join with a cute clip or a bit of teased hair. I have seen this work on chin-length hair perfectly. It keeps the hair out of your eyes better than a plastic headband. It doesn’t give you a headache either.
I used this when I was growing out my buzz cut. It made me feel feminine again. I found that using a Dutch braid for this makes the “headband” look much thicker. I’ve noticed that if you place it about two inches back from your hairline, it looks the most natural. This is a great hair guide staple for weddings. You can weave tiny ribbons into the braid for extra flair. It stays put because you are pinning it into the bulk of your hair. Use the “X” pin method here too.
14. Double Top Knots with Braid Base
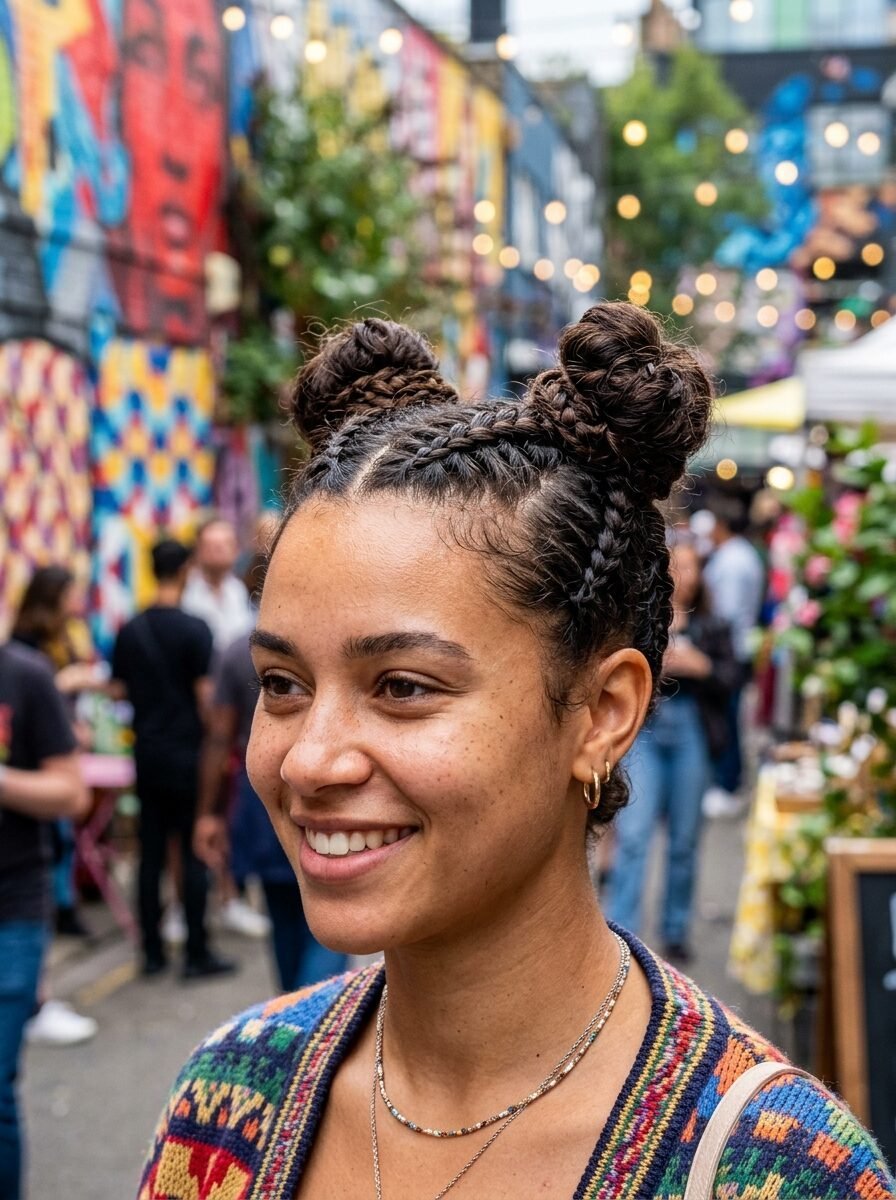
Space buns are fun. Adding braids to the base makes them stay put. You do two Dutch braids from the neck up to the crown. You tie them into two small buns on top of your head. This is a very high-energy look. I see this a lot at gyms and dance studios. It is functional art. The braids stop the buns from sagging. They also catch all the little hairs at the base of your neck. I have tried doing space buns without the braids. They usually fall out after an hour. The braids act like anchors.
In my experience, you should use a texturizing powder on the buns. This makes them look bigger. Short hair often makes for very tiny buns. The powder helps you fluff them up without them falling apart. I saw a girl at the park with this style. She was playing soccer. Her hair didn’t budge. This is a testament to the strength of combining braids with elastics. It is one of those cool braids styles that feels very youthful. You will need four elastics for this look.
15. The Loose French Side Braid
This is for a soft, romantic look. You do a French braid on one side. You keep the tension loose. This creates a draped effect. It is beautiful for a morning at a coffee shop. I have seen this look great on hair that has been air-dried. You don’t need a lot of prep. Just start at the temple and braid toward the back of the head. Secure it with a small, colorful elastic. I like to tug on the loops of the braid to make them look “fat.”
I noticed that if you have a lot of layers, this style might need a bit of help. I use a flexible-hold hairspray. This keeps the layers from jumping out of the loose weave. I have seen this work on very short bobs too. You just braid the very top layer. It looks like a secret detail hiding in your hair. This is one of the most braided hairstyles for short hair that feels “human.” It isn’t meant to be perfect. It is meant to be pretty. It is very easy to do while you are sitting in traffic or on a train.
16. The Twist-Cross Braid
This isn’t a traditional braid. It uses two strands instead of three. You twist them around each other. You add more hair as you move back. It is much faster than a standard braid. It creates a rope-like look. I love this for short hair because it is very hard to mess up. If a strand falls out, you just twist it back in. I have seen this used as a crown or a side accent. It has a very modern, clean aesthetic.
In my experience, twists stay put better on dirty hair. I use a bit of dry shampoo to give the hair some grip. I’ve seen this look great with a middle part. You do a twist on each side. You meet them at the back. It looks very organized and professional. If you have a pixie cut, you can do tiny twists along your hairline. It keeps the sweat off your face during a workout. This is an easy braids alternative for those who find three-strand braiding confusing. It is simple and effective.
17. Diagonal Dutch Braid
Instead of going straight back, you go from one temple to the opposite corner of your neck. This creates a long path for the braid. This is the secret for short hair. The longer the path, the more hair you can catch. I tried this on a whim one day. I was shocked at how much hair I could fit into one braid. It looks very “high fashion.” It creates a unique shape that you don’t see every day. It is a great way to handle hair that is shorter on one side than the other.
I noticed that this style stays put because it crosses the grain of your hair. It locks the layers in place. I have worn this to professional meetings. It looks very polished. You finish the braid at the nape of your neck. You can tuck the tail under or leave it out. I use a heavy-duty elastic for the end. This is a gorgeous braids option that feels very sophisticated. It shows you know how to handle your length with skill. You only need one braid, so it saves time in the morning.
18. Slicked Back Braided Sides

This is the ultimate “cool girl” look. You slick back the sides of your hair with gel. Then you do two tiny braids right above your ears. The top of your hair stays loose and voluminous. It looks like a mohawk but softer. I see this on red carpets a lot. It is very easy to do on short hair. You don’t need to braid the whole head. You are just creating a tight “sidecar” effect. It makes your cheekbones pop.
I have seen this look best on hair that has been blow-dried with a round brush. You want the top to be big and the sides to be flat. In my experience, using a firm-hold gel is key. You don’t want the sides to puff out. The braids help hold the gel in place. It is a mechanical and chemical hold working together. This is one of those short braids styles that works for any age. It is modern, fresh, and very secure. You will need two tiny elastics. It is a great way to end the week with a bold statement.
Hair Tools for Short Braids
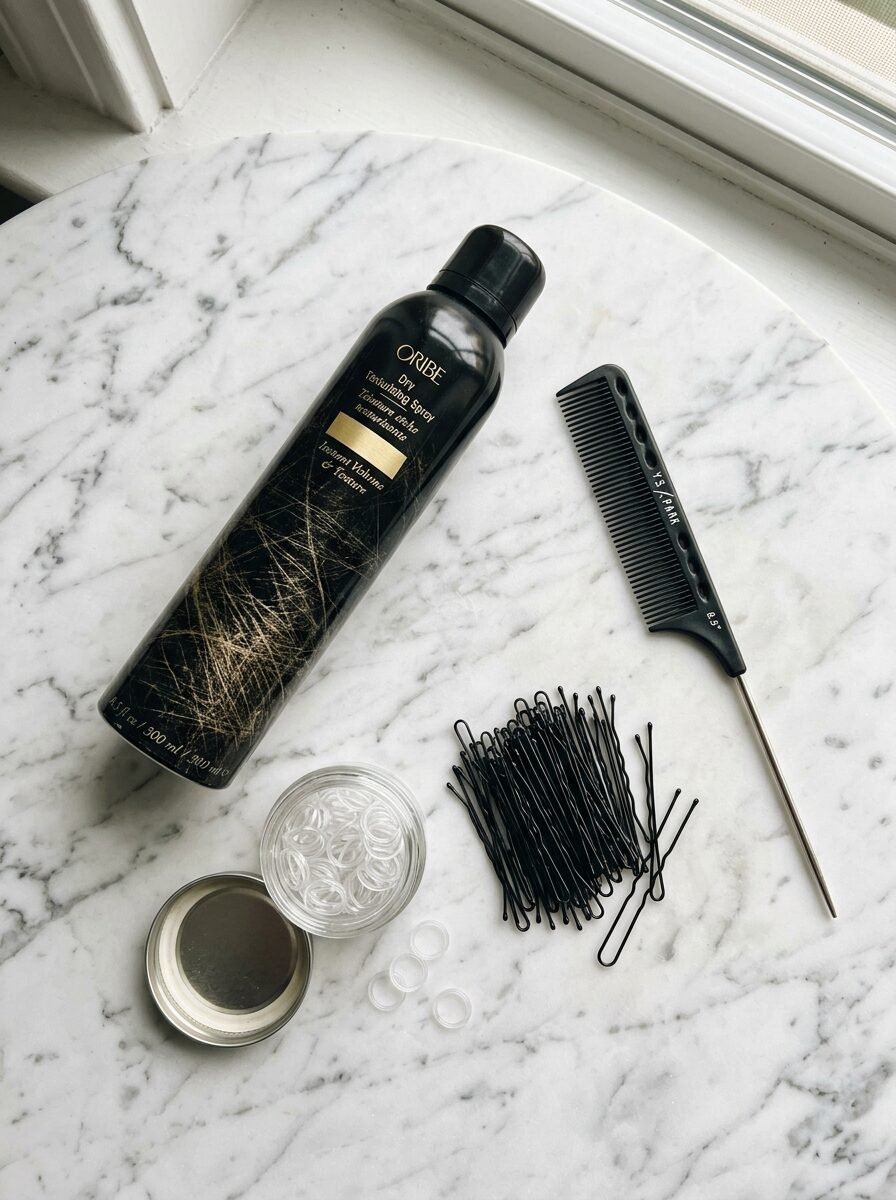
You need the right gear. I have wasted money on clips that slip. I have used elastics that snap. Here is my honest list of what actually works for short hair. These are the tools I keep in my kit.
- Goody Clear Ouchless Elastics: These are the gold standard. They are thin but strong. I have never had one snap mid-day. They are nearly invisible in any hair color.
- Kitsch Pro Bobby Pins: These have a better grip than the cheap ones. They don’t lose their shape after one use. I always buy the matte version. They stay in the hair better than the shiny ones.
- Oribe Dry Texturizing Spray: This is expensive. It is also the only spray that gives my short hair enough “grit” to hold a braid without feeling sticky. A little goes a long way.
- Batiste Dry Shampoo: For a budget option, this is great. It adds volume and absorbs oil. I use it on clean hair just to give it some texture.
- Rat-Tail Comb: You need this for clean parts. A straight part makes a braid look ten times more professional. I use a metal-tipped one for precision.
- Got2b Glued Spiking Glue: If you are doing cornrows or slicked sides, this is the only gel that truly “glues” the hair down. It is very strong. You will need to wash it out thoroughly.
- Sally Beauty Hair Wax Stick: This is great for smoothing down flyaways along the braid. You just swipe it over the finished look. It keeps everything looking neat.
Common Mistakes to Avoid
I have made every mistake possible with short braids. I once tried to braid my hair right after a deep conditioning treatment. The braids lasted ten minutes. The hair was too soft. It just slid right out of the elastics. Here is how to avoid those frustrations.
Braiding Clean Hair
This is the biggest error. Clean hair is slippery. It has no “grip.” I have noticed that braids stay much better on second or third-day hair. If you must braid clean hair, use a texturizing spray first. This mimics the natural oils that help hair stay together. I’ve seen people struggle for an hour with clean hair. Don’t do that to yourself. Give it some grit first.
Taking Large Sections
Short hair has many different lengths. If you take a large section, you are mixing long hairs with short ones. The short ones will eventually pop out. Taking small, half-inch sections is the secret. It keeps the tension even. It ensures that every strand is tucked deep into the weave. I’ve tried to rush by taking big chunks. It always fails. Small sections are your friend.
Not Using Enough Pins
People try to use one pin where they need three. Short hair is stubborn. It wants to go back to its natural shape. You have to force it to stay. I use the “locking” technique. You put one pin in. You put the second one across it. This creates a physical barrier. I have seen braids fall out because the person was “trying to be subtle” with pins. Use as many as you need. You can always hide them with more hair.
Frequently Asked Questions
How long does my hair need to be for braids?
You need at least two to three inches for basic braids. For Dutch or French braids, four inches is better. I have seen micro-braids on one-inch hair, but it requires a lot of gel. If you can grab the hair with your fingers, you can braid it. It might not be a full braid, but you can certainly do accents. I’ve noticed that length is less important than technique. Using the right tools makes short hair much easier to handle.
Which braid stays in short hair the best?
The Dutch braid is the winner. Because it sits on top of the head, it anchors the hair more firmly to the scalp. French braids tend to pull the hair away from the scalp, which leads to slipping. I have seen Dutch braids last through intense workouts and sleep. If you want a “set it and forget it” style, go with the Dutch method. It is the most robust option for short braided hairstyles.
How do I stop the back of my hair from falling out?
This is the most common struggle. The hair at the nape of the neck is often the shortest. I suggest braiding from the bottom up. This catches those tiny hairs first. You can also use a small amount of hair glue or strong gel on that section before you start. If all else fails, use a decorative clip to pin the “stragglers” up. I’ve seen this look very intentional and cute.
Can I sleep in short braids?
Yes, but you should protect them. Use a silk or satin pillowcase. This prevents the hair from frizzing. You can also wear a silk scarf tied around your head. I have done this for music festivals. The braids stayed perfect for three days. If you have very fine hair, you might need to touch up the edges in the morning. Just use a little water and a tiny bit of gel to smooth things down.
Is braiding bad for short hair?
No, as long as you don’t pull too tight. Braiding can actually protect your hair. It keeps the ends from rubbing against your clothes or pillow. This can prevent breakage. I’ve noticed that my hair grew faster when I kept it in braids because I wasn’t using heat on it every day. Just be careful around your hairline. Don’t pull those tiny “baby hairs” too hard. Give your hair a break every few days to let the scalp relax.
How do I make my braids look thicker?
The “pancaking” method is the best trick. Once your braid is secured, gently pull on the outer loops. Do this slowly. Start from the bottom and work your way up. This spreads the hair out and makes the braid look twice as wide. I have seen this turn a tiny plait into a thick-looking braid. It works exceptionally well on short hair. Just make sure your elastic is tight before you start pulling.
Short hair is not a limitation. It is a chance to be creative. These 18 styles prove that you don’t need long locks to have beautiful hair. I have seen these looks work for every face shape and hair texture. You just need a bit of patience and the right products. I used to feel frustrated with my short cut. Now, I love the challenge of finding new ways to braid it. It feels human to want to change your look. It feels good to master a new skill. Try one of these styles tomorrow morning. You might be surprised at how much you like what you see in the mirror. Your hair is your own. Make it work for you.
Short braids are more than just a trend. They are a practical solution for busy people. You can look polished without spending an hour on your hair. I have seen this change the morning routines of many friends. They feel more confident. They spend less time worrying about flyaways. They spend more time enjoying their day. This is the goal of any good hair guide. It should make your life easier. These 18 cute braids for short hair that stay put are your new secret weapon. Use them well.

Sarah Mitchell — Founder & Editor-in-Chief
Sarah Mitchell is the founder and editorial voice behind Hair Level Up. A licensed cosmetologist with more than 15 years of experience, she has styled A-list celebrities for editorial shoots and red carpets, with work featured in Vogue, Elle, and Harper’s Bazaar. Early in her career, she trained under the legendary hairstylist Oribe in New York, an apprenticeship that still shapes her editorial eye today. Sarah founded Hair Level Up in 2020 after one bad haircut convinced her that women deserved a destination that felt like a magazine, taught like a stylist, and inspired like an art gallery. She oversees every story from concept to publication, guided by a simple belief: a good story teaches you something, but a great one makes you feel beautiful while it does.