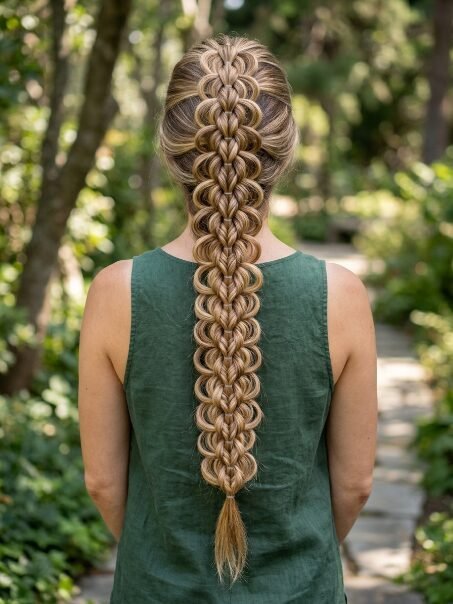
How to Master the Pull-Through Braid in 6 Steps
Picture a frantic Saturday morning. You have a wedding in three hours. Your hair refuses to cooperate. You want something intricate. You want a look that rivals elaborate salon work. You remember the pull through braid. I sat in my bathroom last June facing this exact situation. My curling iron broke. I had exactly forty clear elastics and a comb. I walked into the venue looking like I spent three hours in a stylist chair. The truth? It took me fifteen minutes. This style creates the illusion of intricate weaving. It tricks the eye. People think you masterfully crafted complex knots. Instead you just tied a series of ponytails. I spent years styling clients for major events. Women always ask for 8 Strand Braids or massive boho styles. They panic when they see the price tag for that level of labor. I started teaching them this exact cheat code. It requires zero actual braiding skills. You only need to know how to tie a ponytail. You just loop sections of hair through each other. It sounds entirely too simple. The visual payoff is massive. Your hair will look three times thicker. You will gather compliments all night. Best of all you will save yourself hundreds of dollars and endless frustration.

You will master this volume heavy style today. You will need clear elastics and a rat tail comb. We will cover the exact steps from prep to finish. You will read about specific product picks from brands like Kenra and Oribe. I will share my exact experiences styling fine hair versus thick hair. We cover tools, variations, and fixes for common mistakes. Expect specific details on creating massive volume. You will save money skipping the salon. You will finish reading ready to style your own hair flawlessly. You will walk away with the exact blueprint for creating stunning Puffy Braids in minutes.
Required Tools For Flawless Braiding
You cannot construct a house without a hammer. You cannot style hair without proper gear. We talked about elastics and texturizing spray. Let us dive deeper into your arsenal.
A paddle brush detangles before you begin. Mason Pearson makes the finest brushes on earth. They cost a fortune. A Wet Brush Original detangler works perfectly for a fraction of the cost. I own six Wet Brushes in my kit. You need smooth hair to start. Tangles ruin the clean lines of the loops.
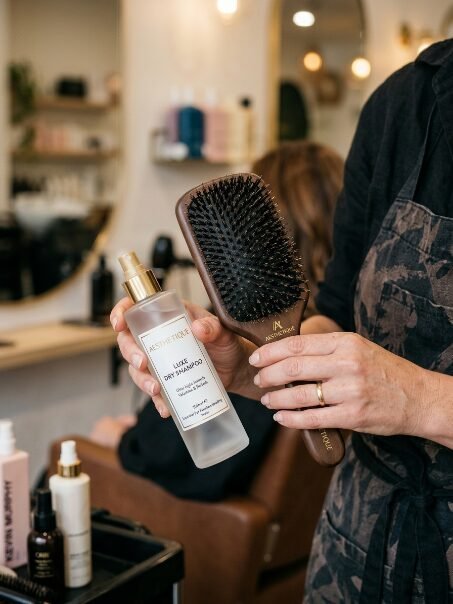
Dry shampoo saves second day hair. Batiste Dry Shampoo soaks up oil quickly. Oribe Gold Lust Dry Shampoo smells like a luxury perfume. Both absorb grease perfectly. Grease makes hair slip out of elastics. You need grip to make this style hold up.
You need bobby pins. Meta Grip Premium Bob Pins hold better than any brand I have tried. They feature a crinkled texture. They do not slide out. You will use these to pin back rogue layers or flyaways.
Sectioning clips keep hair organized. Drybar Hold Me Hair Clips grab massive sections of hair tightly. They do not leave dents in your strands. You need these to keep the bottom ponytails out of your way while you work.
Your hands are your best tools. Keep them clean. Sticky hands pull hair. Wash your hands thoroughly before you start touching the styling powder.
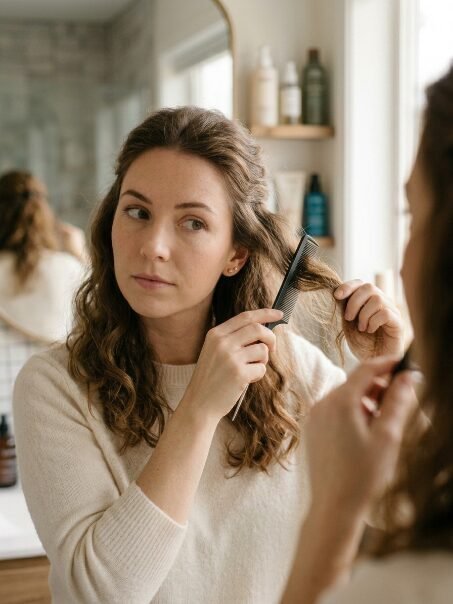
1. Prep Your Hair And Gather Your Tools
We start with a clean slate. Your hair needs texture. Freshly washed hair slips. It falls out of elastics easily. I tell my clients to style on day old hair. I styled Sarah for her prom last year. She arrived with freshly washed hair. We spent forty five minutes just creating artificial grit. You need grip.
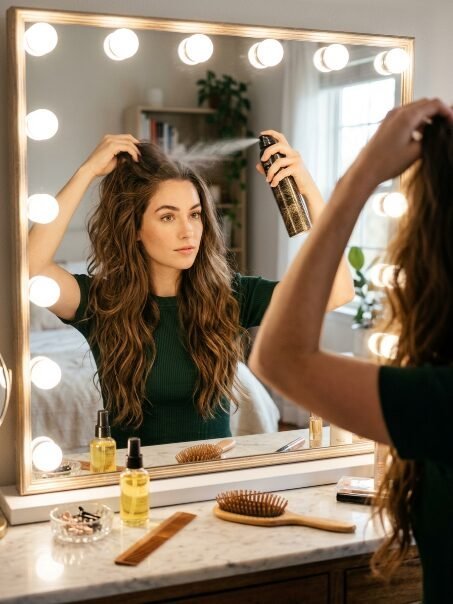
Grab a dry texturizing spray. I love Oribe Dry Texturizing Spray. It gives fine hair guts. Spray it at the root. Work it through the mid lengths. Brush it out gently. This step changes the entire foundation of your styling session.
You need clear elastics. Do not buy cheap ones from the drugstore. They snap under pressure. I bought a pack of cheap elastics once. Three snapped while I styled a bride. It ruined the entire look. Buy professional grade elastics. Blax clear snag free hair elastics never break. Buy a pack. Keep them in your vanity.
You need a rat tail comb. A carbon fiber comb works best. Cricket makes a great one. It prevents static. You need precise parting. Messy parts ruin the clean look of the loops. Clean parts elevate the style from amateur to professional.
Gather some styling powder. Schwarzkopf Osis Dust It styling powder is a lifesaver. You sprinkle a tiny bit on the loops later. It creates massive volume. I keep three bottles in my kit at all times.
Sit in front of a mirror. Place a second mirror behind you. You need to see the back of your head. Have your elastics open and ready. Put them on your wrist or lay them on the counter. Preparation prevents panic.
If you have layers you need hairspray. Layered hair pokes out of the loops. Kenra Volume Spray 25 holds those short pieces in place. Have it sitting next to your comb.
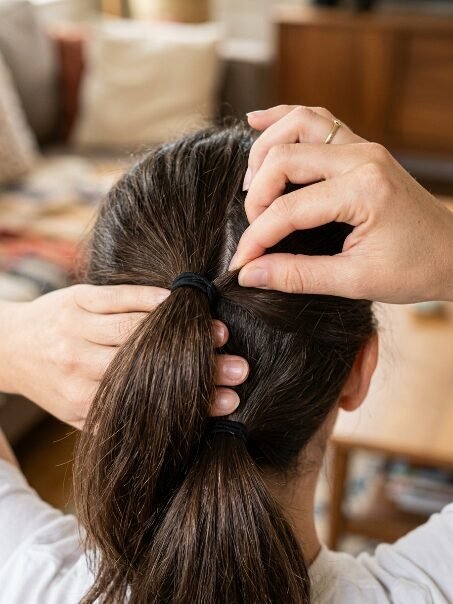
2. Create The Foundation Ponytails
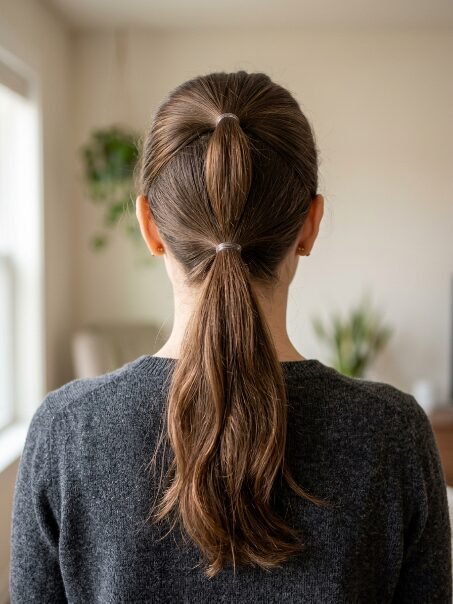
Everything rests on these first two ponytails. Take your rat tail comb. Create a half up section. Start at your temples. Draw the comb straight back. Gather the hair smoothly. Tie it with a clear elastic. Do not make it too tight. You want the hair to lay flat against your scalp.
This is your first ponytail. Let it fall down your back.
Now pick up more hair. Start below your first section. Gather hair from the top of your ears. Pull it back to the center of your head. Fasten it with a second clear elastic. This creates your second ponytail. It sits directly under the first one.
I worked with a client named Emily in 2023. She struggled with this step. Her ponytails were crooked. Crooked ponytails ruin the final shape. You must make sure they sit perfectly aligned down the center of your head. Check your back mirror. Readjust if necessary.
These two ponytails act as the anchor. They hold the weight of the entire style. If you have thick hair you should use two elastics per ponytail. I learned this the hard way during a photoshoot in Miami. The humidity was brutal. The single elastics stretched. The style sagged. Doubling up provides extra security.
You now have two ponytails stacked vertically. Clip the top ponytail up and out of the way for a moment. Look at the bottom ponytail. Make sure it feels secure. Unclip the top one. You are ready to start the weaving motion.
Keep your tension even. Uneven tension creates lopsided loops later. Smooth the sides with your hands. You want the hair feeding into the elastics to look polished. A polished base makes the messy loops look intentional.
3. Split And Fasten The First Section
This step starts the magic. Take your top ponytail. Divide it exactly in half. You now have a left piece and a right piece. Hold one piece in each hand.
Take the bottom ponytail. Pull it straight up. Pass it right between the two halves of the top ponytail. Clip this bottom ponytail to the top of your head. Get it completely out of your way.
Now bring the two halves of the original top ponytail back together underneath. You need to incorporate more hair now. Scoop up a small section of loose hair from the left side of your head. Scoop up a small section of loose hair from the right side of your head. Join these new sections with the two halves you are holding.
Fasten all of this together with a new clear elastic. You just created your first loop.
Let the clipped hair down. That hair now becomes your new top ponytail. You just swapped their positions.
I taught this exact move to my sister last Thanksgiving. She thought it sounded like a math problem. Once she physically did it her brain clicked. It relies entirely on repetition. You split the top. Pull the bottom through. Clip it up. Gather loose hair to the split pieces. Fasten them underneath.
Keep the sections equal. If you grab a thick chunk of hair on the left and a thin wisp on the right the braid twists. I saw this happen constantly when I taught a local styling class. Students rushed the gathering phase. Take your time. Measure the sections with your fingers.
Use your rat tail comb if your fingers feel clumsy. The comb creates sharp clean lines. Clean lines make the finished style pop visually.
4. Repeat The Pull Through Motion Down The Length
You established the pattern. Now you just repeat it. Split the new top ponytail. Pull the bottom one up through the middle. Clip it out of the way. Gather loose hair from the sides. Join it with the split pieces. Fasten with an elastic.
Keep going down the back of your head. You will eventually run out of loose hair to incorporate. This usually happens at the nape of your neck.
Once you hit the nape the pattern changes slightly. You no longer have loose hair to gather from the sides.
Take the top ponytail. Split it in half. Pull the bottom ponytail up through the middle. Clip it up. Bring the two halves together underneath. Do not gather any new hair. Just tie the two halves together with an elastic.
Unclip the top ponytail. Split it. Pull the bottom through. Clip it up. Tie the halves underneath. Repeat this all the way down the length of your hair.
I styled a model with extensions last year. She had twenty two inches of hair. We repeated this motion down to her waist. The repetition feels tedious. It pays off immensely. Fully Braided Hairstyles demand patience during the tying phase.
Stop tying when you have two or three inches of hair left. You need a tail to anchor the final loops.
Maintain consistent spacing between your elastics. If you place one elastic an inch down and the next one three inches down it looks sloppy. Aim for two inches between every elastic. This spacing creates perfect uniform bubbles.
If your arms get tired take a break. Just clip both ponytails to your shirt. Shake out your shoulders. Working on long hair requires endurance.
5. Pancake The Loops For Maximum Volume
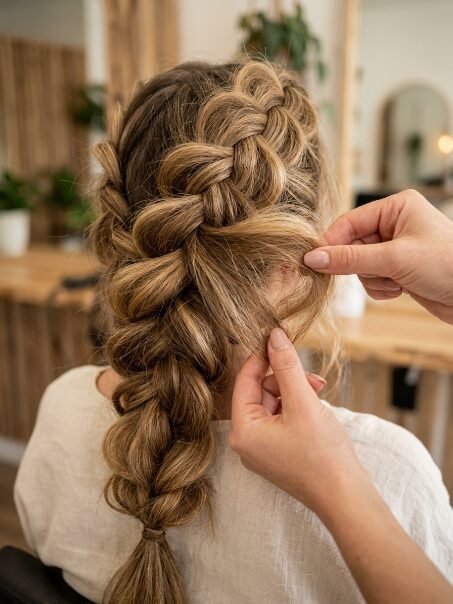
This step changes everything. Tightly tied elastics look rigid. You need to expand the hair. We name this pancaking.
Start at the bottom of the braid. Gently tug the outer edges of the loops. Pull them outward horizontally. Work your way up to the top.
Pancaking requires a delicate touch. You want to pull just the outer layer of hair. If you grab the whole loop you ruin the structure. I ruined many styles early in my career by pulling too hard.
Sprinkle Schwarzkopf Osis Dust It styling powder onto your fingertips. Gently massage the powder into the edges of the loops as you pull. The powder creates friction. It locks the teased shape in place.
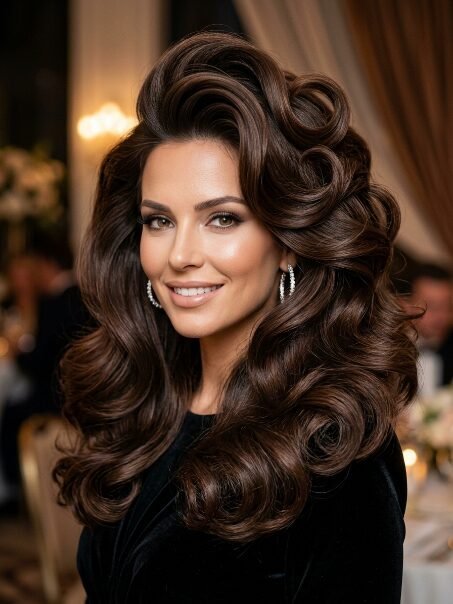
Pull the loops until they look huge. You want massive volume. The bigger the loops the thicker your hair looks.
I worked with a bride named Jessica. She had very fine thin hair. She wanted her hair to look thick and luxurious. I used this pancaking system. I pulled the loops until they were three times their original size. She cried when she saw the mirror. She could not believe it was her own hair.
Do not skip the back of the loops. People often only pancake the sides. You need volume all the way around. Tug the hair gently outwards and slightly backwards.
If layers poke out while you pull do not panic. Tuck them back in gently. Apply a tiny bit of Kenra hairspray to glue them down.
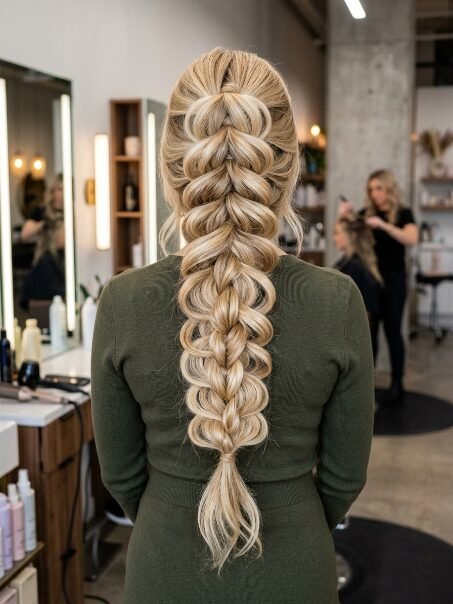
Pancaking creates the illusion of intricate weaving. The elastics disappear entirely inside the fluffed hair.
6. Fasten The Ends And Set The Style
You arrived at the end. You need to finish the look tightly. Take the two remaining ponytails. Tie them together with one final clear elastic. Wrap the elastic tight.
Take a tiny piece of hair from the tail. Wrap it tightly around the final elastic to hide it. Use a small bobby pin to fasten the wrapped hair. Slide the pin upward into the elastic. It completely conceals the band.
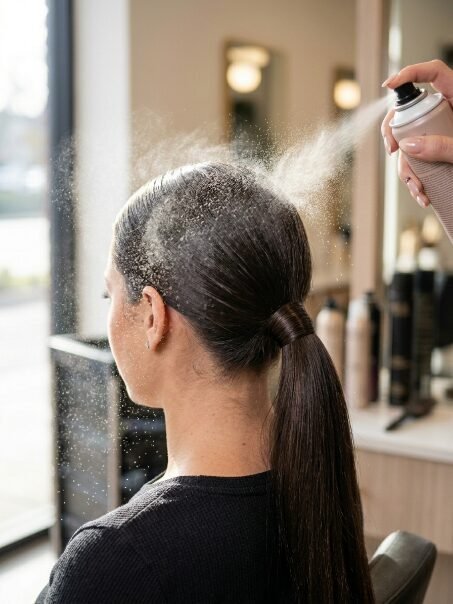
Now you set the style. Humidity destroys volume. You need a strong hold hairspray. L’Oreal Elnett Satin Extra Strong Hold Hairspray is my favorite. It holds perfectly without looking crusty.
Spray the entire style from ten inches away. Give it a light even coat.
Use your fingers to smooth any remaining flyaways. If you have baby hairs around your face style them softly. Pull out a few wisps around your ears. This softens the look.
I did this for my sister in law last month. She attended an outdoor festival. The wind blew endlessly. Because I set the hair properly it survived twelve hours outdoors. The style looked identical at midnight as it did at noon.
Take your back mirror. Inspect your work. Make sure the loops look balanced. If one side looks flat give it a tiny tug.
You just created a masterpiece. Your hair looks thick intricate and professional. You avoided salon prices. You mastered a complex looking skill.
Variations On The Classic Look

Once you master the base pattern you open endless possibilities. You can adapt this for different occasions.
Try a half up version. Stop gathering new hair after three loops. Let the rest of your hair hang loose in soft waves. This gives you amazing Braid Ideas For Long Hair. I love doing this for casual weekend brunches. It keeps hair out of your face while showing off your length.
You can create a faux Spider Braid. A true Spider Braid involves complex confusing knotting. You can mimic the look. Make tiny tight loops. Do not pancake them. The small rigid loops resemble an eight legged shape. It looks intricate but uses the exact same elastic tying routine.
Try 2 Braid Hair Styles. Part your hair straight down the middle. Create pigtails. Apply the exact same loop routine to both sides. It looks youthful and playful. My niece wears this to gymnastics. It holds up through tumbling routines perfectly.
Some people want Celtic Braid Styles. Celtic knots look incredibly hard. You can create a fake Celtic look. Take small pieces from the sides of your loops. Twist them softly. Pin them across the center of the loops. It gives a woven historical look.
Do you love 3 Strand Braid Hairstyles? You can incorporate them. Create a tiny three strand plait. Pin it alongside your main style. It creates texture and contrast.
Unusual hairdos stand out on Pinterest. Unique Hairdos grab attention immediately. Incorporating metallic cuffs or small pearls to the elastics elevates the look entirely. Slide a pearl pin into the center of every loop for a bridal aesthetic.
Common Mistakes And Quick Fixes
Everyone messes up. I certainly did when I started. Let us address the pitfalls.
Your loops look deflated. You probably tied the elastics too tightly. Tight elastics choke the hair. Leave a tiny bit of slack when tying. This gives you room to pull the hair outward during pancaking.
The back of your head shows bald spots. You gathered the hair too sharply. Use a soft touch when pulling hair from the sides. Brush the hair gently towards the center to cover the scalp.
Your hair sticks straight out. You did not keep the ponytails flat. When you tie the initial ponytails direct the hair downward. Do not pull it straight back like a cheerleader. Keep it close to your neck.
Pieces fall out constantly. Your hair feels too clean or too layered. Spray more texturizing spray. Use a stronger hairspray. Pin the rogue pieces directly into the center of the loops using mini bobby pins.
The bottom tail looks ratty. You ran out of hair too soon. You need to leave a decent chunk of hair for the final tail. It finishes the look cleanly. Brush the tail out to keep it smooth.
Your parts look messy. You used your fingers instead of a comb. Always use the metal tail of your comb to draw the lines.
The loops look lopsided. You grabbed uneven sections of hair. Take your time. Feel the thickness of the hair in your left hand. Compare it to your right hand. Make sure they match before tying the elastic.
Frequently Asked Questions
Can I do this on short hair?
You need hair that falls past your shoulders. The loops consume a lot of length. Collarbone length hair might give you three loops. Waist length hair gives you ten. If you have a bob try the half up version instead. You can still participate in the trend without massive length.
Does this damage my strands?
Using standard rubber bands damages hair. Standard bands grip and tear strands. Clear snag free elastics slide out cleanly. Be gentle when removing them. Use small scissors to cut the elastics out if they feel tangled. Never rip an elastic out forcefully.
How long does this stay in place?
A properly fastened style lasts all day. I have clients who sleep in it. They wake up with a slightly messy version. It looks like bohemian bedhead. Hairspray dictates longevity. Use a strong hold spray and you will easily get twenty four hours of wear.
Do I need thick hair to make it look good?
Absolutely not. The pancaking step creates artificial thickness. Fine hair actually holds the teased shape very well. Texturizing powder is your best friend if you have thin hair. It grips the strands and makes them look massive.
Can I wash the styling powder out easily?
Yes. Styling powder washes out with standard shampoo. If you use a lot of it you might need to shampoo twice. It dissolves in warm water. Do not sleep with heavy powder in your hair for multiple days to avoid scalp buildup.
Why do my elastics keep breaking?
You bought cheap elastics. Drugstore brands degrade quickly. Oils from your hair break down the plastic. Buy professional grade elastics like Blax. They stretch further and resist snapping. Keep them away from direct sunlight when storing them.
Can I do this on wet hair?
Never try this on wet hair. Wet hair stretches and snaps. It also looks incredibly flat when it dries. You need the volume of dry hair. Blow dry your hair completely before starting.
Should I curl my hair first?
Curling creates amazing texture. You do not strictly need to curl it. Straight hair works fine. Curled hair simply blends better when layers poke out. If you have an extra twenty minutes throw some loose waves into your hair before starting.
Final Thoughts On This Routine

You now possess a great skill. You can manipulate your hair into complex shapes using cheap clear elastics. You do not need an expensive stylist to look incredible for your next event. The styles you see online often fake it. They use this exact loop system. You bypass the frustration of actual braiding.
Practice makes perfect. Do not expect perfection on your first attempt. Your hands need to learn the muscle memory. Grab your comb, your elastics, and your spray. Stand in front of your mirror. Dedicate twenty minutes tonight to trying this.
I taught this to dozens of women. Every single one felt a rush of pride when they finished. You created something beautiful with your own hands. Pin your finished photos online. Show off your work. Your hair looks amazing. You command attention with a style that screams luxury but requires basic skills. Try it tomorrow morning and watch the compliments roll in.

Sarah Mitchell — Founder & Editor-in-Chief
Sarah Mitchell is the founder and editorial voice behind Hair Level Up. A licensed cosmetologist with more than 15 years of experience, she has styled A-list celebrities for editorial shoots and red carpets, with work featured in Vogue, Elle, and Harper’s Bazaar. Early in her career, she trained under the legendary hairstylist Oribe in New York, an apprenticeship that still shapes her editorial eye today. Sarah founded Hair Level Up in 2020 after one bad haircut convinced her that women deserved a destination that felt like a magazine, taught like a stylist, and inspired like an art gallery. She oversees every story from concept to publication, guided by a simple belief: a good story teaches you something, but a great one makes you feel beautiful while it does.