25 Easy Updo Hairstyles for Date Night and Dinner Parties
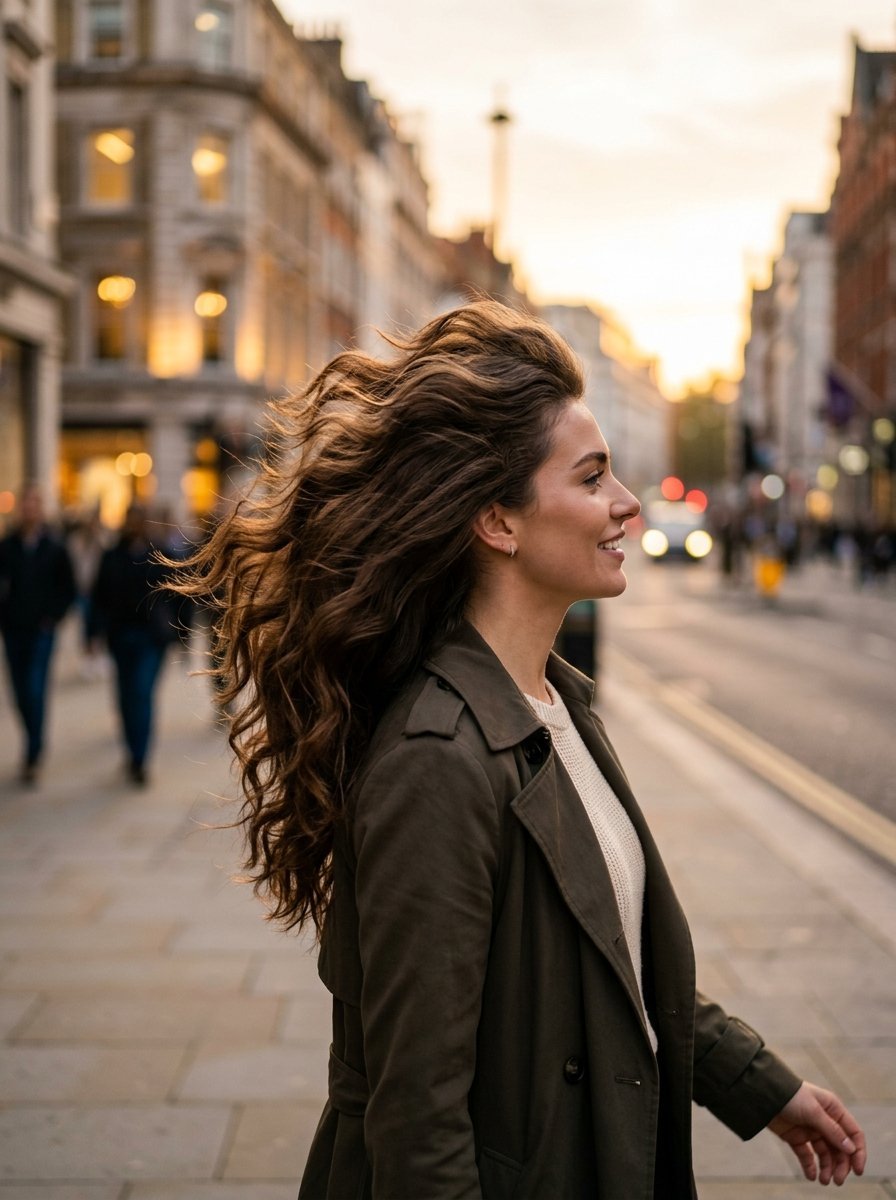
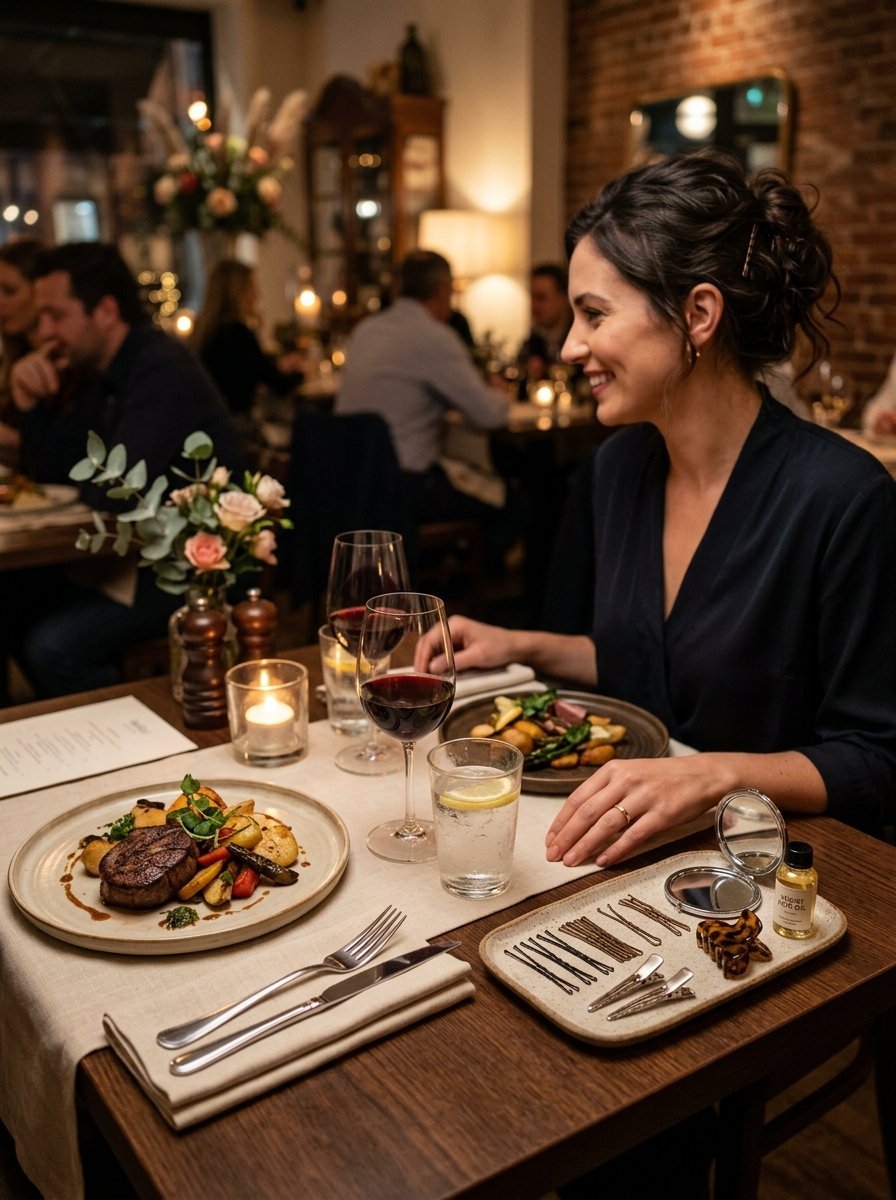
You are standing in front of the bathroom mirror. Your reservation is in exactly forty-five minutes. You have already spent a long time perfecting your makeup, and now your hair is refusing to cooperate. It feels slightly weighed down, maybe a little oily from a long week, and you lack the time for a full wash and blowout. This exact situation happened to me last Friday before a dinner party downtown. Instead of panicked washing, I pulled my hair into a swift, strategic updo that actually gathered more compliments than my standard salon blowouts.
Executive Summary
This comprehensive guide delivers twenty-five salon-grade updo hairstyles designed for immediate execution at home. Each look requires less than ten minutes, addresses real-world hair struggles like unexpected grease or lack of volume, and works beautifully for American dining settings. You will find step-by-step assembly breakdowns, exact tool recommendations, and troubleshooting strategies to keep your style secure from cocktails to dessert.
1. The Sculpted Bella Hadid Knot
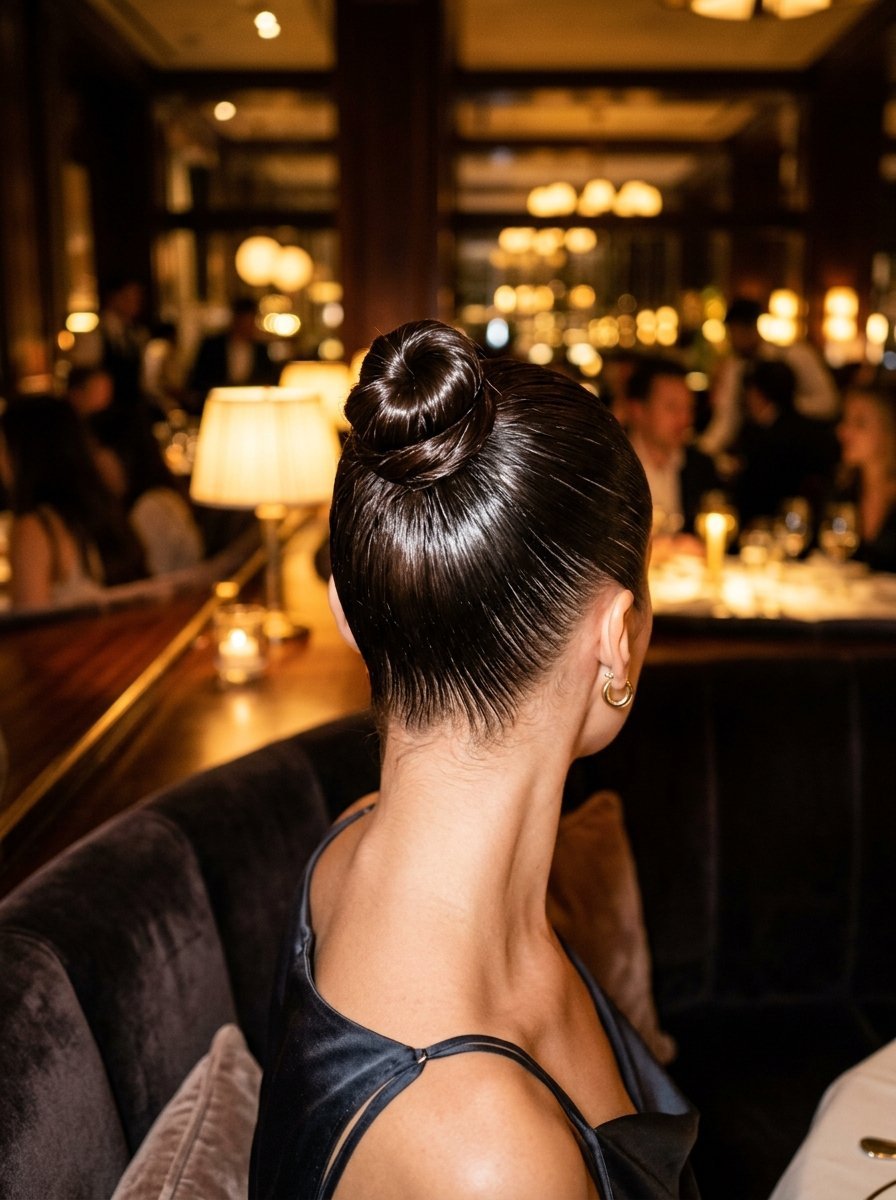
This style turns second-day hair into an intentional fashion statement. It uses your natural scalp oils to create a glassy, high-shine finish that anchors tightly at the crown of your head.
In my experience, trying to do this on freshly washed hair is an uphill battle. The hair simply slips out of the elastic. Last month, I wore this to a crowded Manhattan bistro on a humid night, and it did not budge a single millimeter.
- Prep Time: 5 minutes.
- Best For: Straight, wavy, or oily hair.
- Key Tool: Mason Pearson Boar Bristle Brush ($175) or a budget-friendly Denman slicking brush.
Execution Steps
- Part your hair precisely down the center using a metal rat-tail comb.
- Apply a nickel-sized amount of hair balm from mid-lengths to roots.
- Brush hair backward into a high ponytail, smoothing out any bumps.
- Secure the ponytail tightly with a heavy-duty elastic band.
- Twist the length of the ponytail into a tight rope.
- Coil the rope around the base, leaving the last two inches of your ends pointing outward.
- Pin the base with four large bobby pins, letting the sharp ends flare out.
2. The Romantic Textured Low Bun
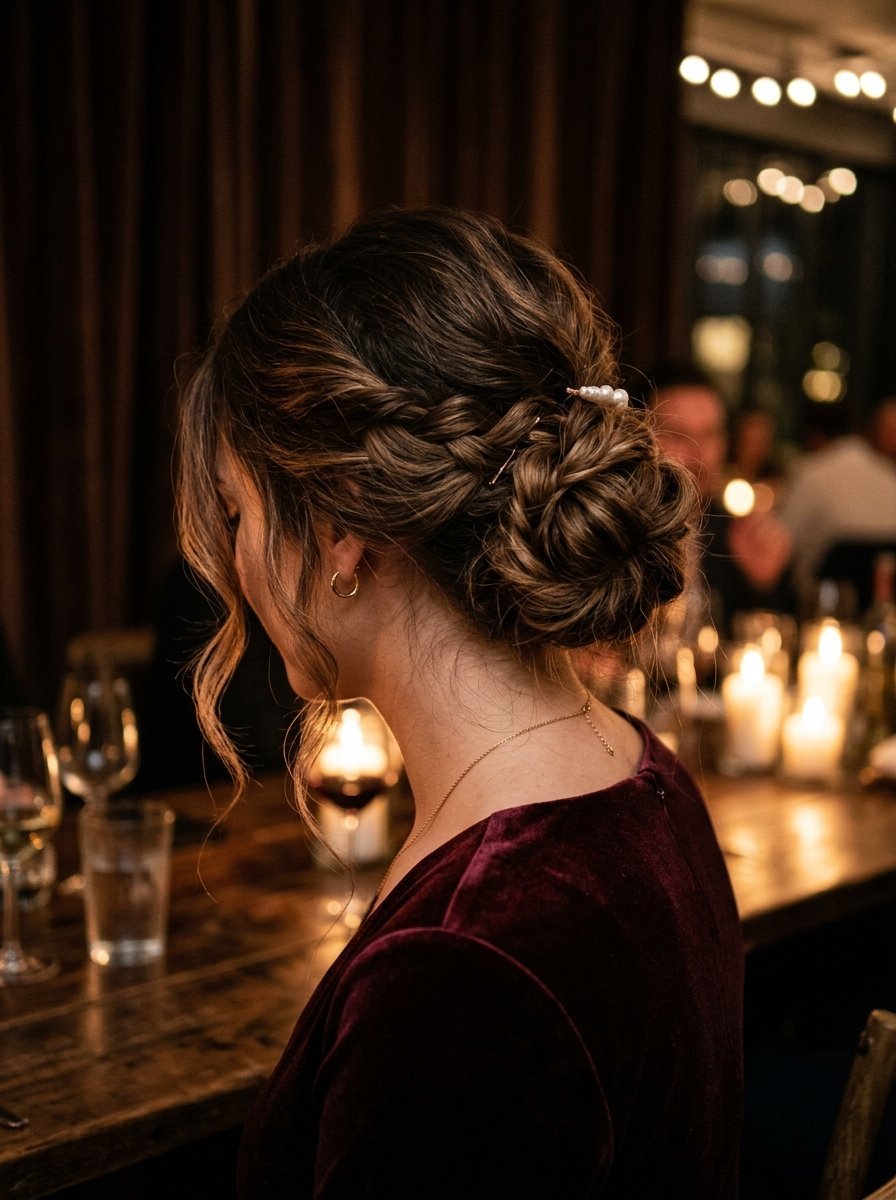
This look gives off an effortless, French-girl aesthetic that works perfectly for cozy candlelit booths. It thrives on natural texture and slight imperfections around the face.
I see people ruin this look by making it too neat. The magic lies in the soft tendrils that frame your jawline. When I tried this for an anniversary dinner last winter, I noticed that pulling pieces out after securing the bun creates a much more natural drape than leaving them out initially.
- Prep Time: 7 minutes.
- Best For: Wavy, curly, or fine hair needing volume.
- Key Tool: Oribe Dry Texturizing Spray ($49).
Execution Steps
- Mist your entire mane generously with a texturizing spray.
- Gather hair loosely at the nape of your neck using your fingers, not a brush.
- Loop the hair into a low ponytail, but do not pull the ends through on the final elastic wrap.
- Take the remaining loop and gently pull it apart to create a full, crescent shape.
- Tuck the loose ends under the elastic and pin them flat.
- Use your thumbs to gently tug hair upward at the crown for a slight lift.
- Tug two small sections of hair free around your ears and massage them to create soft waves.
3. The Modern French Twist
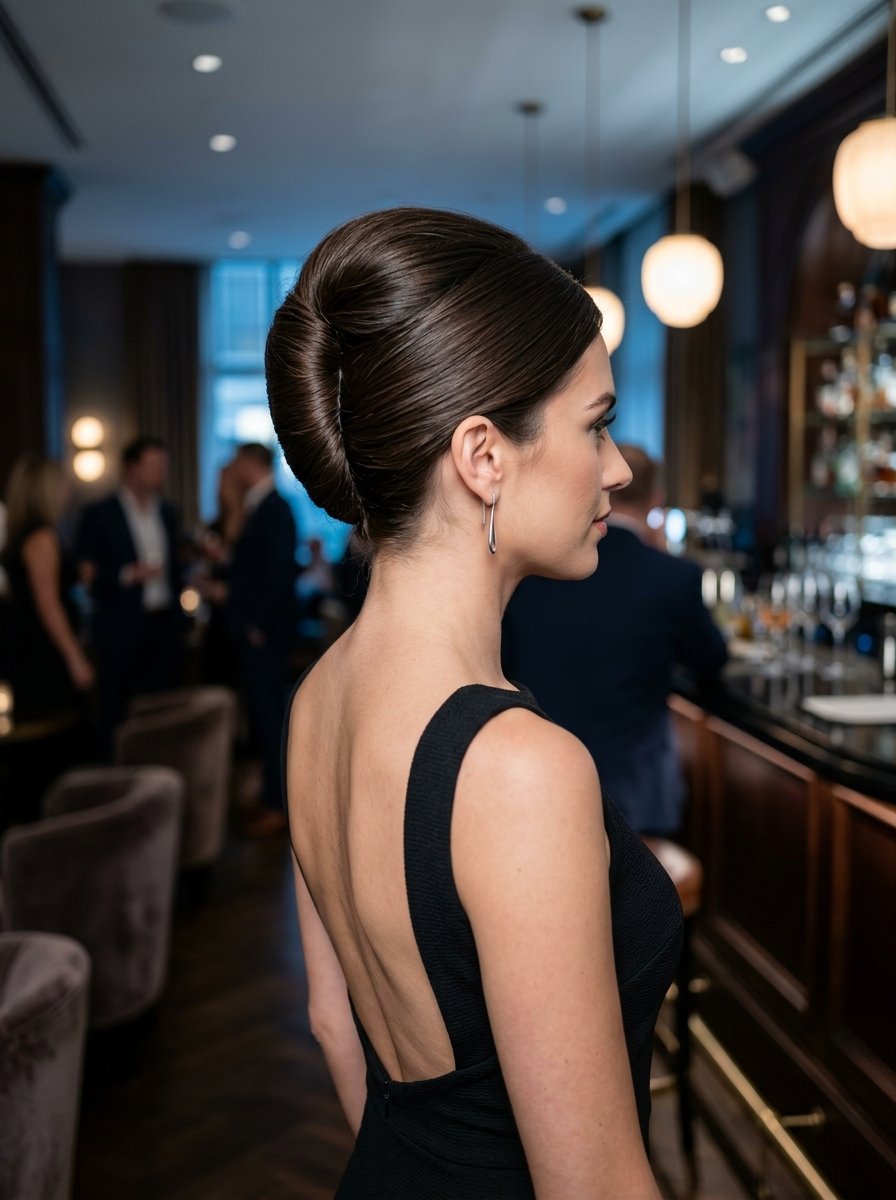
A contemporary take on a classic silhouette that does away with the stiff, prom-like structure of the past. It looks incredibly chic when paired with a low-backed dress or a sharp blazer.
Most people struggle because their hair slips out of the twist. The secret lies in creating an invisible internal scaffolding using interlocking pins. I watched a senior stylist use this exact crisscross method backstage at New York Fashion Week, and it changed how I approach updos completely.
- Prep Time: 8 minutes.
- Best For: Medium to long thick hair.
- Key Tool: Diane 3-Inch Hair Pins ($6).
Execution Steps
- Gather all hair to one side of your head, just off-center to the left.
- Insert a row of bobby pins vertically from the bottom up to hold this side flat.
- Gather the hair in your right hand and roll it tightly inward toward the center pins.
- Ensure the ends roll neatly inside the vertical pocket you have created.
- Insert large hair pins down into the seam of the twist, catching both the roll and the base hair.
- Lightly mist with a flexible-hold working spray to catch flyaways.
4. The Slicked-Back Clean Girl Topknot
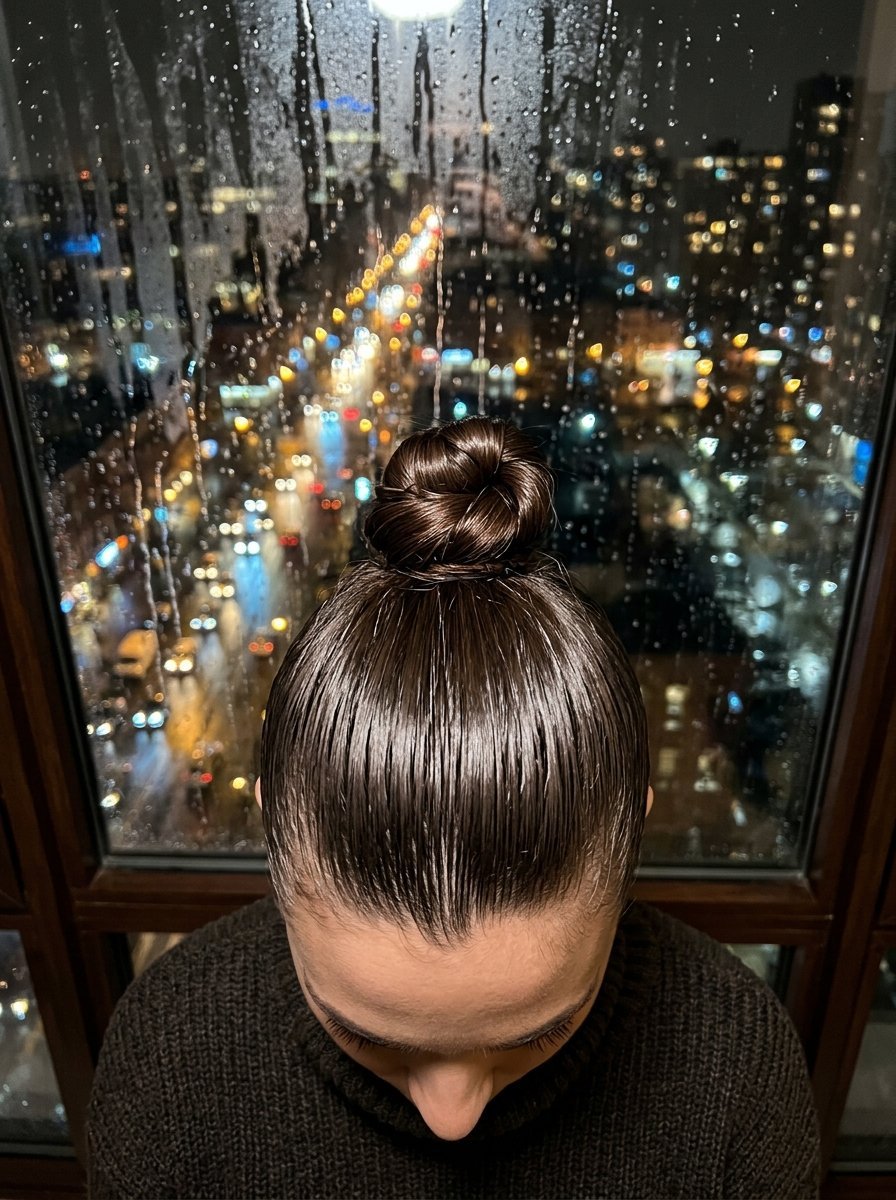
The ultimate solution for oily roots that needs to look incredibly polished and deliberate. It pulls the face upward, highlighting your cheekbones and jawline beautifully.
This is my absolute fallback when weather conditions are wet or unpredictable. I have seen this look stay flawless through a three-course rooftop dinner during a sudden summer storm. It works best when you use a firm-hold gel that dries without flaking.
- Prep Time: 4 minutes.
- Best For: All hair types, especially greasy hair days.
- Key Tool: Eco Styler Olive Oil Gel ($8).
Execution Steps
- Dampen your roots slightly with a continuous water mister.
- Work a quarter-sized amount of styling gel through the top sections of your hair.
- Brush hair up to the high crown, tracking smooth lines with a fine-tooth comb.
- Secure into a tight, dense ponytail.
- Wrap the hair length into a neat spiral around the elastic.
- Anchor the bun with an additional hair tie wrapped directly over the top of the structure.
5. The Messy Cloud Bun
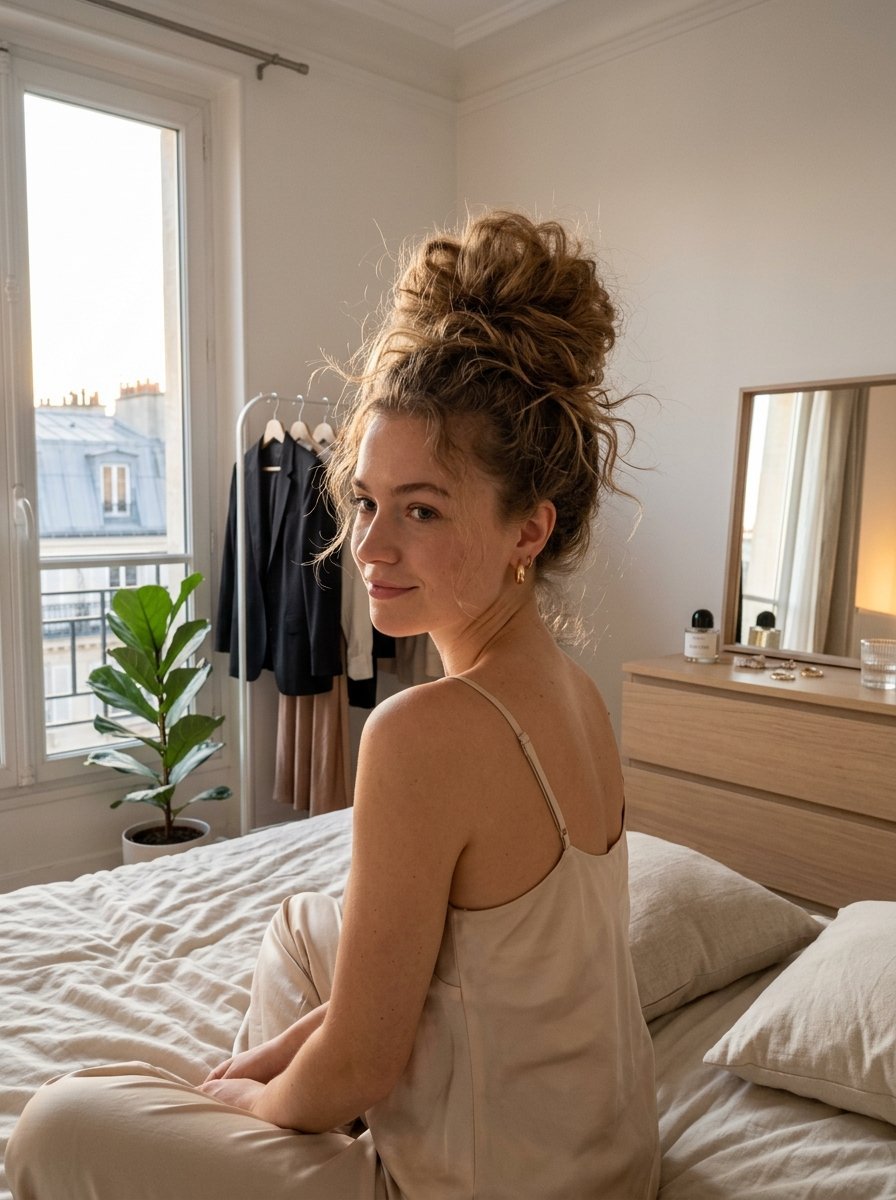
A weightless, ethereal updo that looks voluminous and full, even if your hair is actually on the thinner side. It relies on internal airiness rather than dense packing.
If your hair is very silky, this bun will want to deflate within an hour. To prevent this, I always dust the mid-lengths with a volumizing powder before twisting. The added friction keeps the cloud shape intact all evening.
- Prep Time: 6 minutes.
- Best For: Fine, thin, or medium hair.
- Key Tool: SexyHair Big Powder Play ($20).
Execution Steps
- Puff a small amount of volume powder directly into your mid-lengths.
- Flip your head upside down and gather hair into a high, loose ponytail.
- Secure with a soft fabric scrunchie to avoid harsh creasing.
- Tease the ponytail lightly using a backcombing motion from ends to base.
- Tuck the teased ends loosely back into the scrunchie band.
- Gently pull sections of the bun outward to form a large, airy shape.
6. The Red-Carpet Sleek Chignon
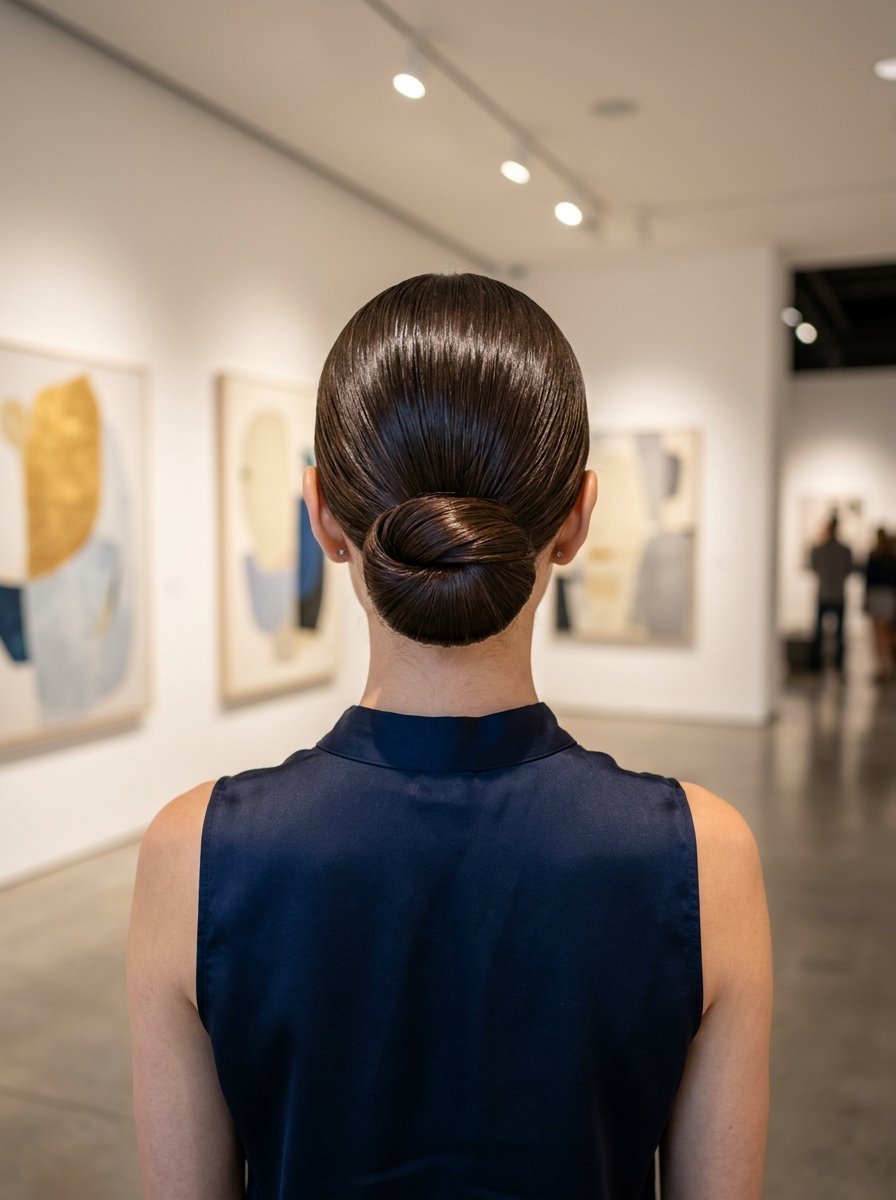
A low, symmetrical bun that sits right at the base of the skull, projecting quiet luxury and elegance. It pairs perfectly with statement earrings.
I used to think this required hours of smoothing, but a flat iron handles the bulk of the work before you even pin it. I wore this to a gallery dinner last fall and loved how it kept its glassy look under harsh lighting.
- Prep Time: 10 minutes.
- Best For: Naturally straight or easily smoothed hair.
- Key Tool: GHD Platinum+ Styler ($279).
Execution Steps
- Run a flat iron through your hair to ensure a completely smooth canvas.
- Create a clean, deep side part.
- Comb hair down smoothly into a low ponytail behind your right ear.
- Twist the ponytail into a sleek, compact circle.
- Secure using fine u-pins hidden directly underneath the bun’s perimeter.
7. The Braided Halo Updo
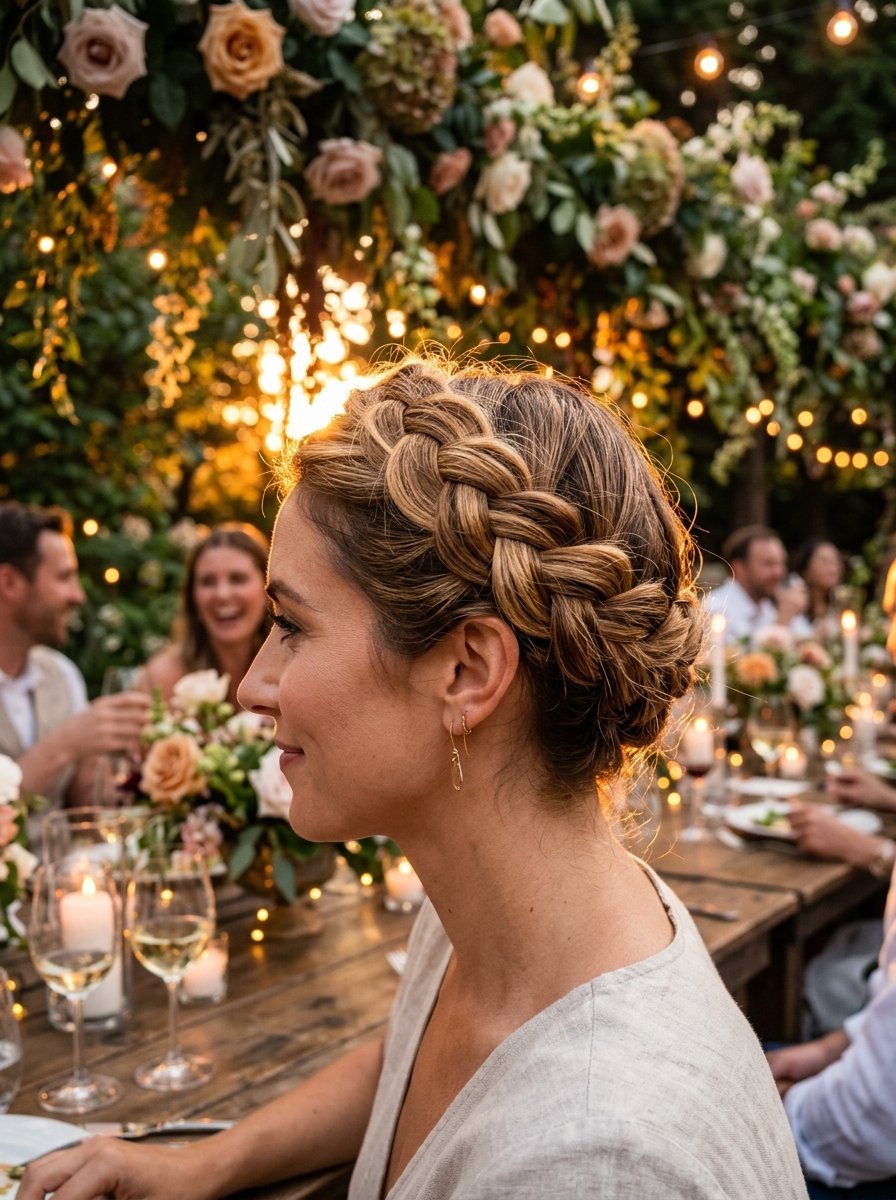
A bohemian-leaning updo that looks intricate but simply involves wrapping two standard braids around the circumference of your head.
This is a lifesaver if you have long hair that feels heavy when piled on top of your head. By distributing the weight evenly around the perimeter, you completely avoid the classic updo headache.
- Prep Time: 9 minutes.
- Best For: Long hair of any texture.
- Key Tool: Clear elastic bands.
Execution Steps
- Divide your hair down the back into two equal sections.
- Braid each section into a standard three-strand braid and secure with a clear tie.
- Take the left braid, pull it across the top of your head like a headband, and pin it down.
- Take the right braid, wrap it across the back or top in the opposite direction, and tuck the ends.
- Pin every two inches along the braids to lock the halo structure down.
8. The Vintage Faux Bob
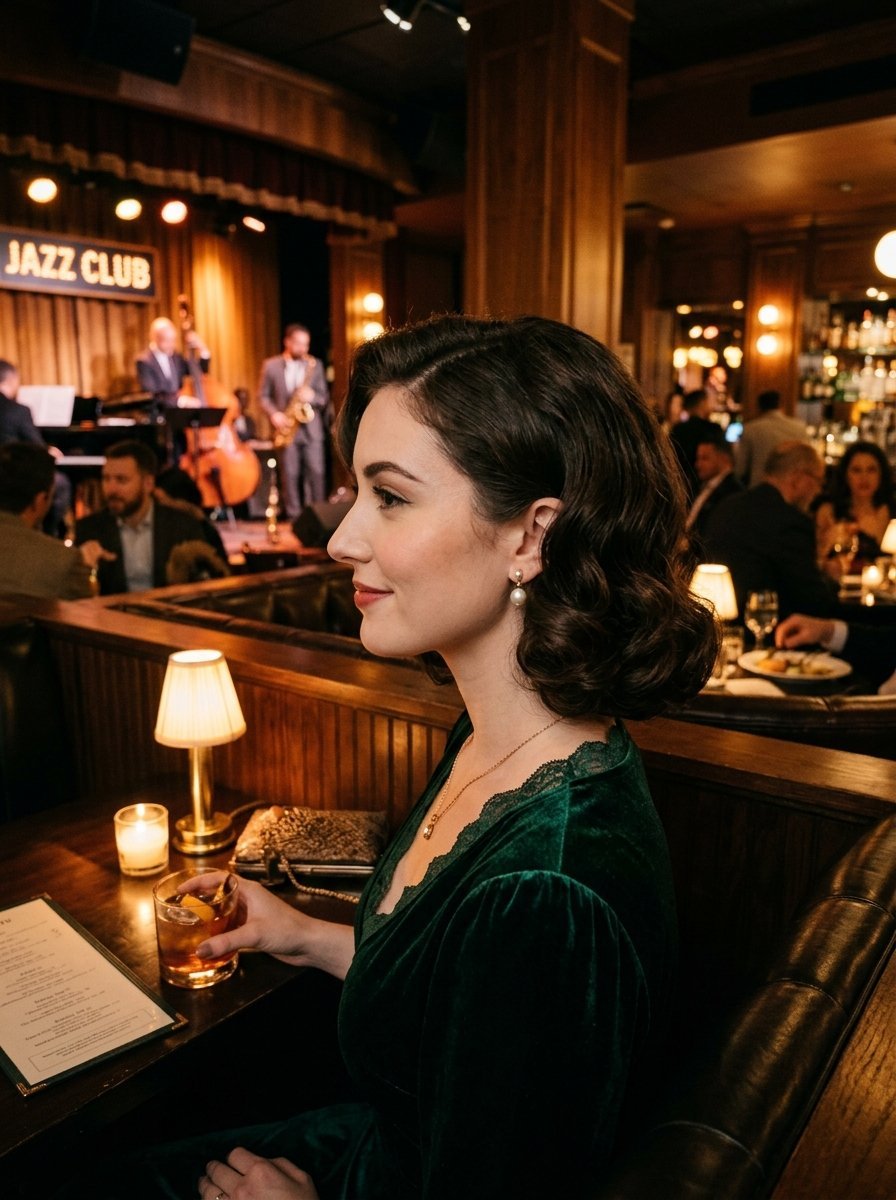
A brilliant way to trick everyone into thinking you chopped your hair into a chic, bouncy collarbone-length cut for the evening.
I love using this strategy for themed dinner parties or when I want a drastic style shift without commitment. The key parameter here is securing the hidden braid tightly against your neck so the structure does not drop.
- Prep Time: 12 minutes.
- Best For: Long, pliable hair.
- Key Tool: Large metal crocodile clips.
Execution Steps
- Braid the lowest two inches of your hair into a loose, flat plait.
- Roll that braid upward and inward, tucking it completely under the mass of your hair at the nape.
- Secure the tucked braid flat against your scalp using large bobby pins placed horizontally.
- Pull the outer layers of hair down gently over the hidden roll to create a faux bob shape.
- Use a wide-tooth comb to smooth the exterior surface.
9. The Bubble Bun High Ponytail
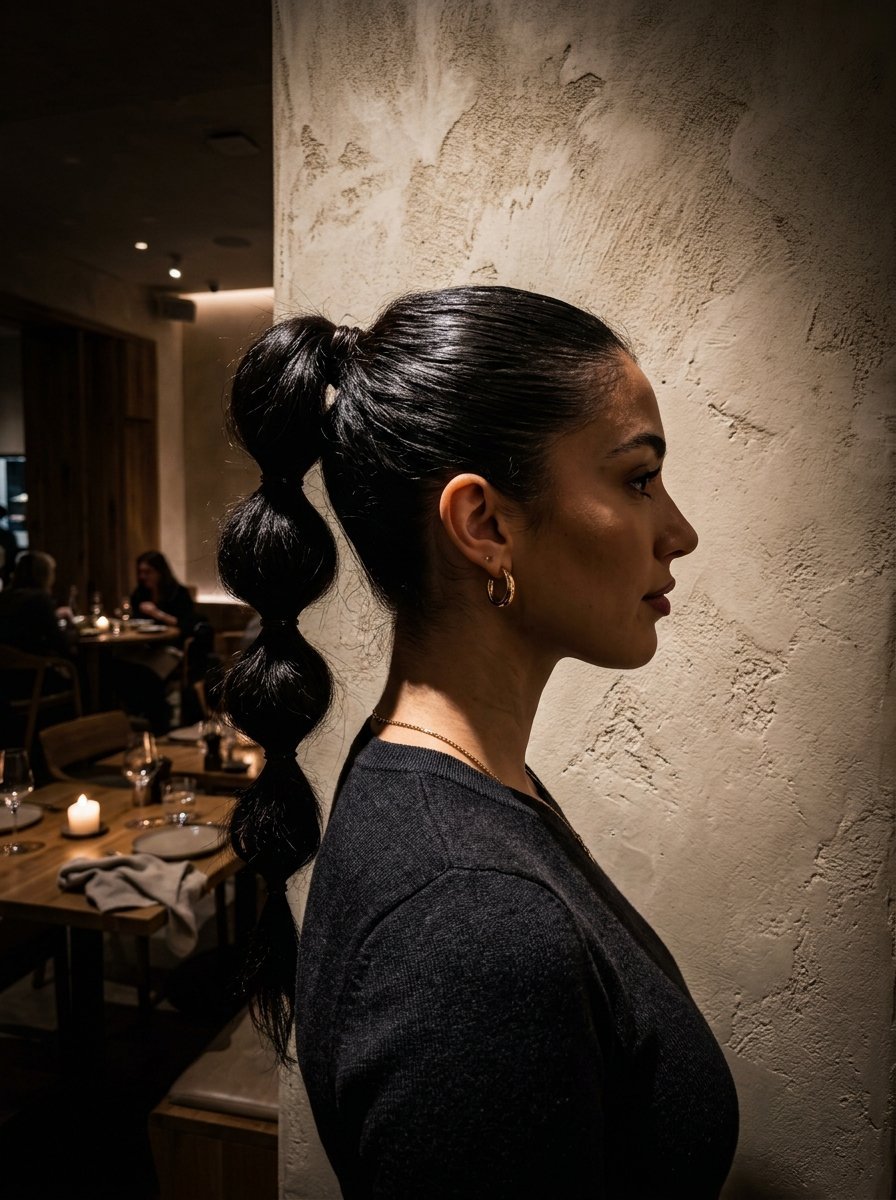
A youthful, high-energy updo that combines the sleekness of a high pony with the architectural interest of a structural bun.
I see this style trending heavily across social media because it photographs beautifully from the side profile. If you are planning to take photos at dinner, this is your best option.
- Prep Time: 5 minutes.
- Best For: Medium to long hair lengths.
- Key Tool: Got2b Glued Blasting Freeze Spray ($7).
Execution Steps
- Pull hair into a high ponytail right at the crown of your head.
- Place a second elastic band about three inches down the length of the ponytail.
- Push that second elastic upward toward the base, causing the hair between to bubble out.
- Repeat this process down the length if your hair is long enough, or pin the first bubble into a loop.
- Lock the bubble shapes in place with a firm freeze spray.
10. The Effortless Claw Clip Twist
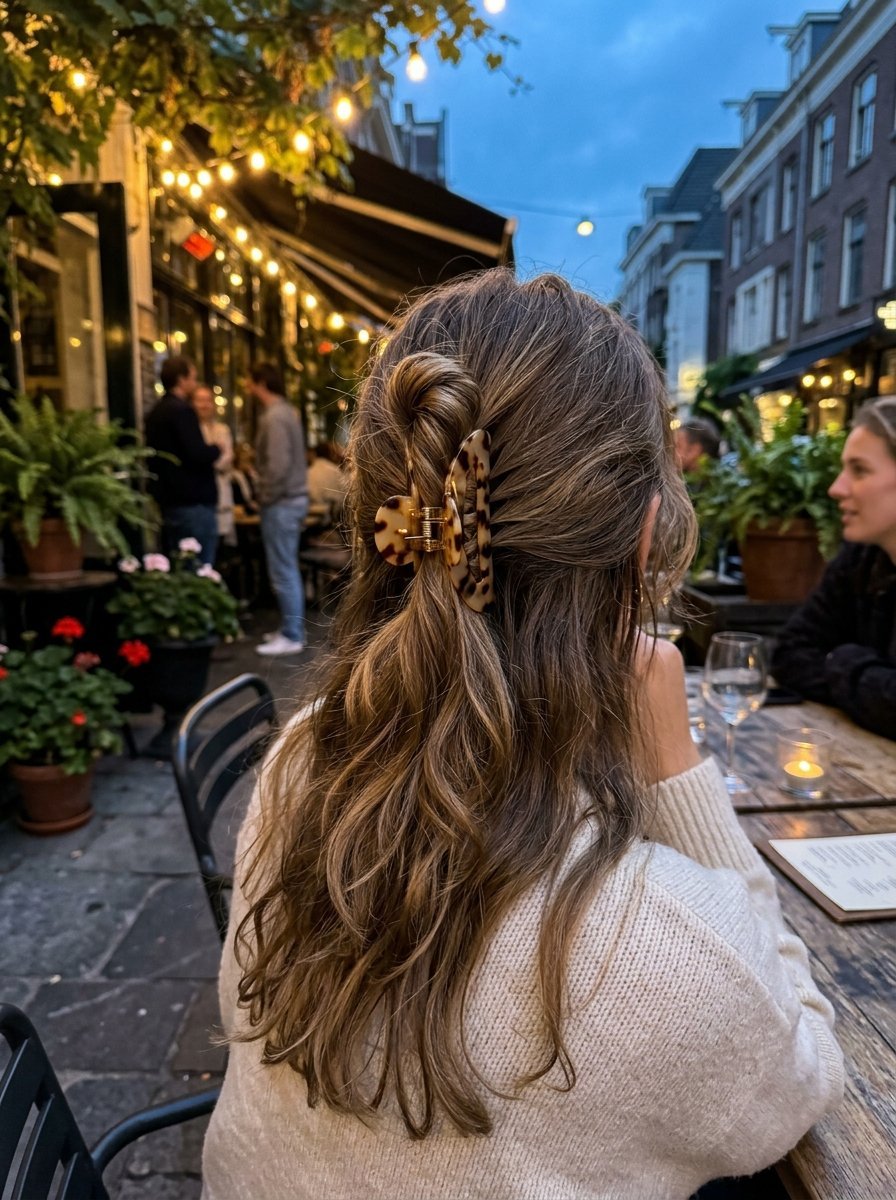
The fastest updo in existence, elevated for an evening out by choosing a premium metal or tortoiseshell clip instead of a cheap plastic one.
This is the ultimate low-effort style that still looks incredibly intentional. In my experience, using a claw clip with flat teeth rather than rounded ones ensures it stays clamped tight while you are sitting in high-backed dining chairs.
- Prep Time: 2 minutes.
- Best For: Medium length hair with fine to medium thickness.
- Key Tool: Kovess Large Metal Claw Clip ($12).
Execution Steps
- Gather hair at the nape of your neck into a low ponytail hold.
- Twist the length upward until it forms a tight column against the back of your head.
- Fold any excess length down if your hair goes past your shoulders.
- Clamp your heavy-duty claw clip over the middle section of the twist, securing it to the scalp hair.
- Let the top ends cascade naturally over the top of the clip.
11. The Twisted Low Crown
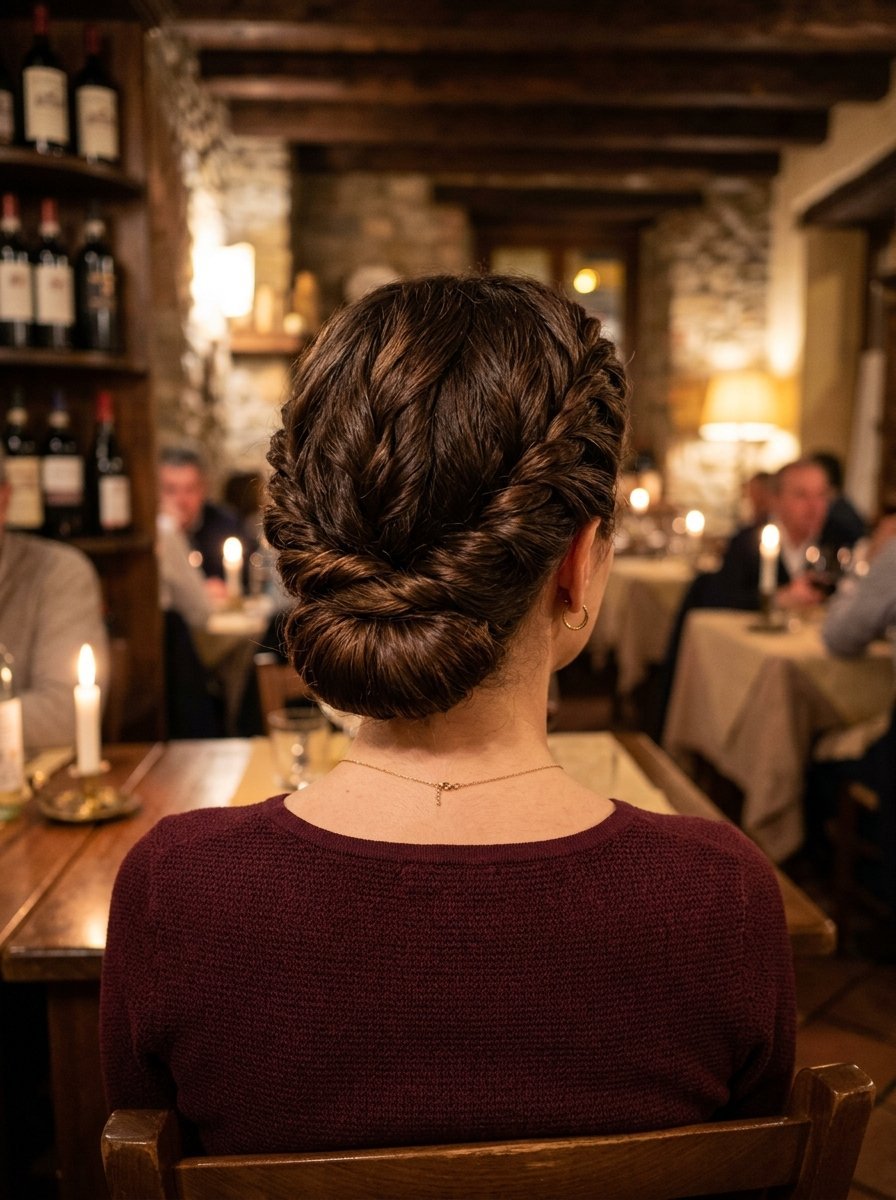
A soft, romantic look where two side twists meet in the back, rolling up into an elegant, horizontal bun along the neckline.
This style is perfect if you struggle with braiding. Twisting is much more forgiving and creates a thicker, more dimensional look on fine hair textures.
- Prep Time: 6 minutes.
- Best For: Short-to-medium lengths or layered hair.
- Key Tool: Bobby pins matching your hair color exactly.
Execution Steps
- Take a two-inch section of hair above your left ear and twist it tightly backward.
- Secure it temporarily in the middle of your head with a clip.
- Repeat the twist on the right side.
- Join both twists in the back with a small clear elastic.
- Flip the remaining hair up and through the space above the elastic loop, rolling it into a compact horizontal cushion.
12. The Triple Tucked Ponytail
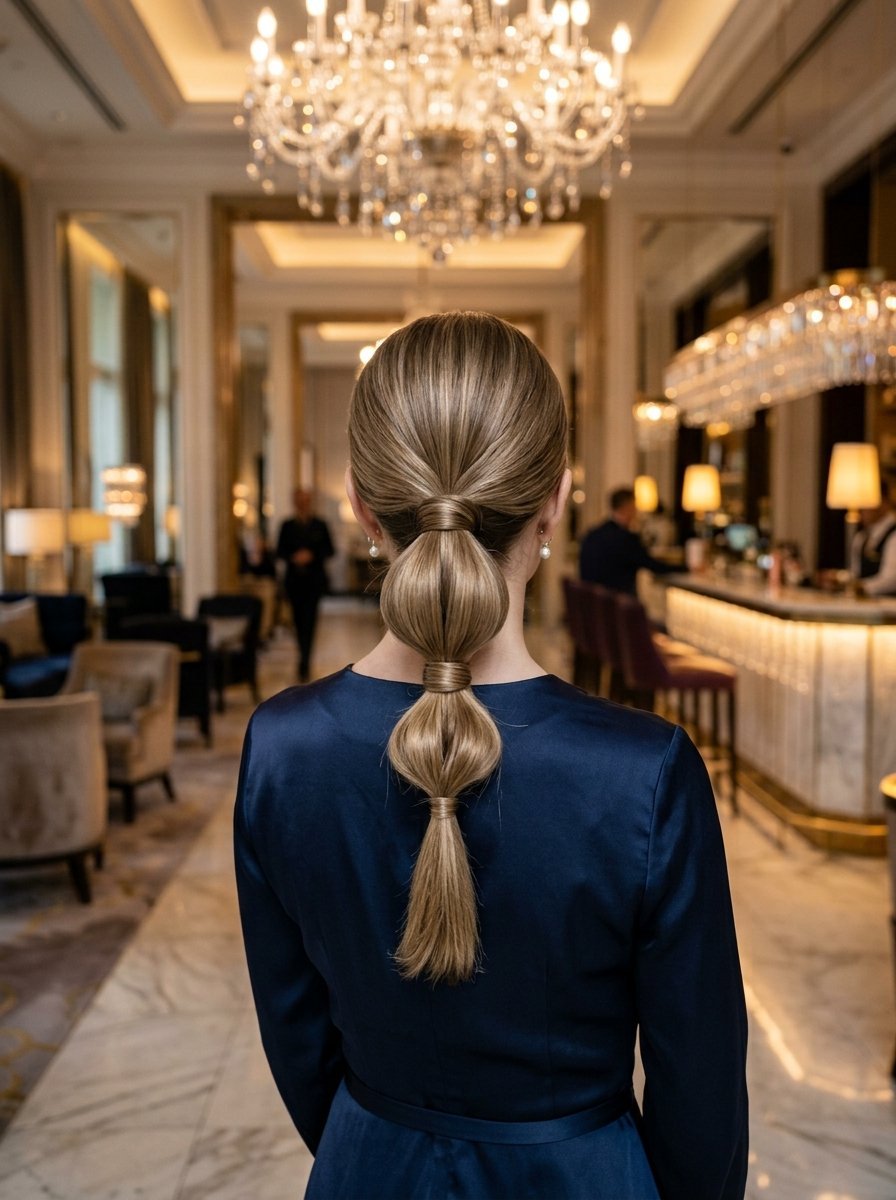
An ingenious construction where three small vertical ponytails are flipped inward to create a complex, woven look that looks like a high-end salon creation.
I used this method for a friend’s rehearsal dinner when her hair refused to hold a curl. It completely hides any split ends or dry texture within the flips themselves.
- Prep Time: 8 minutes.
- Best For: Medium to long hair.
- Key Tool: Elastic loop topsy-tail tool ($4).
Execution Steps
- Section hair horizontally into three equal parts: top, middle, and bottom.
- Tie the top section into a standard ponytail.
- Loop the ponytail up and push it down behind its own elastic tie.
- Gather the tails of the first section into the middle section and tie a second ponytail.
- Flip that second ponytail inward just like the first.
- Repeat the process with the final lowest section at the base of the neck.
13. The Pineapple Updo for Natural Curls
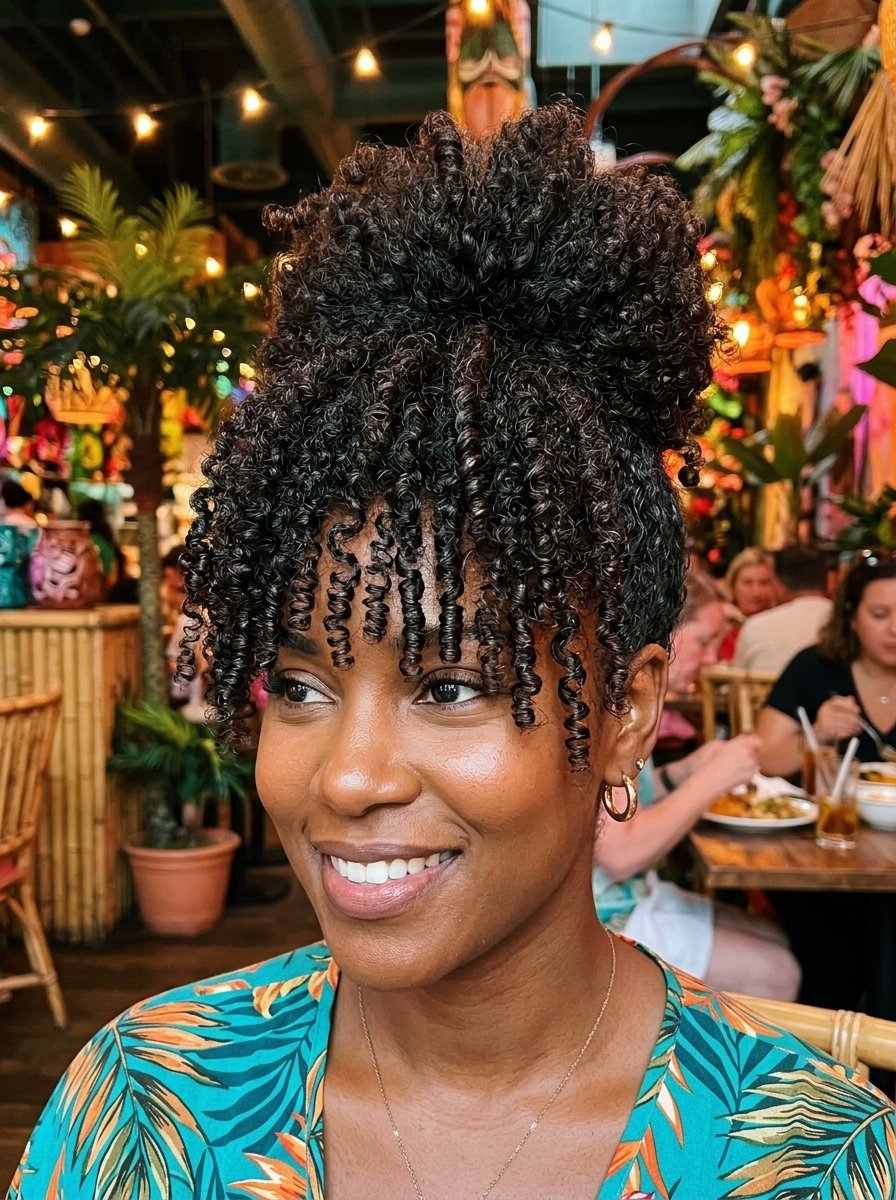
A gorgeous, high-volume style that showcases natural coil texture while keeping hair elegantly off your neck and face for dining comfort.
This look relies entirely on preserving your natural curl pattern. I have found that using a silk or satin scrunchie prevents the curls from flattening out or frizzing at the base during the evening.
- Prep Time: 4 minutes.
- Best For: Type 3 and Type 4 curly/coily hair.
- Key Tool: Slip Silk Scrunchies ($39 for a pack of three).
Execution Steps
- Flip your head forward completely.
- Gather curls loosely at the very front of your hairline, near your forehead.
- Loop a silk scrunchie around the base once or twice, keeping it deliberately loose to avoid crushing patterns.
- Let the curls pine-apple forward, cascading over your eyes and brow line naturally.
- Use a tiny drop of hair oil on your fingertips to separate any tangled ends.
14. The Sleek High Ballerina Bun
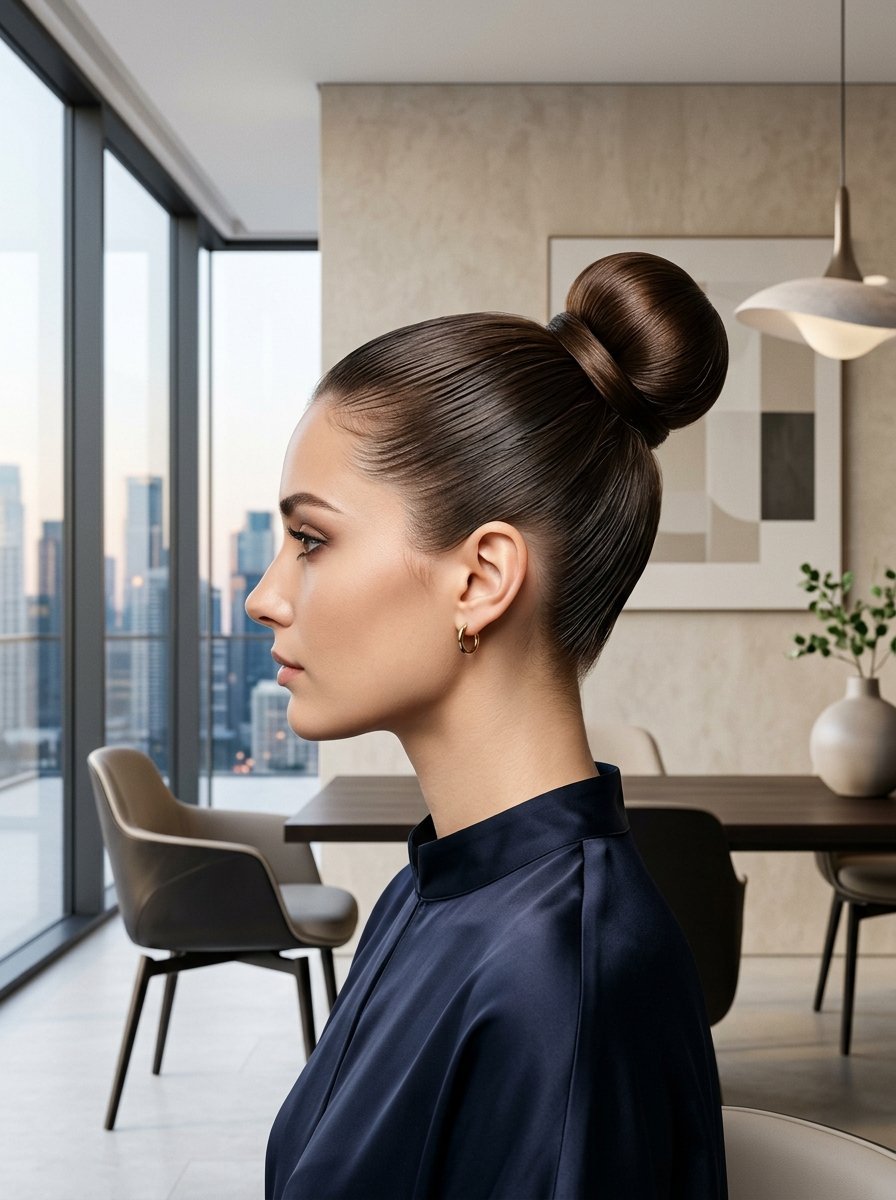
A timeless, high-altitude bun that looks completely smooth and round from every single angle. It gives an immediate structural elegance to any outfit.
To get that perfect circular symmetry, I highly recommend using a mesh bun donut. It acts as an internal blueprint, ensuring your bun doesn’t turn out lopsided or deflated halfway through dinner.
- Prep Time: 7 minutes.
- Best For: All hair types with medium to long lengths.
- Key Tool: Mesh Bun Donut Ring ($5).
Execution Steps
- Pull hair into a high, taut ponytail and secure with a sturdy band.
- Slide the mesh donut over the ponytail down to the base.
- Spread your hair evenly over the donut mesh until it is completely covered.
- Slide a second elastic band over the hair-covered donut to lock the shape.
- Tuck and pin the remaining loose ends around the perimeter of the bun.
15. The Half-Up Top Knot Fusion
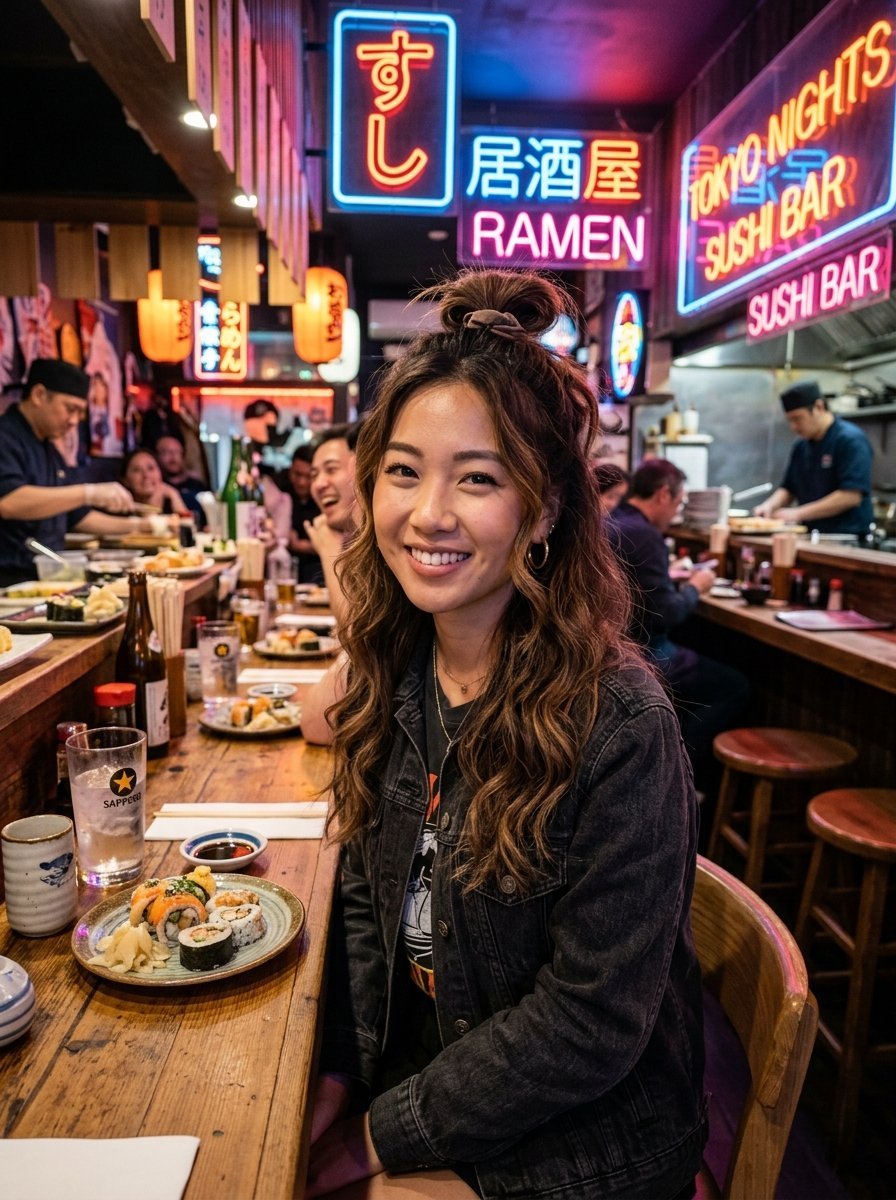
Perfect for when you cannot decide between wearing your hair down or putting it up. It keeps hair completely out of your eyes while letting your length show in the back.
I love this option for casual dinner dates at a local bistro. It offers a relaxed vibe while still looking styled and intentional.
- Prep Time: 5 minutes.
- Best For: Wavy or straight bob and lob lengths.
- Key Tool: Small clear elastics.
Execution Steps
- Section off the top third of your hair, starting from the arches of your eyebrows.
- Pull this top section into a high ponytail on top of your head.
- Twist that ponytail into a small, playful knot.
- Secure with three small pins around the base.
- Run a texturizing spray through the remaining loose hair below to give it a lived-in texture.
16. The Regal Braided Top Knot
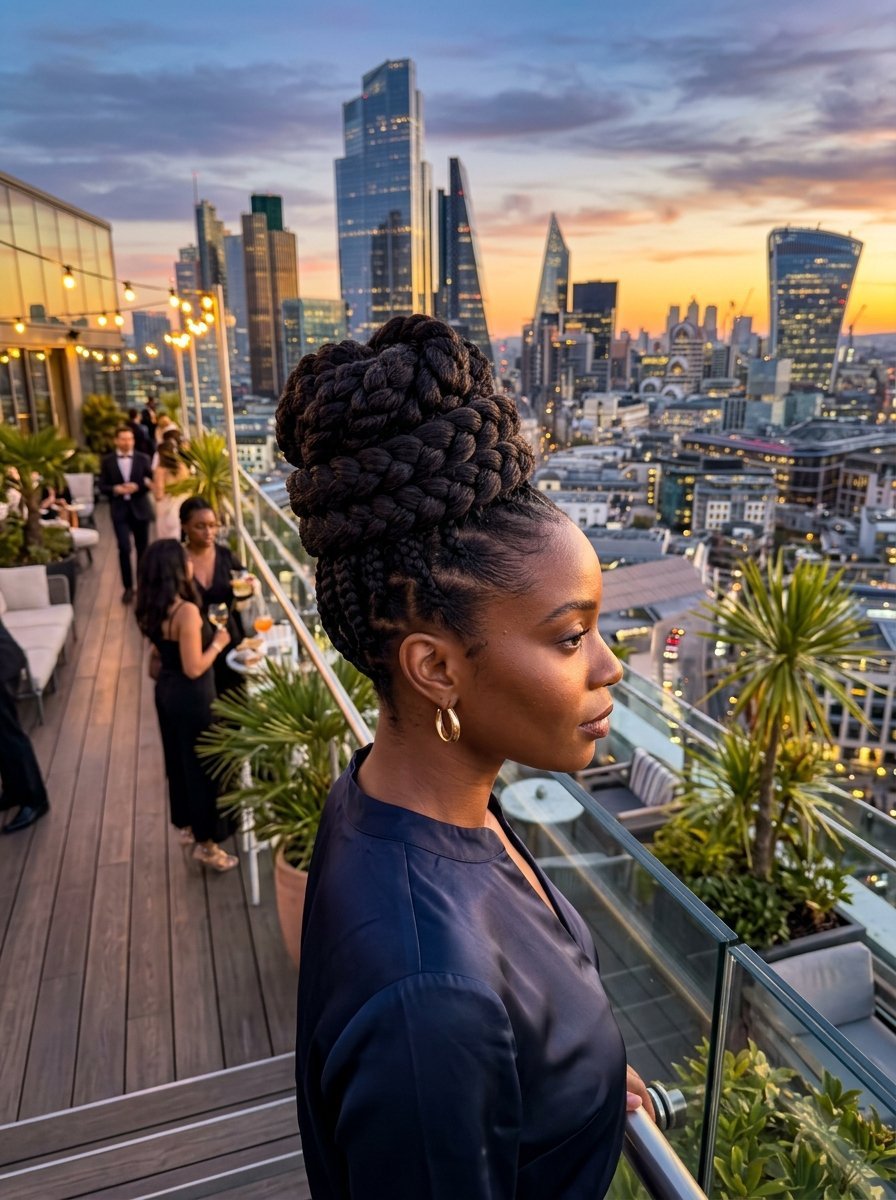
An architectural masterpiece that takes a simple high bun and encircles it with a thick, protective braid for maximum visual interest.
This style looks incredibly intricate but is highly functional. The surrounding braid acts as a shield, preventing shorter layers or flyaways from escaping throughout the night.
- Prep Time: 10 minutes.
- Best For: Thick, long hair.
- Key Tool: Firm-hold edge control gel.
Execution Steps
- Gather all hair into a high pony at the center crown.
- Separate the ponytail into two distinct sections: one large, one small.
- Twist the large section into a standard high bun and pin it down securely.
- Braid the smaller remaining section into a tight three-strand plait.
- Wrap that braid directly around the base of the bun, pinning it as you wrap.
17. The Side-Swept Romantic Bun
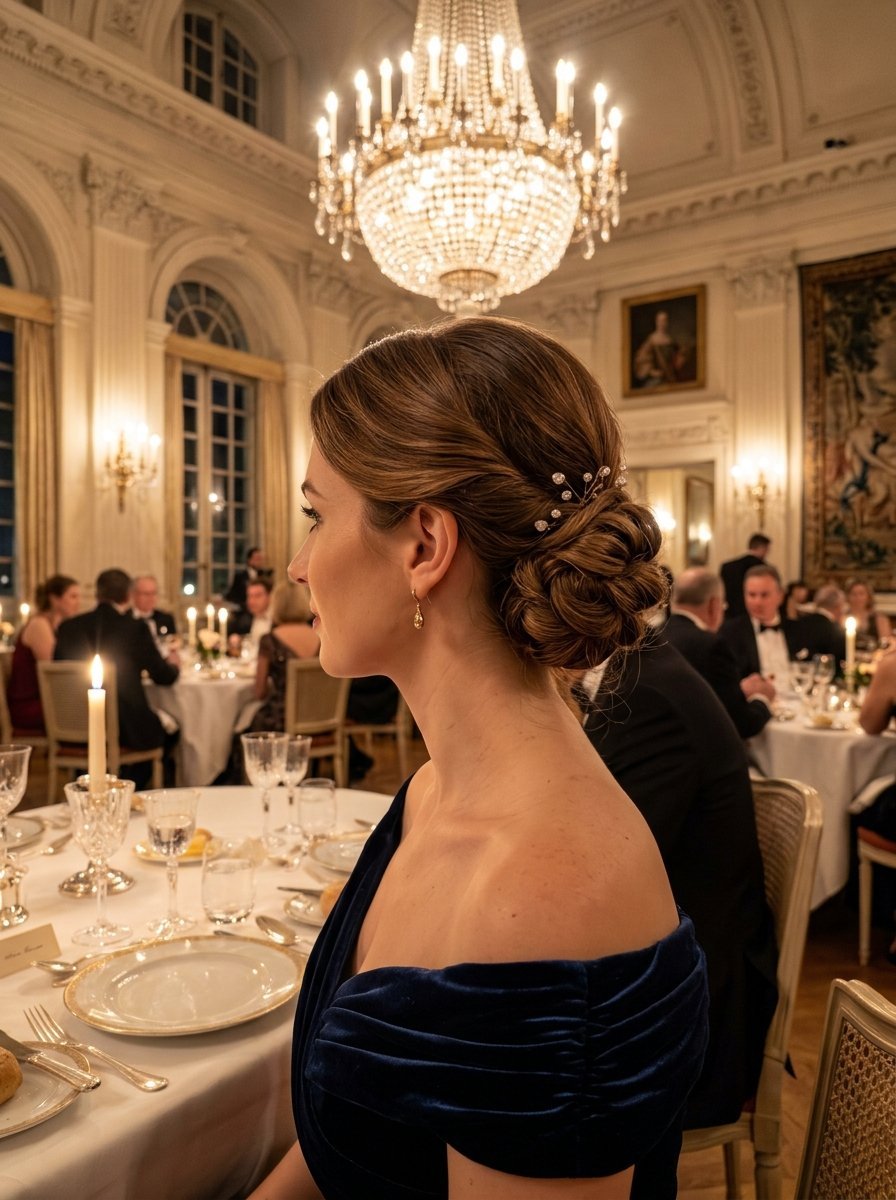
An asymmetrical approach that places a soft, detailed bun just below one ear, creating a beautiful silhouette in profile photos.
If you are wearing a dress with an asymmetrical neckline, always position the bun on the opposite side of the strap to balance your visual weight perfectly.
- Prep Time: 8 minutes.
- Best For: Medium to long hair with natural wave.
- Key Tool: Flexible hold hairspray.
Execution Steps
- Create a deep side part on your preferred side.
- Sweep all hair across the back of your head to the opposite side behind the ear.
- Secure into a low side ponytail.
- Braid the pony loosely, then coil it into a soft flat circle.
- Pin the edges flat to your scalp behind the earlobe.
18. The Modern Gibson Girl Roll
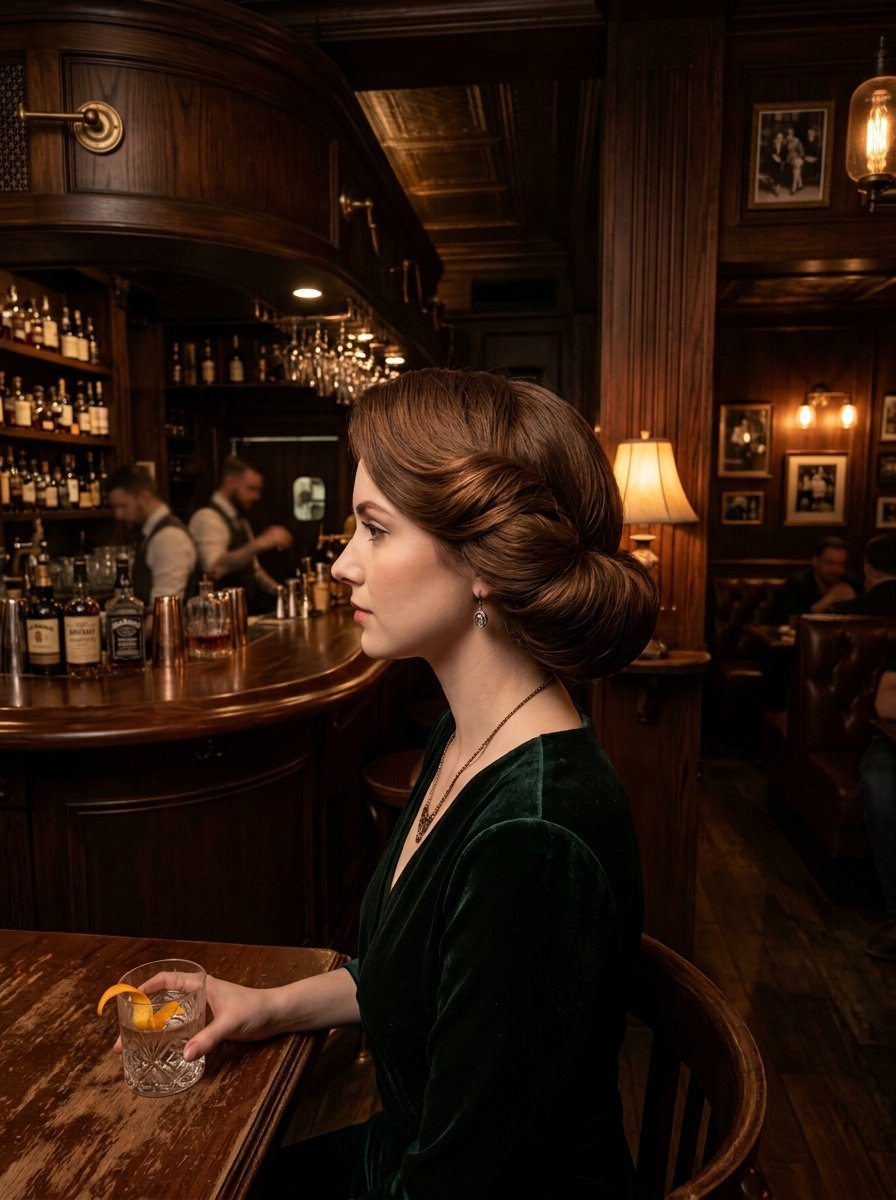
A vintage-inspired look that creates a continuous, pillowy roll of hair along the entire lower half of your head.
This look works best on hair that has been curled the day before. The residual bend makes rolling the hair into the pocket incredibly smooth and effortless.
- Prep Time: 7 minutes.
- Best For: Fine to medium textures.
- Key Tool: Elastic headband.
Execution Steps
- Place an elastic headband over the top of your hair, sitting low around your skull like a crown.
- Start from the front sides, tucking small sections of hair down and over the headband loop.
- Work your way toward the back, rolling the remaining lengths up and over the band until everything is tucked inside.
- Use bobby pins to reinforce the roll along the base of your skull.
19. The Knotted Low Buns
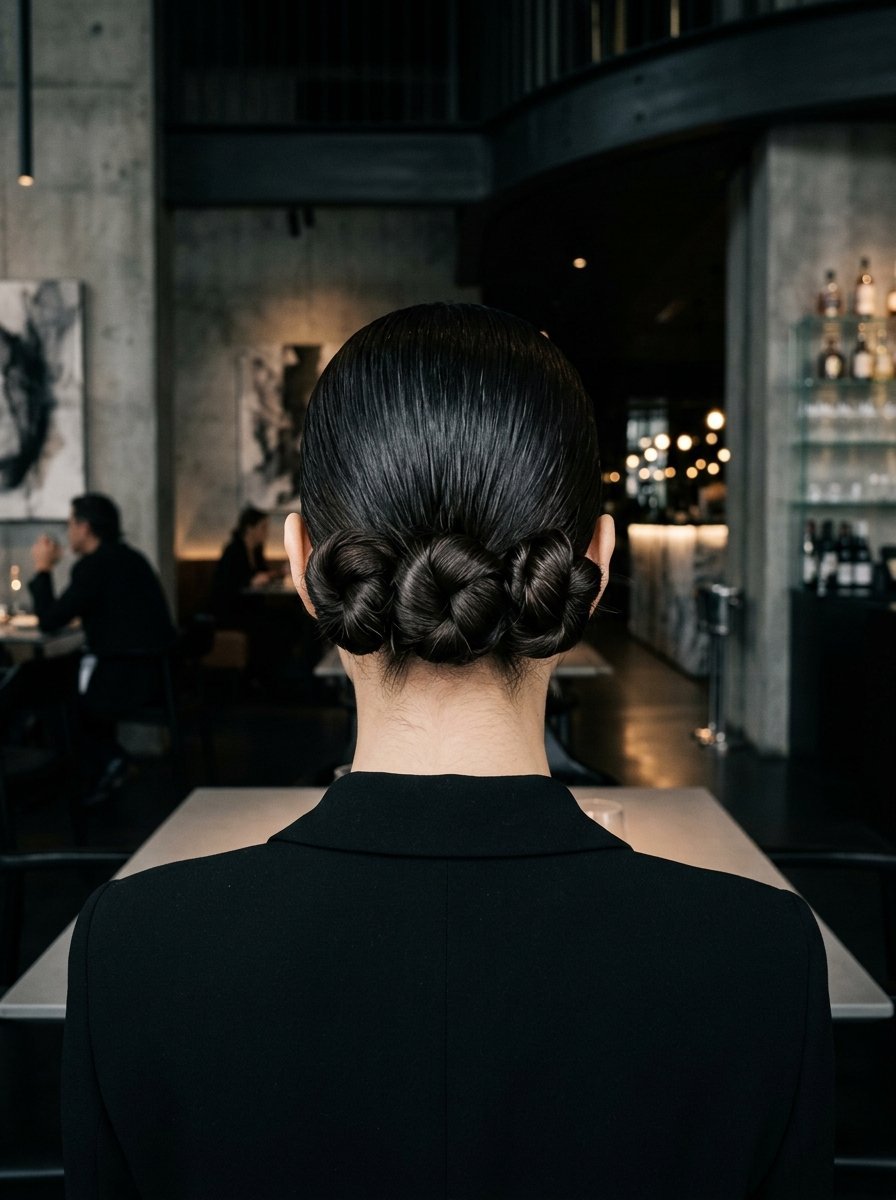
A creative alternative to the single chignon, featuring two or three small knots lined up horizontally at the nape of the neck.
I see this look frequently at modern art gallery openings and high-end restaurants. It gives off a very intentional, high-design vibe without requiring complex skills.
- Prep Time: 9 minutes.
- Best For: Medium lengths or layered hair.
- Key Tool: Small elastics.
Execution Steps
- Divide hair vertically down the back into two or three equal sections.
- Tie each section into a small low ponytail right next to each other.
- Twist each individual ponytail into a tight, compact knot.
- Pin each knot down with two pins, creating a neat horizontal row of mini buns.
20. The High-Volume Messy Shag Updo
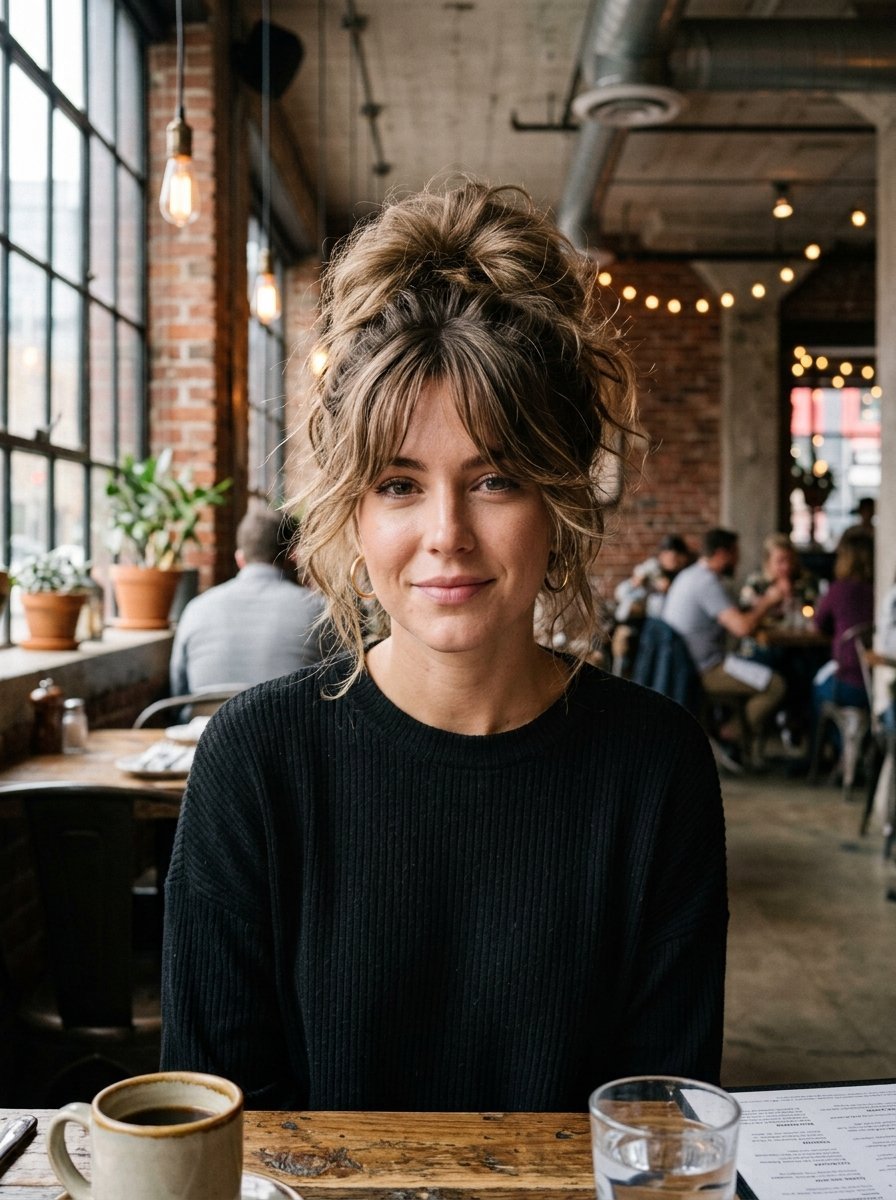
The perfect updo choice if you have a modern shag or curtain bangs. It celebrates layers rather than trying to paste them down flat.
I love this look because it gets better as the night goes on. If a few layers slip out while you are chatting over drinks, it simply adds to the lived-in, effortless aesthetic.
- Prep Time: 6 minutes.
- Best For: Layered cuts, shags, and bangs.
- Key Tool: Volumizing dry shampoo texture paste.
Execution Steps
- Apply a small amount of texture paste to your roots for structural grip.
- Gather your hair into a high, messy pile at the crown, leaving your bangs completely free in front.
- Secure with an elastic, allowing shorter layers to fall out along the sides naturally.
- Loop the remaining length into a loose, messy pile and pin roughly.
- Style your face-framing bangs with a round brush or straightener to finish.
21. The Scarf-Interwoven Low Bun
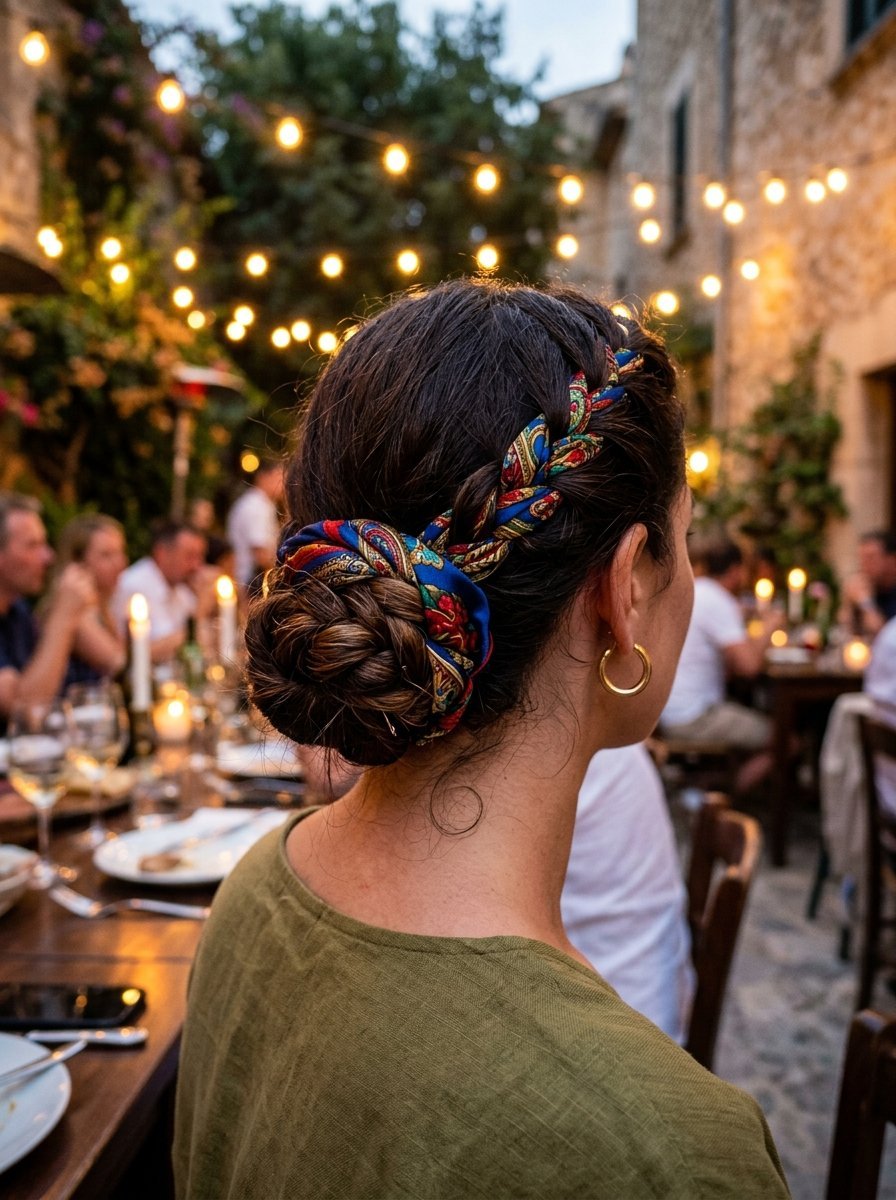
An incredibly chic way to dress up an updo by incorporating a silk square scarf directly into the structure of your hair braid.
This is a fantastic strategy if you want your hair to match your outfit perfectly. Simply select a silk scarf that shares colors with your dress or blouse.
- Prep Time: 8 minutes.
- Best For: Medium to long hair.
- Key Tool: A small silk square scarf.
Execution Steps
- Tie your hair into a low ponytail with a standard elastic tie.
- Loop your silk scarf through the elastic band so it hangs down evenly with your hair strands.
- Divide your hair into two sections, using the scarf ends as the third section.
- Braid the hair and scarf together down to the ends and secure with a clear tie.
- Twist that colorful braid into a low bun and pin securely to hide the ends.
22. The Sleek Low Loop
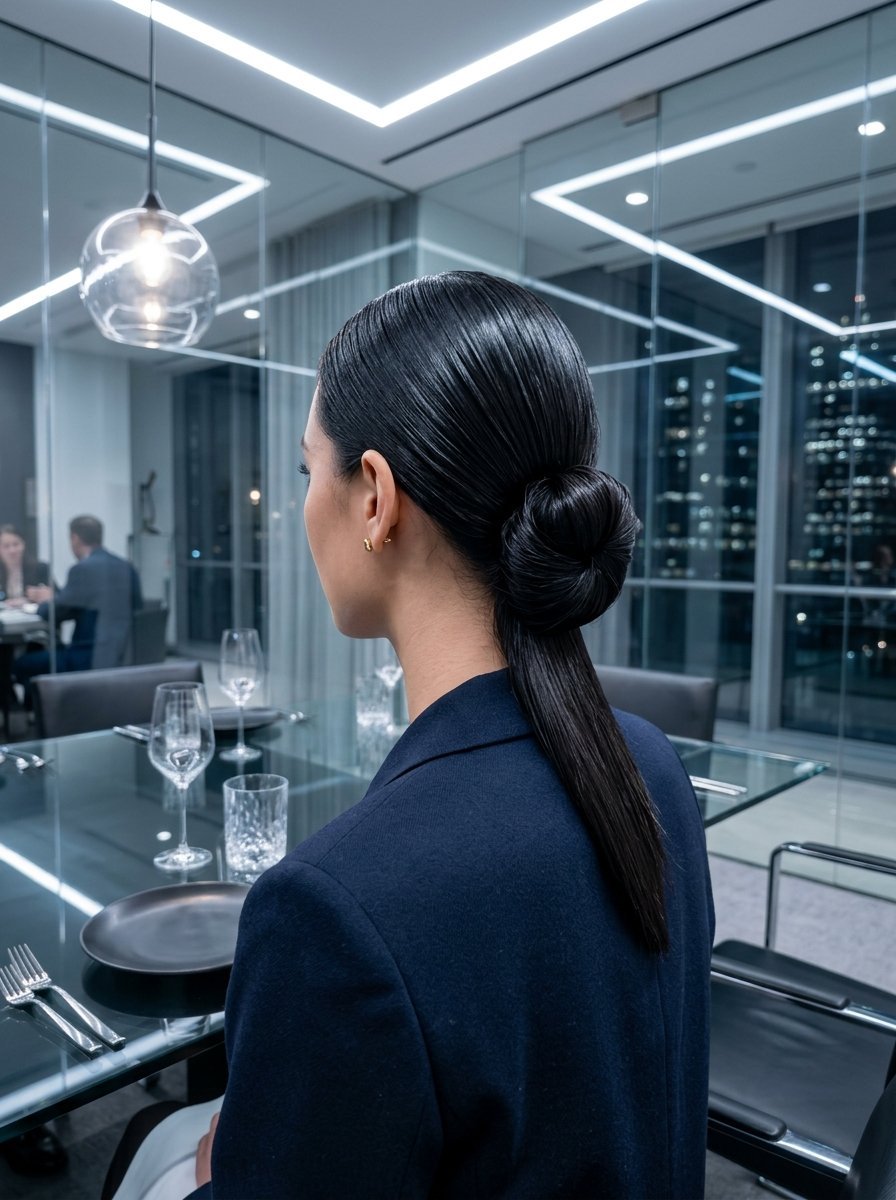
A minimalist, high-fashion updo that takes seconds but looks incredibly clean and modern. It features a sharp drop loop rather than a round bun.
This look is highly favored in corporate dinners or modern dining spaces. It works best when your hair has a glassy, reflective surface sheen.
- Prep Time: 3 minutes.
- Best For: Long, straight hair.
- Key Tool: Color Wow Extra Mist-ical Shine Spray ($29).
Execution Steps
- Comb hair down smoothly into a tight low ponytail at the center nape.
- On the final loop of your elastic band, only pull the hair halfway through.
- Leave the remaining ends pointing directly downward out of the loop base.
- Wrap a small strand of those loose ends around the elastic to cover it completely.
- Finish with a heavy mist of shine spray across the entire smooth surface.
23. The Fishtail Accent Bun
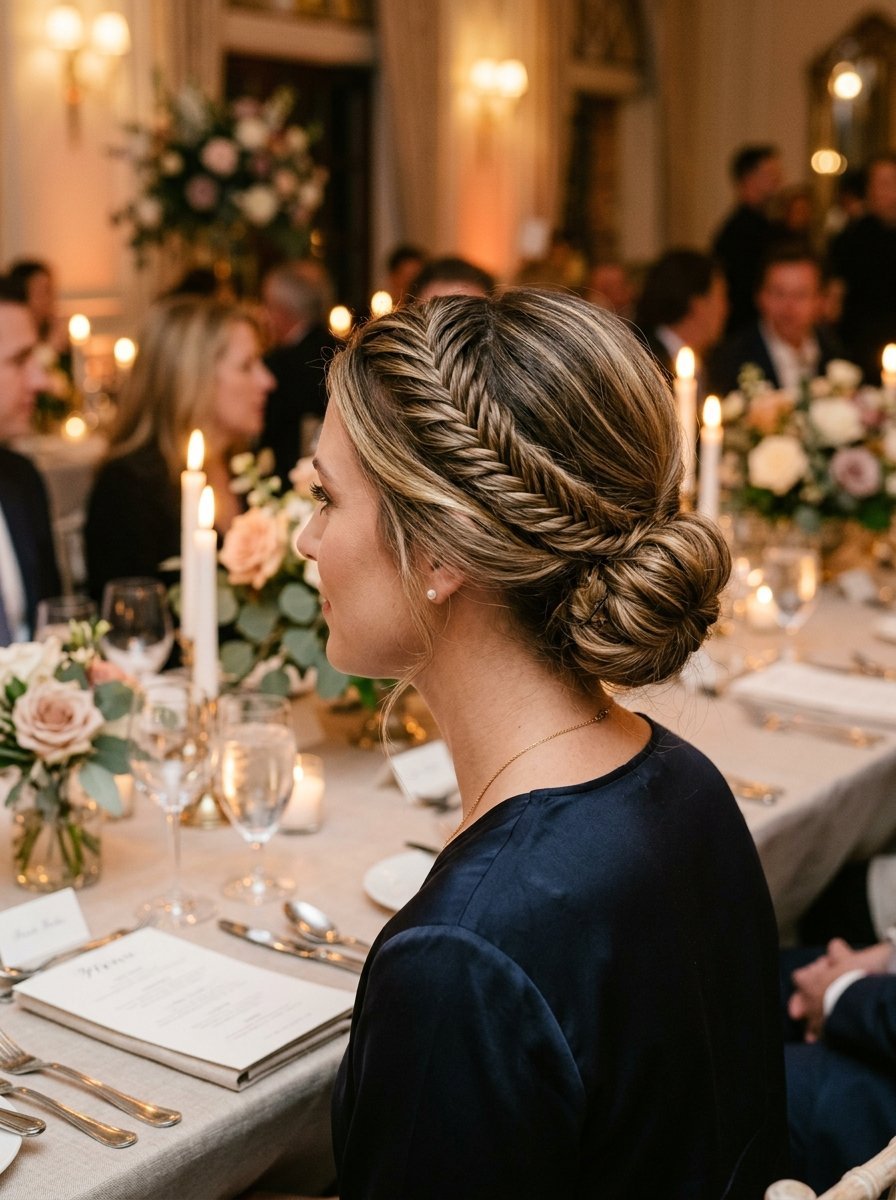
A classic low bun that is elevated by weaving a small, intricate fishtail braid along one side of the head before gathering everything together.
If you have highlighted hair, this style is magical. The weaving process of the fishtail braid highlights different tones and dimensions beautifully.
- Prep Time: 11 minutes.
- Best For: Long hair needing dimensional interest.
- Key Tool: Sectioning clips.
Execution Steps
- Separate a two-inch section of hair from your front part down to your ear on one side.
- Fishtail braid this section by crossing small outer strands over to the inside repeatedly.
- Pull the rest of your hair into a low bun at the back of your head.
- Drape the finished fishtail braid over the top of the bun, wrapping it around the base to hide your pins.
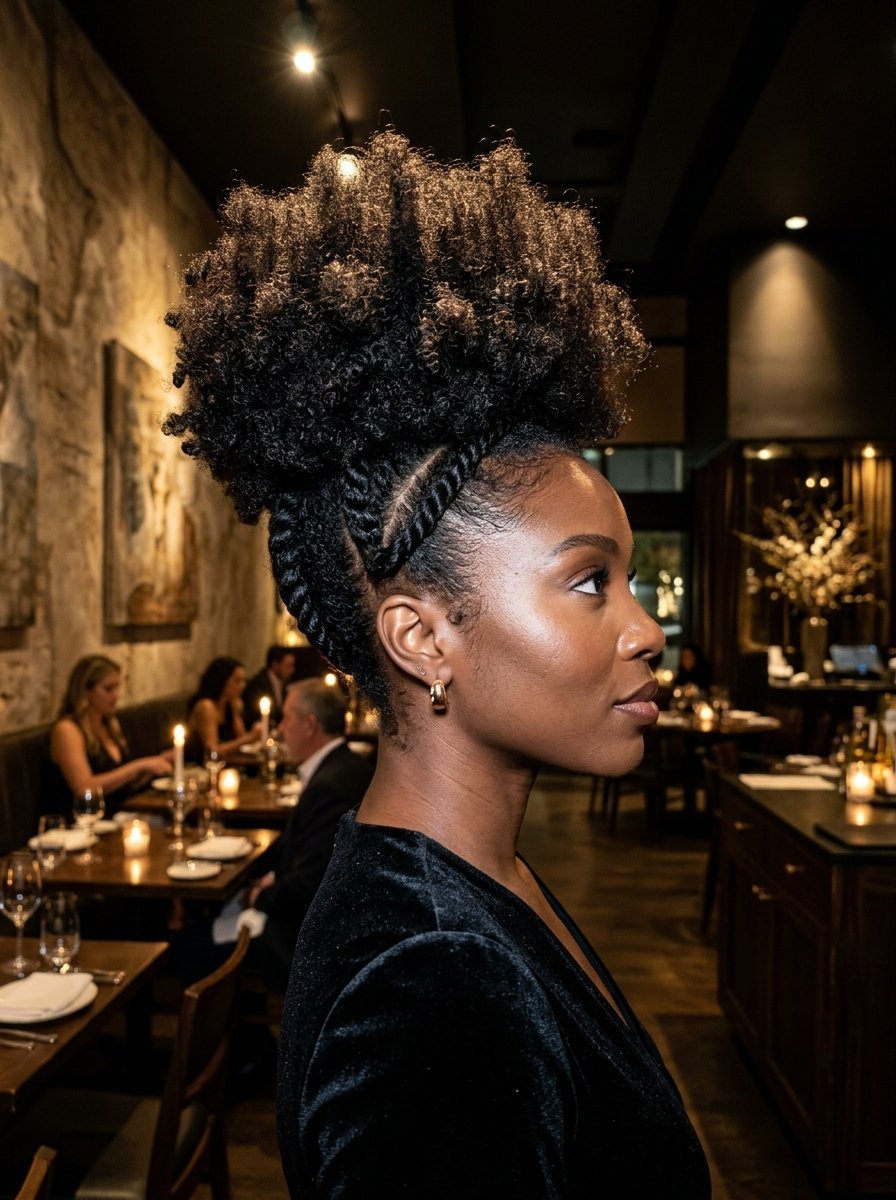
24. The Double Twisted High Puff
A striking, structural style for curly textures that uses two front twists to pull hair back into a towering, magnificent cloud of natural curls.
This updo offers an elegant frame for your face while ensuring your high-volume curls stay securely upward and do not fall forward into your food during dinner.
- Prep Time: 7 minutes.
- Best For: Thick curly or coily hair patterns.
- Key Tool: Wide elastic hair band or head band.
Execution Steps
- Create a clean center part just at the front two inches of your hairline.
- Twist each front side flat against your scalp moving backward toward the crown.
- Gather all remaining hair up into a very high puff using a wide, non-damaging elastic band.
- Pin the ends of your front twists directly into the base of the puff to integrate them seamlessly.
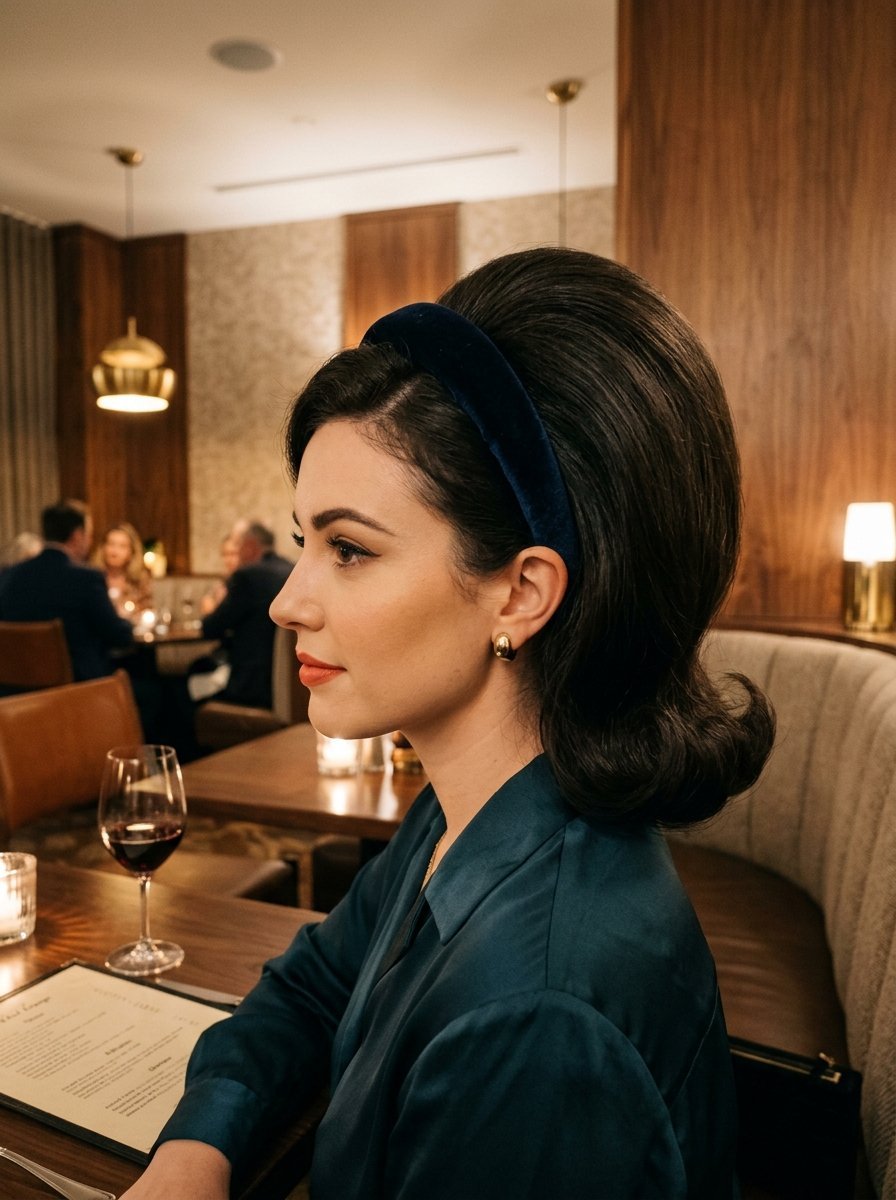
25. The Headband-Anchored Bouffant
A subtle nod to sixties glamour that uses a thick headband to push hair back, creating a flattering lift and volume at the back crown.
This is my savior when my front hairline is looking flat or uneven. The headband instantly hides any hairline issues while the back remains piled high and elegant.
- Prep Time: 6 minutes.
- Best For: Fine or medium hair wanting retro volume.
- Key Tool: Thick fabric padded headband ($15).
Execution Steps
- Backcomb the hair at your crown heavily to create a solid cushion of volume.
- Gather the hair below the cushion into a soft, loose French twist or low bun.
- Slide your padded headband onto your head, pushing it back about two inches from your hairline.
- Gently push the headband forward slightly to accentuate the crown volume lift behind it.
Comprehensive Updo Tool Comparison
Choosing the correct tool determines whether your updo lasts through dinner or falls apart in the car ride over. The table below breaks down the exact performance metrics of primary anchoring tools based on real lifestyle testing.
| Tool Name | Hold Strength | Best Hair Texture | Invisible Factor | Reusability |
| Standard Bobby Pin | Medium | Medium to Thick | High (if matched correctly) | Medium (spring stretches out) |
| U-Shaped Hair Pin | Light to Medium | Wavy, Curly, Coarse | Very High | High (infinitely reshapeable) |
| Clear Plastic Elastic | Very High | Fine, Thin, Silky | High | Low (single use only) |
| Silk Fabric Scrunchie | Light | Textured, Fragile, Coily | Low (meant to be seen) | High (washable) |
| Metal Claw Clip | High | Fine to Medium | Low (architectural statement) | Extremely High |
Troubleshooting Guide for Sticky Situations
Even with perfect execution, hair can behave unpredictably. Here is how to fix common updo emergencies on the fly without restarting from scratch.
Problem: The Bun Feels Loose and Heavy
- Why it happens: You anchored the pins only into the outer loop of the bun rather than hooking them into the structural base ponytail flat against your scalp.
- The swift fix: Take a large three-inch bobby pin. Catch a small loop of hair from the very edge of your bun, flip the pin inward toward the center, and push it straight down against your scalp bone.
Problem: Short Layers Are Popping Out Everywhere
- Why it happens: Your hair has hidden layers that are too short to complete the full circumference of the twist or bun rotation.
- The swift fix: Do not try to force them back down with heavy spray, which creates a crunchy look. Instead, use a clear brow gel wand or a dedicated mascara-style flyaway stick to paint them flat along the surface of the updo.
Frequently Asked Questions
How do I make my updo stay secure if my hair is freshly washed and silky?
Freshly washed hair lacks the necessary friction to hold pins in place. To fix this instantly, mist your hair from roots to ends with a dry shampoo or a sea salt spray before styling. This coats the strands in microscopic particles that give bobby pins a textured surface to clamp onto securely.
Will these updos cause headaches during a long multi-course dinner?
Updo headaches happen when too much hair weight pulls continuously on a single localized section of scalp nerves. To prevent this, always distribute your styling weight. Opt for low buns or perimeter styles like the Braided Halo Updo, which spread hair weight evenly along the base of your skull rather than pulling from the crown.
How can I make a basic claw clip look formal enough for a luxury restaurant?
The secret lies entirely in the material construction of your clip. Swap out your casual plastic or neon claw clips for options made from high-shine gold plating, polished silver, or deep tortoiseshell acetate. Ensure your ends are smoothed with a touch of hair oil where they cascade out of the clamp.
What is the easiest way to remove an updo at night without breaking hair?
Never pull or yank at elastics and pins when you are tired after dinner. Start by feeling out and removing every single metal pin individually first. If you used clear plastic elastics, do not unravel them. Use a small pair of cuticle scissors to carefully snip the plastic band, which prevents stripping and snapping your hair cuticles.

Sarah Mitchell — Founder & Editor-in-Chief
Sarah Mitchell is the founder and editorial voice behind Hair Level Up. A licensed cosmetologist with more than 15 years of experience, she has styled A-list celebrities for editorial shoots and red carpets, with work featured in Vogue, Elle, and Harper’s Bazaar. Early in her career, she trained under the legendary hairstylist Oribe in New York, an apprenticeship that still shapes her editorial eye today. Sarah founded Hair Level Up in 2020 after one bad haircut convinced her that women deserved a destination that felt like a magazine, taught like a stylist, and inspired like an art gallery. She oversees every story from concept to publication, guided by a simple belief: a good story teaches you something, but a great one makes you feel beautiful while it does.