The Struggle for the Perfect Curly Half-Up Look
Natural curls often feel like they have a mind of their own. Last Saturday, I spent forty-five minutes trying to get my ringlets to cooperate for a brunch date. I tried a full ponytail, but it felt too heavy. I tried leaving it down, but the humidity turned my definition into a cloud of frizz. This is a common frustration for anyone with texture. We want to show off the bounce and volume without the hair constantly falling into our eyes.
Curly half-up hairstyles offer the best of both worlds. You get the security of an updo with the romantic feel of long, loose curls. In my experience, the secret lies in working with your natural pattern rather than fighting it. I have seen countless people try to slick down their curls into submission. This usually leads to breakage and flat roots. Instead, these fifteen styles embrace the chaos and turn it into a polished look.
Whether you have tight coils or soft waves, these ideas provide a framework for manageable, beautiful hair. I have tested these in various climates and on different hair days. Some work best for day-three curls, while others are perfect for a fresh wash day. Let’s look at how you can make your texture the star of the show.
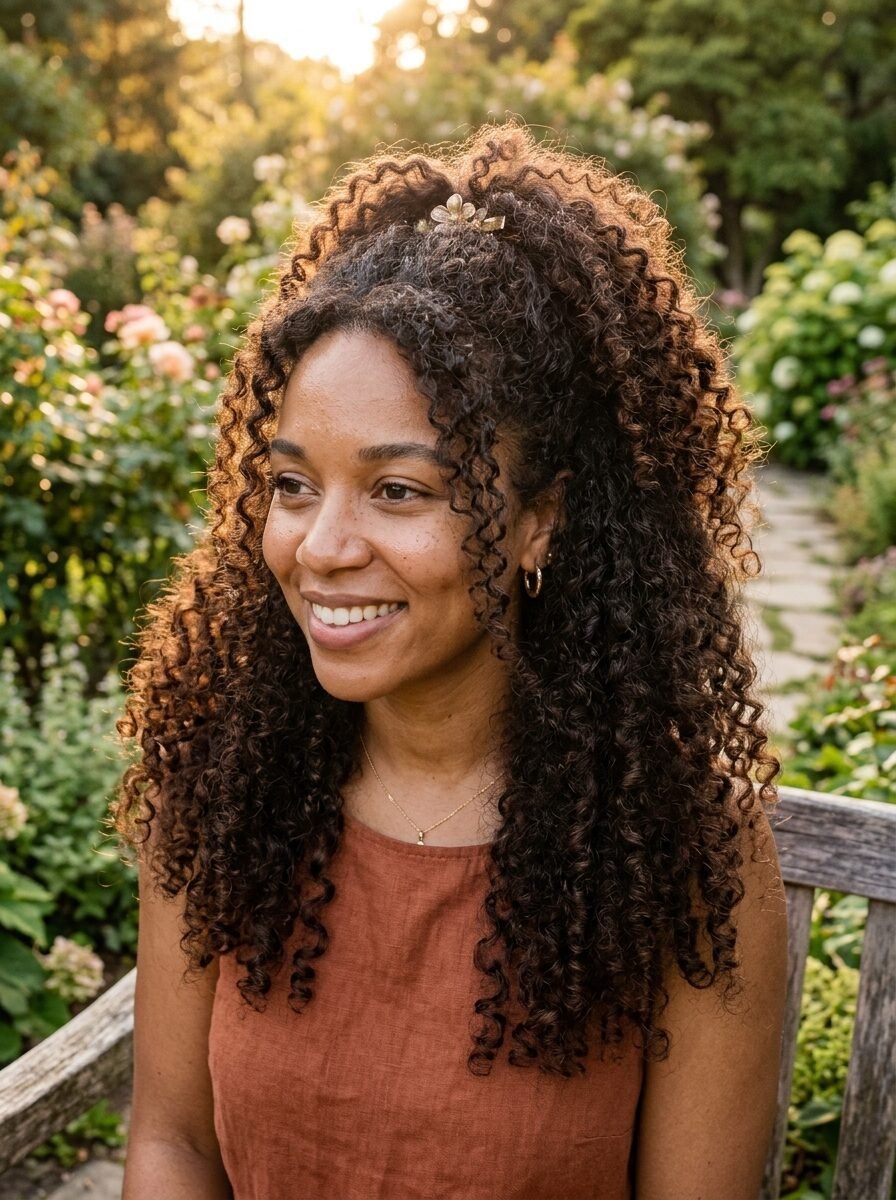
1. The High Pineapple Half-Pony
The pineapple technique is a staple in the curly community for sleeping. However, it makes an incredible daytime style too. I’ve noticed this works exceptionally well for those with type 3C or 4A curls who want maximum height. You gather the top section of your hair right at the crown. Use a silk scrunchie instead of a tight elastic. This prevents the “dent” that often ruins curl patterns.
When I tried this last summer in New Orleans, the height kept the hair off my neck while letting the back curls flow freely. It creates a silhouette that mimics a faux-hawk without the commitment. To keep the edges looking intentional, I suggest using a small amount of Pattern Beauty Edge Control. It stays put without getting crunchy. This style is a lifesaver when your roots feel a bit flat but your ends still have great definition.
2. Twisted Side Crown
This style is perfect for weddings or formal events where you want to look elegant but effortless. You take two small sections from the front and twist them back toward the center. In my experience, twisting away from the face opens up your features and highlights your cheekbones. Use small, clear elastics to secure the twists at the back.
I’ve seen this work beautifully on 2C waves. It adds structure to hair that might otherwise look messy. If you find your twists slipping, try spraying a bit of dry shampoo on the section before you start. This provides the grip needed for the hair to stay in place. I recommend the Batiste Volumizing Dry Shampoo for this. It adds a bit of grit without leaving a white residue on darker hair.
3. The Oversized Claw Clip Lift
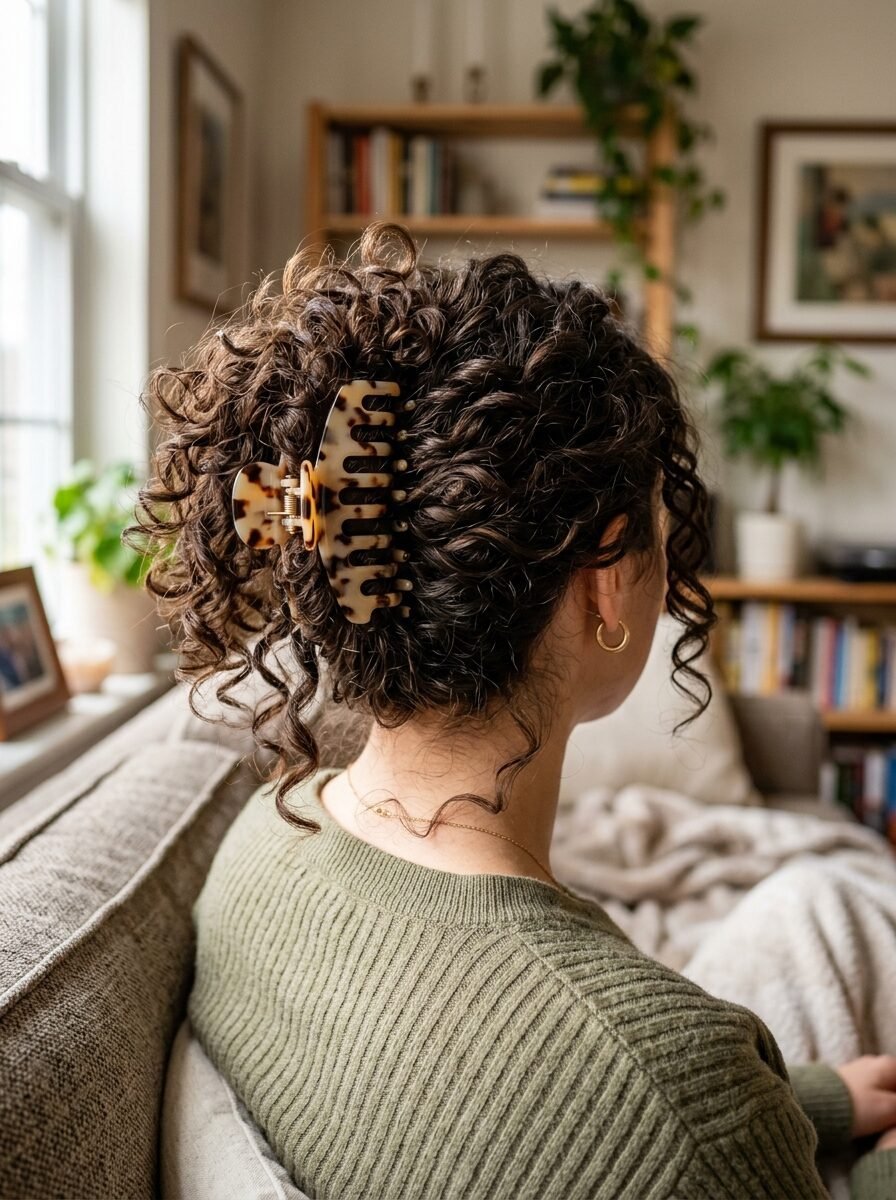
Claw clips are back in a big way. For curly hair, they are much better than hair ties because they don’t compress the curls. You gather the top half of your hair and pull it toward the back. Instead of twisting it tight, let it sit loosely and clamp a large clip right under the bulk of the hair. This pushes the top curls upward and outward.
I tried this recently using a Kitsch Jumbo Claw Clip. It held my thick hair all day without a single adjustment. The curls cascade over the clip, hiding it slightly and creating a fountain effect. This is my go-to for “lazy” hair days. It looks like you put in effort, but it takes less than thirty seconds. It is especially useful for those with long, heavy curls that usually lose volume by midday.
4. Double French Braid Half-Back
Braiding curly hair requires a different touch than straight hair. You don’t want to pull too tight, or you will lose the texture. Create two French braids starting from the hairline and stop right at the back of your head. Leave the rest of the hair to explode into curls. This creates a beautiful contrast between the structured braids and the wild texture.
In my experience, this style is the ultimate solution for windy days. It keeps the front sections secure so they don’t tangle. I’ve noticed that applying a light oil, like the Mielle Rosemary Mint Scalp & Hair Strengthening Oil, to your fingertips while braiding helps reduce frizz. It also makes the braids look shiny and healthy. This look is a favorite for music festivals or outdoor hikes.
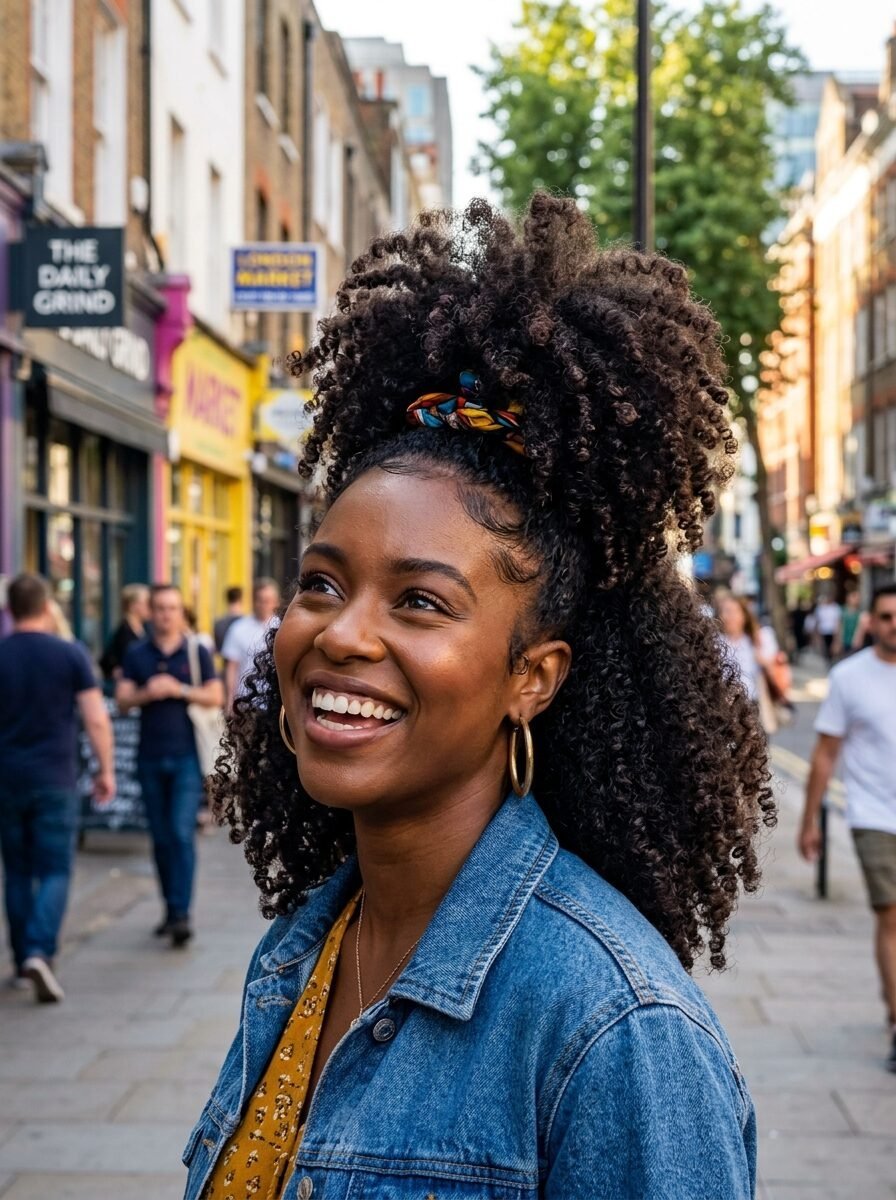
5. The Messy Top Knot with Tendrils
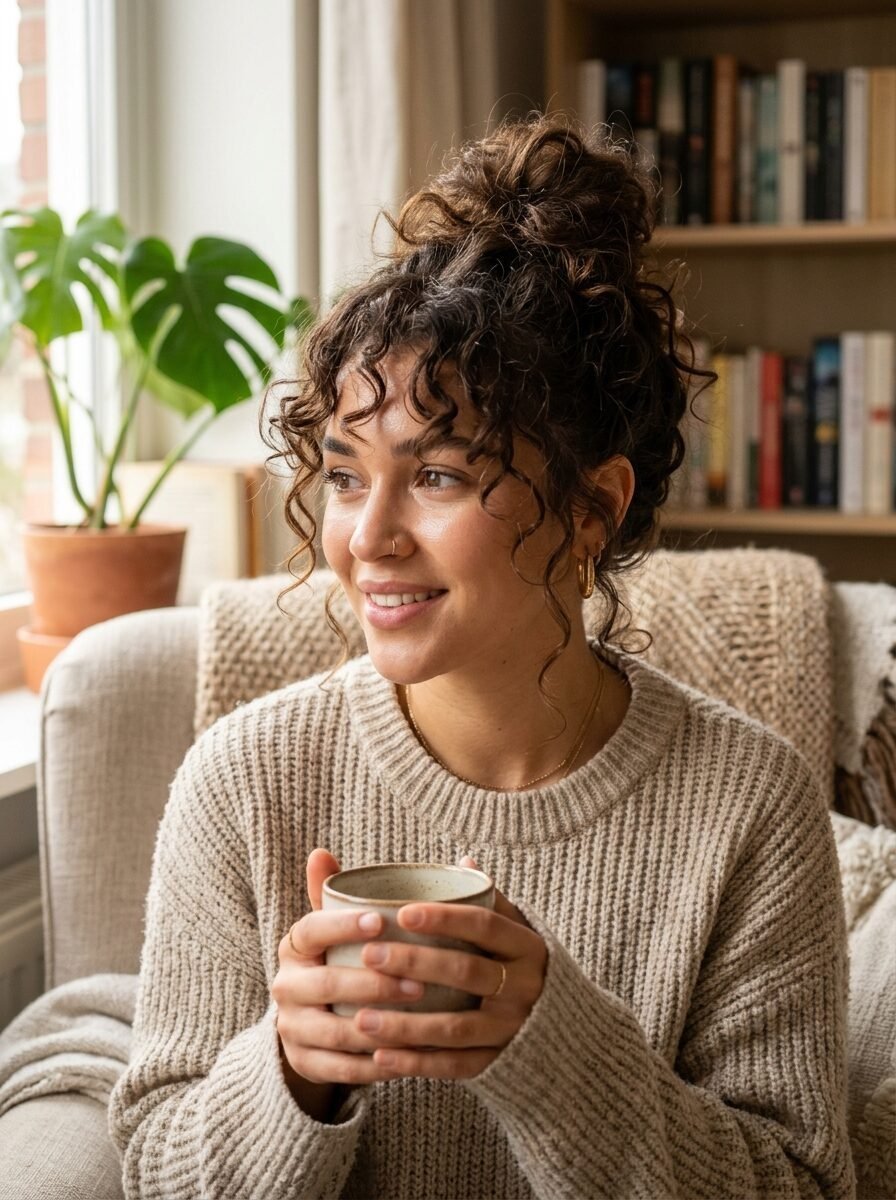
Sometimes you want a look that says “I just woke up like this,” even if you didn’t. Pull the top section of your hair into a loose bun at the very top of your head. The key is to let a few curls escape around your ears and forehead. These face-framing pieces soften the look and make it feel more romantic.
I’ve seen this work best on day-two hair when the curls have a bit more body. If the bun feels too small, gently tug on the loops to give it more volume. I often use a few U-shaped hair pins instead of an elastic for a more “airy” feel. It’s a great way to hide oily roots while still showing off your length.
6. Triple Twist Back Tucks
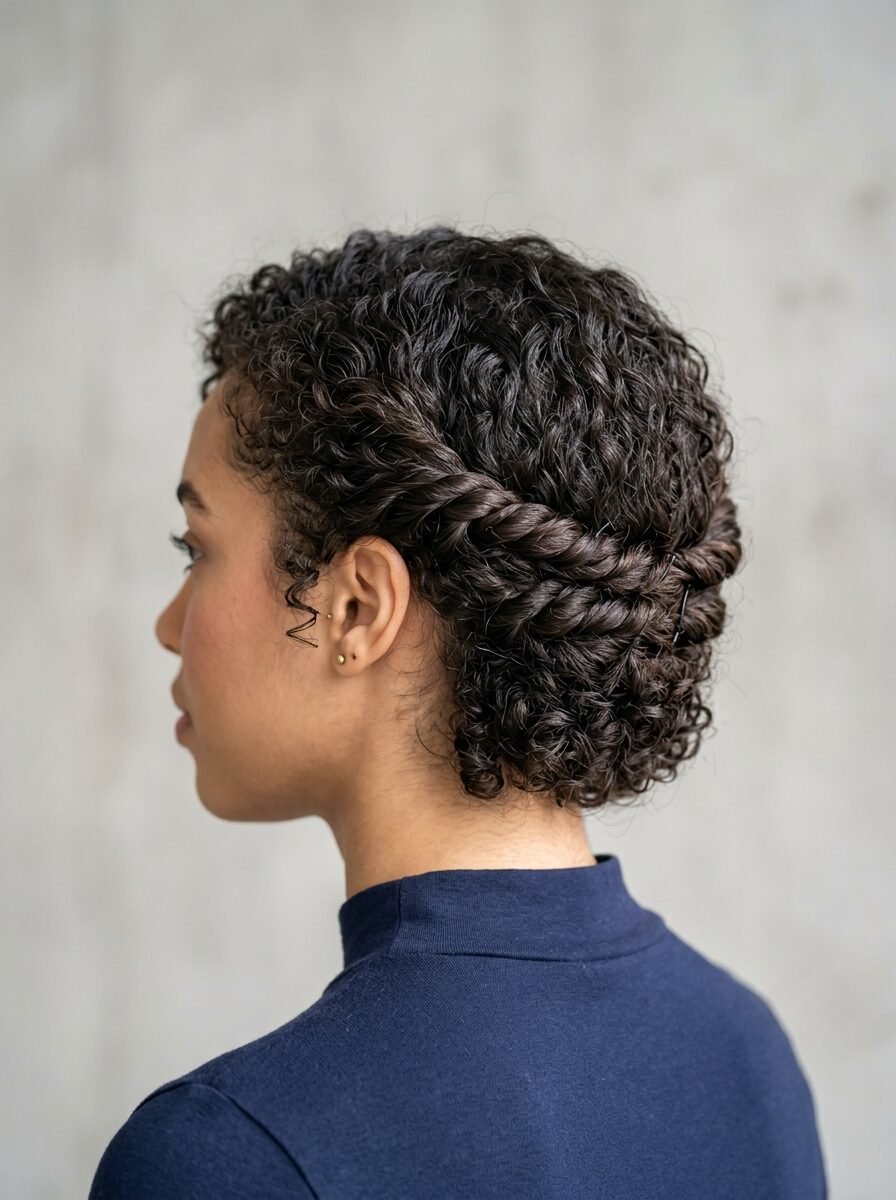
If you have shorter curly hair, like a bob or a lob, this is for you. Divide the top section into three mini sections. Twist each one back and pin them side-by-side at the back of your head. This creates a textured, tiered effect that looks much more complicated than it actually is.
When I first tried this, I made the mistake of using flat bobby pins. They just slid right out. I learned that crinkled bobby pins, like those from Diane, hold much better in curly hair. Make sure to cross two pins in an “X” shape for maximum security. This style keeps the hair away from your face while allowing your natural curl pattern to shine in the back.
7. The Ribbon Wrapped Half-Up
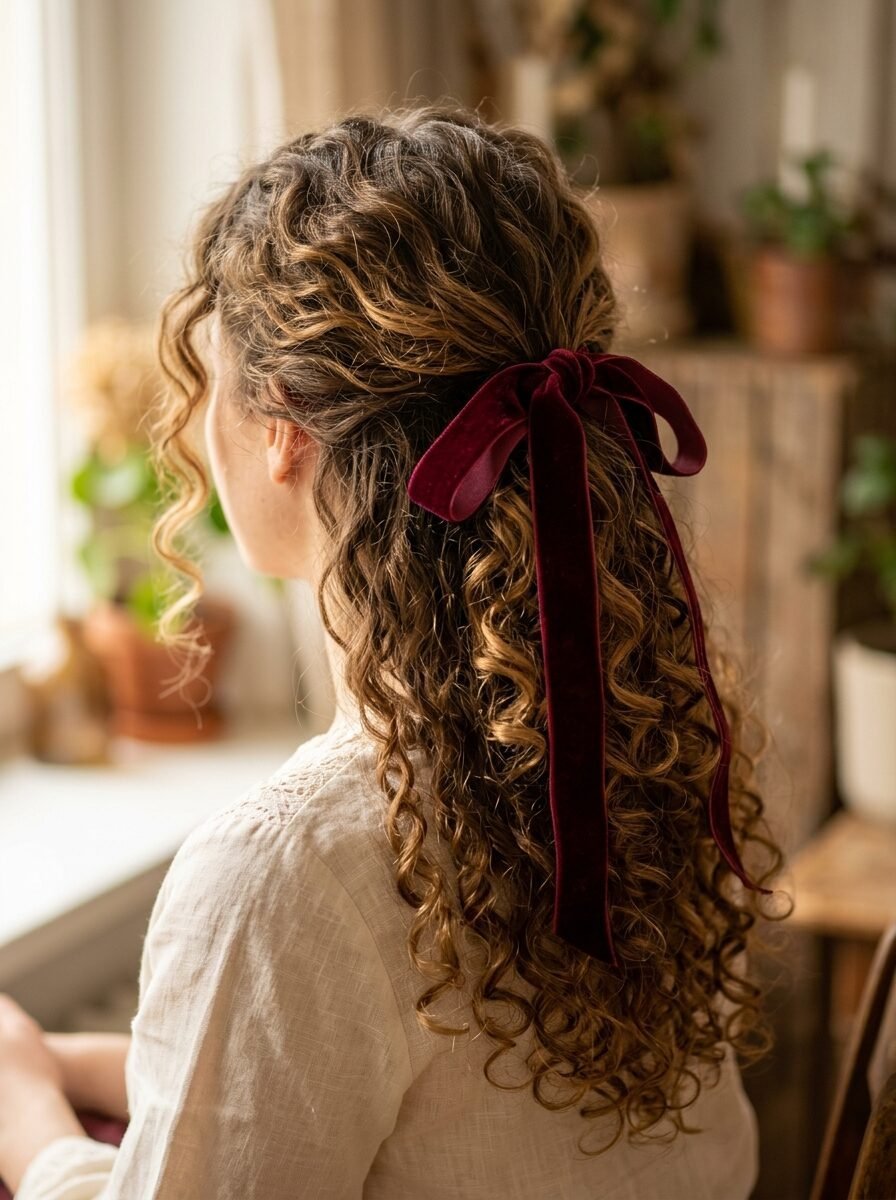
Adding an accessory can completely change the vibe of a hairstyle. Gather your hair into a standard half-pony and tie a long velvet or silk ribbon around the base. Let the ends of the ribbon mingle with your curls. It adds a touch of classic style to a modern look.
I noticed that silk ribbons are better for preventing tangles. Cotton ribbons can sometimes “grab” the hair and cause knots. I’ve seen this look great for holiday parties or family photos. It’s a simple way to elevate a basic style without needing any advanced skills.
8. Faux Hawk Curls
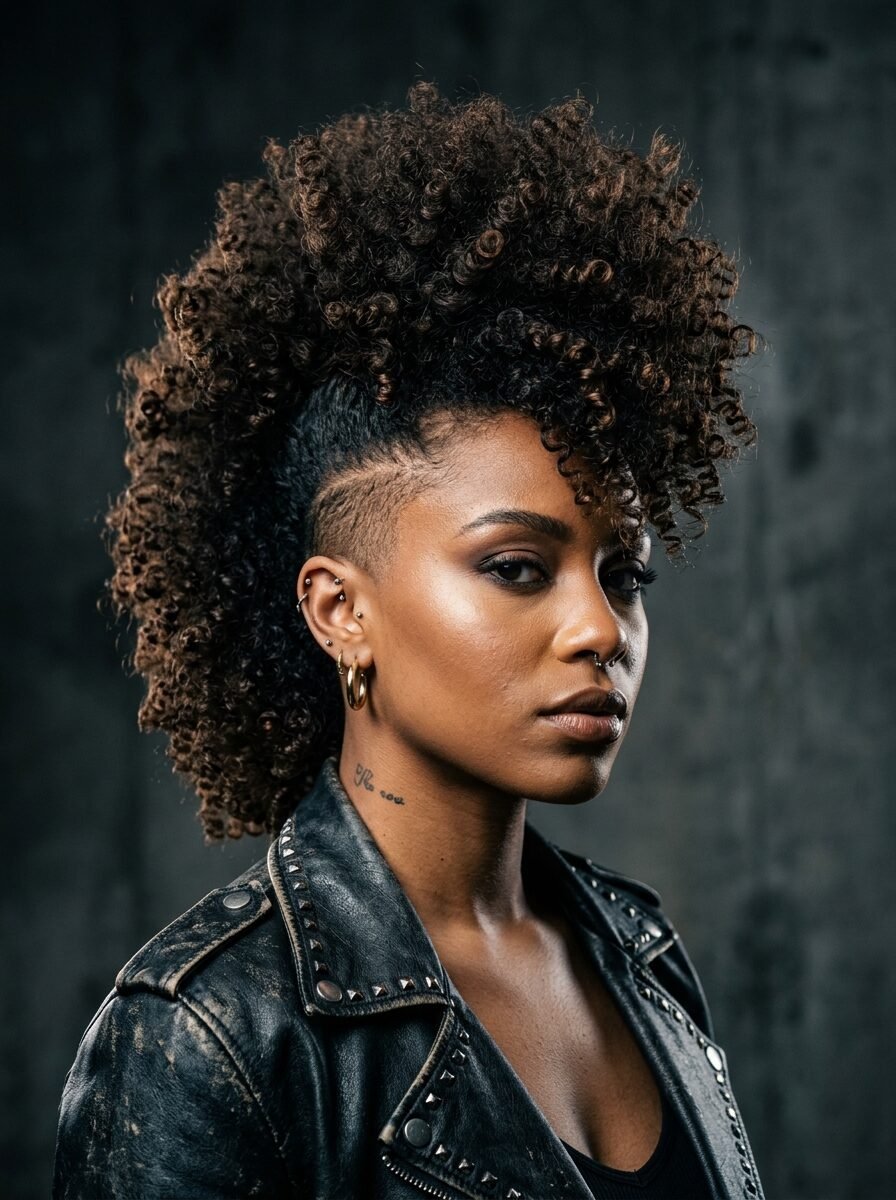
This is for the bold. Secure the sides of your hair with small combs or decorative pins, pushing all the volume toward the center of your head from the forehead to the nape of the neck. This creates a mohawk silhouette that is entirely made of curls.
In my experience, this style requires a strong-hold gel to keep the sides sleek. I recommend the Eco Style Olive Oil Gel. It’s affordable and provides a great hold without flaking. This look is perfect for a night out or when you want your hair to be a conversation starter. It celebrates the verticality of curls in a way few other styles do.
9. The Bubble Half-Pony
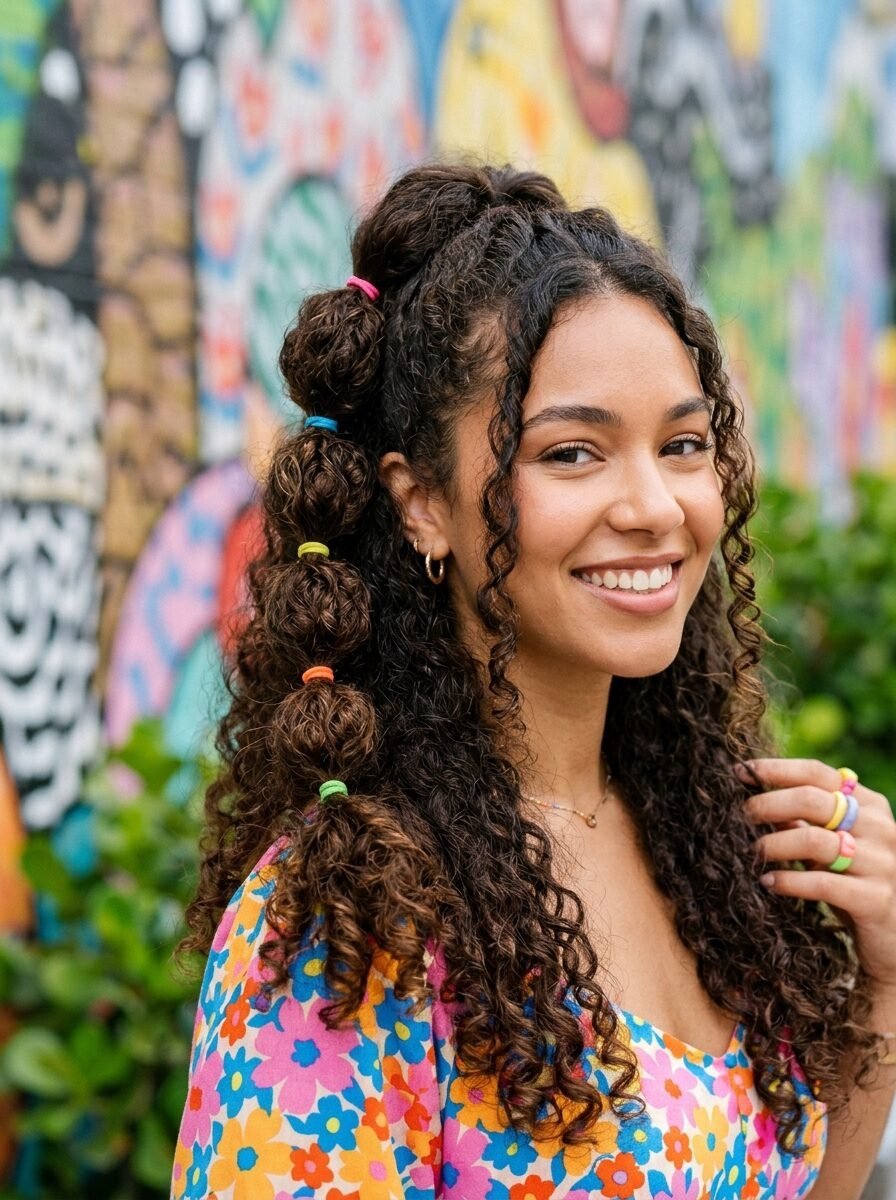
The bubble braid trend isn’t just for straight hair. On curly hair, the “bubbles” look even better because they have natural internal volume. Secure a half-pony, then add another elastic an inch or two down. Gently pull at the hair between the elastics to create a rounded bubble. Repeat until you reach the ends of the top section.
I’ve seen this work incredibly well on children and adults alike. It’s playful and keeps the hair very secure. If your curls are too tight to “bubble,” try using a pick to gently fluff the hair between the bands. It adds a whimsical touch to your daily routine.
10. Side-Swept Pinned Half-Up
Instead of pulling hair straight back, pull it all to one side. Pin the top section behind one ear using decorative clips or plain bobby pins. This creates an asymmetrical look that is very flattering for most face shapes.
I noticed this is a great way to show off a statement earring. When I wore this style to a gallery opening, I received more compliments on my hair than the art. It feels sophisticated and high-fashion. Use a bit of hairspray, like the DevaCurl Flexible Hold Hairspray, to keep the swept side flat and the curly side bouncy.
11. The Scarf Headband Half-Up

Wrap a colorful silk scarf around your head like a headband, then pull the top half of your hair over the scarf at the back. Secure it with a small elastic. This hides the knot of the scarf and adds a pop of color to your hair.
In my experience, this is the best style for “sweat days” or when you are at the beach. The scarf protects your hairline from sweat and salt, while the curls are free to catch the breeze. I’ve seen this look fantastic with vintage patterns or bright, solid colors.
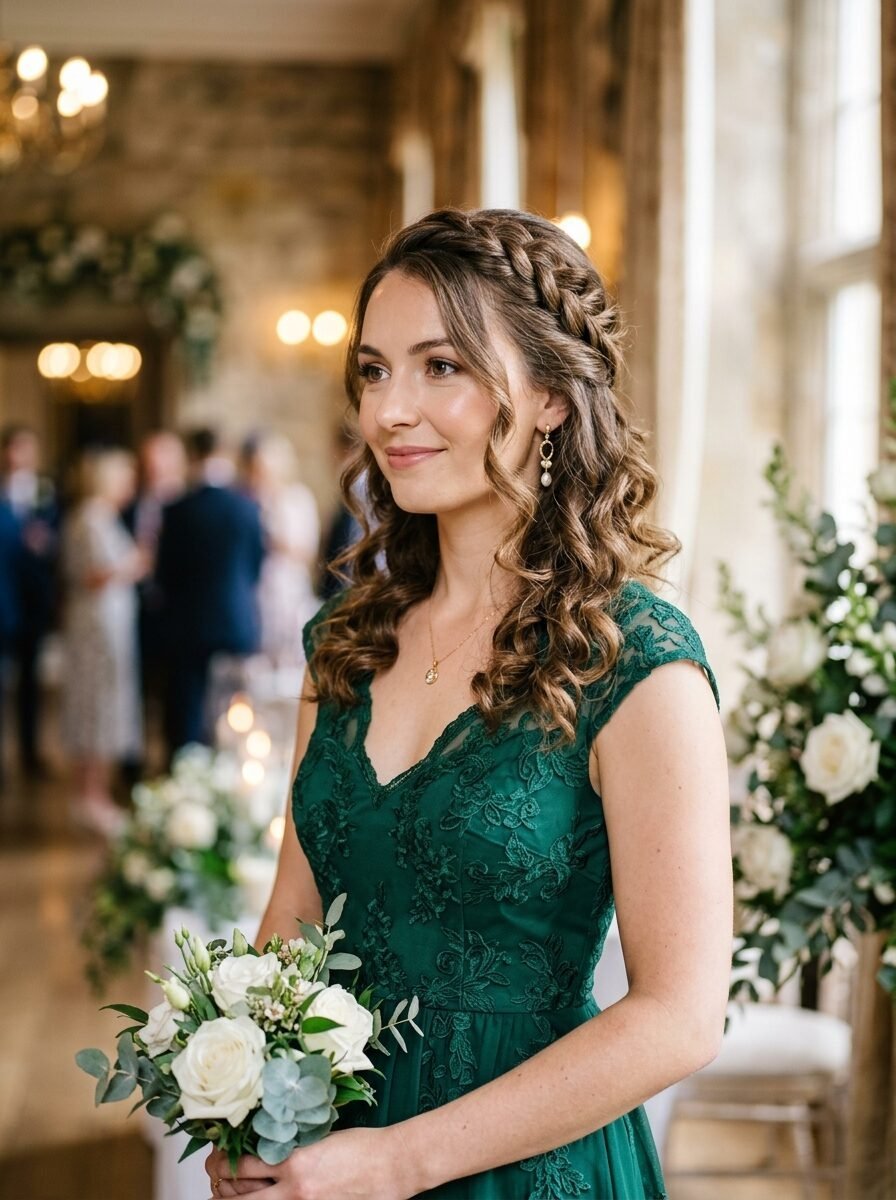
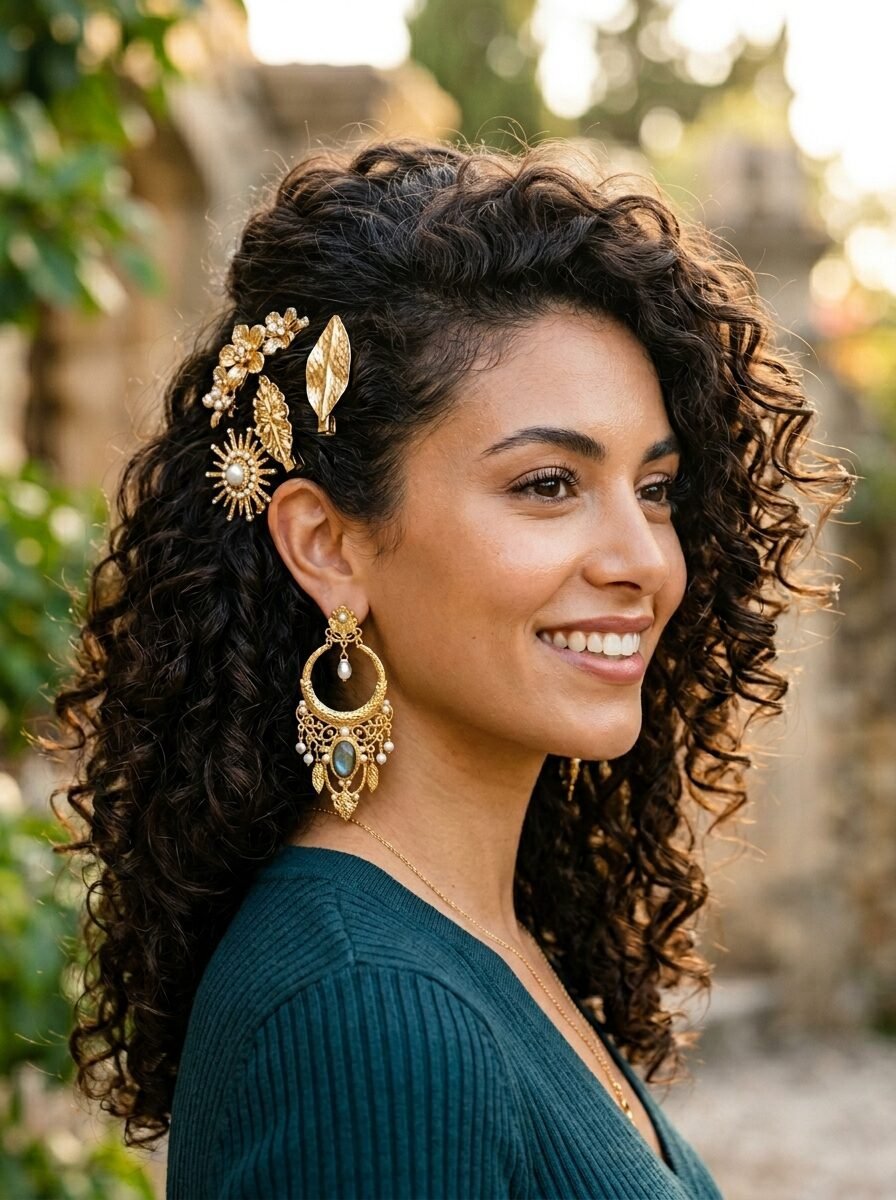
12. Pearl Pin Accents

Take a simple half-up bun and scatter several pearl-topped pins throughout the hair. Don’t worry about making them symmetrical. The randomness adds to the charm. Curls provide the perfect “cushion” for these pins to stay in place without sliding.
I tried this for a friend’s wedding and it stayed secure through hours of dancing. The pearls catch the light beautifully against textured hair. It’s an easy way to add a “bridal” or “glamour” feel to your natural hair without using heat tools.
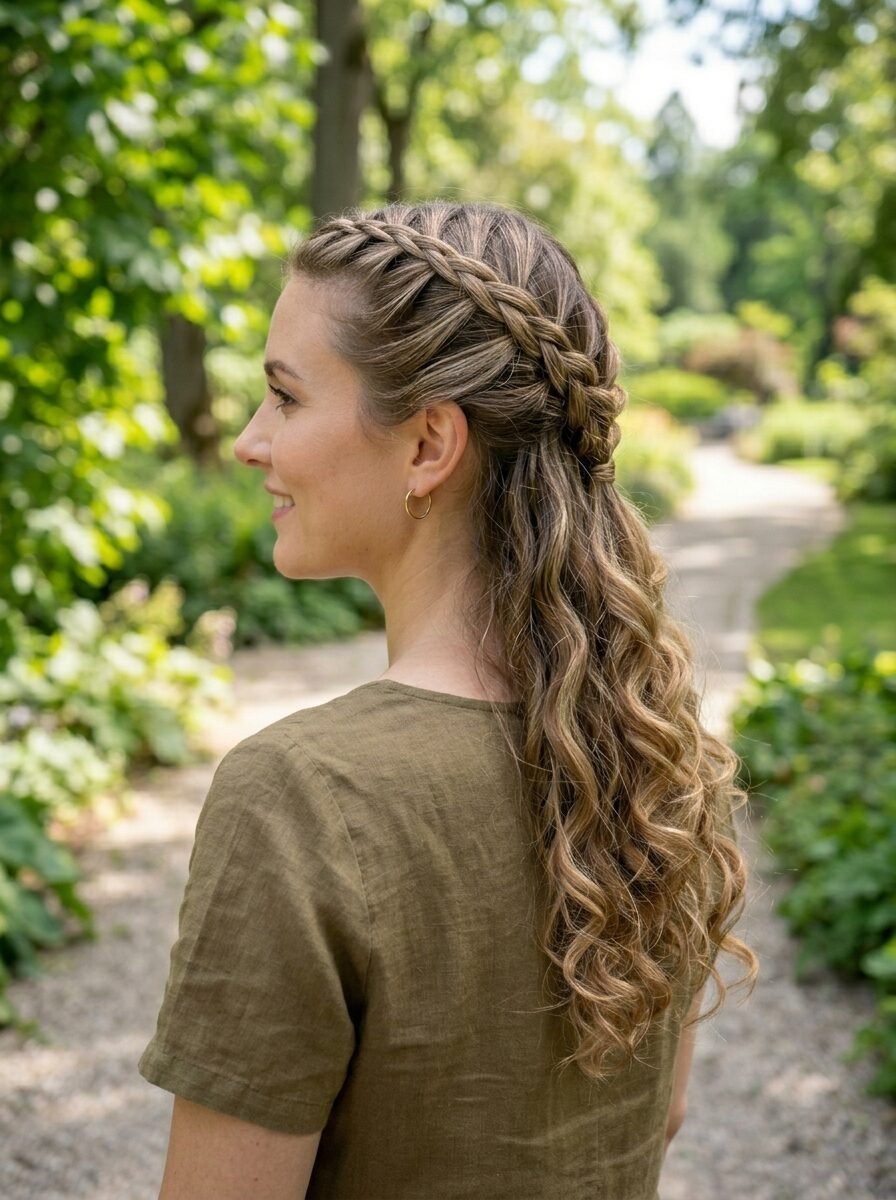
13. The Waterfall Braid for Curls

This is a more advanced technique, but the result is stunning. As you braid across the back of your head, you “drop” a piece of hair and pick up a new one. This creates a look where the curls appear to be flowing out of the braid like a waterfall.
I’ve noticed that this style works best on wavy or loose curly hair (type 2C to 3A). On tighter coils, the braid can get lost in the volume. If you struggle with the technique, there are many “cheat” versions using small elastics that give the same look. It’s a very romantic, bohemian style.
14. Smooth Front with Textured Back

Use a boar bristle brush to smooth the very front section of your hair back into a tight half-pony. Leave the rest of the hair completely natural and voluminous. The contrast between the sleek front and the wild back is very modern.
In my experience, using a leave-in conditioner like the Curls Blueberry Bliss Reparative Leave-In helps the front stay smooth without feeling “glued” down. This is a professional look that works well for office environments where you want to keep your curls contained but still visible.
15. The Low Looped Half-Up
Instead of a high pony, secure your hair at the nape of your neck but only pull the top half. On the last loop of the hair tie, don’t pull the hair all the way through. This creates a small, chic loop that sits against the rest of your curls.
I’ve seen this work perfectly for those with very long hair that feels too heavy for a high ponytail. It distributes the weight more evenly. It’s a quiet, understated look that feels very “clean girl” aesthetic. It’s simple, effective, and keeps your ends protected.
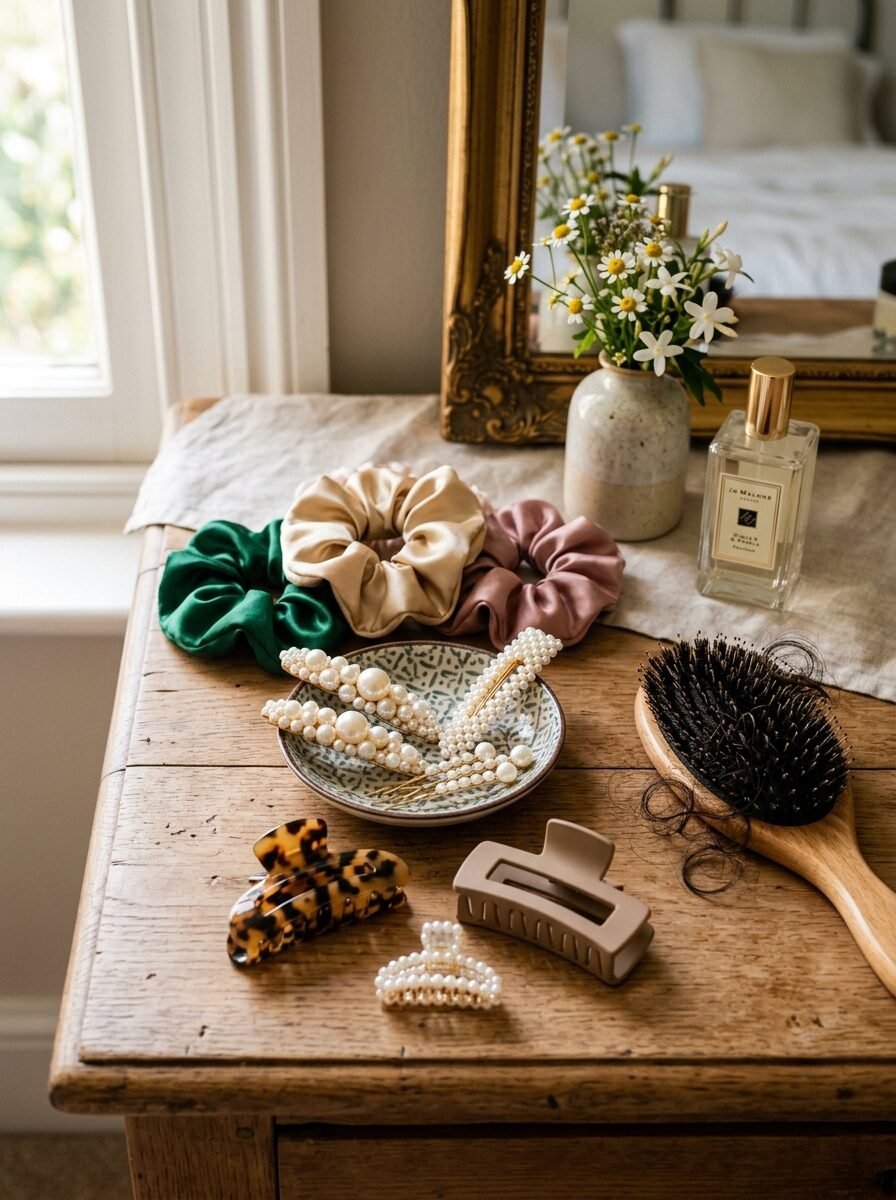
Essential Tools for Curly Hairstyling
To achieve these looks, you need the right kit. Not all hair tools are created equal for curls. I have tried many products over the years, and these are the ones that actually make a difference.
| Tool Category | Recommended Brand/Product | Why It Works |
| Brushes | Denman D3 Original Styler | Perfect for defining curls while wet. |
| Hair Ties | Invisibobble Power | Prevents headaches and “hair dents.” |
| Edge Control | Carol’s Daughter Black Vanilla | Great hold without any white flakes. |
| Clips | Teleties Large Claw Clip | Nearly indestructible and holds thick hair. |
| Moisturizer | SheaMoisture Coconut & Hibiscus | Keeps curls hydrated and bouncy all day. |
| Microfiber Towel | Perfect Haircare Towel | Reduces frizz significantly during drying. |
I’ve seen many people use standard terry cloth towels on their curls. In my experience, this is the fastest way to create frizz. Switching to microfiber or even an old cotton t-shirt makes a massive difference in how your half-up styles look. If the base of your hair is frizzy, the style will never look polished.
Troubleshooting Common Curly Hair Issues
Even with the best styles, things can go wrong. Here are some situations I’ve encountered and how to fix them.
Frizz at the Crown
This usually happens because the top layer of our hair takes the most damage from the sun and wind. If you notice frizz after securing your half-up look, don’t add water. Water often makes it worse once it dries. Instead, take a tiny amount of hair oil and smooth it over the surface using the palms of your hands.
Sagging Styles
Curly hair is heavy. If your half-pony starts to sag by lunch, you likely need more support. I’ve seen success by using two hair ties instead of one. Another trick I’ve tried is “propping” the ponytail up with two bobby pins pushed vertically through the hair tie at the base. It acts like a kickstand for your hair.
Tangled Ends
Half-up styles leave the bottom half of your hair free to rub against your clothes. This causes “fairy knots” at the nape of the neck. To prevent this, I suggest applying a bit more leave-in conditioner to the bottom sections than the top. I’ve noticed that silk-lined collars or scarves also help reduce this friction.
Frequently Asked Questions
How do I make my curls last longer in a half-up style?
The secret is in the prep work. Use a styling cream with a light hold on wash day. In my experience, hair that has some “memory” stays in place much better. Avoid using heavy silicones, as they can weigh the hair down and make it slip out of pins.
Can I do these styles on short curly hair?
Yes. Styles like the Triple Twist Back Tucks and the Claw Clip Lift are specifically great for shorter lengths. For very short hair, focus on using small decorative pins to pull back sections rather than trying to fit everything into one hair tie.
What is the best way to refresh curls for a half-up look?
I’ve seen the best results using a mix of water and a little bit of conditioner in a spray bottle. Mist the hair lightly and scrunch. Don’t touch it until it is completely dry. Once dry, you can pull the top section back. This prevents you from styling “frizzy” hair.
Are hair ties bad for curly hair?
Standard rubber bands are very damaging. However, silk scrunchies and coiled ties are much safer. I have seen a significant reduction in hair breakage since I switched to silk ties. They glide off the hair rather than pulling at the curls.
How do I add volume to the top of my half-up style?
Try “back-combing” only the very roots of the top section before securing it. Be very gentle. I’ve also tried using a small volume insert or “bump-it” for formal events. However, for a natural look, simply tugging the hair forward slightly after securing the tie usually does the trick.
Should I style my hair wet or dry?
For most of these looks, dry hair is better. Wet hair is more fragile and prone to stretching. If you secure a half-pony while wet, the hair might dry in a flattened shape. I suggest styling when the hair is at least 90% dry.
Embracing Your Natural Texture
The most important part of any hairstyle is confidence. Curly hair is unique because no two days are ever the same. One day your curls might be tight and springy, and the next they might be loose and wavy. These fifteen styles are meant to be a guide, but feel free to adapt them to what your hair is doing that morning.
I have seen that the more you embrace the natural quirks of your curls, the easier styling becomes. Don’t worry about every single hair being in place. A few stray curls or a bit of volume only adds to the beauty of the look. Texture is a gift. It gives your hair character and life that straight hair often lacks.
Whether you are heading to a job interview or just running errands, a half-up style keeps you looking put-forward. It is a practical solution to the daily “curly hair struggle.” Try one of these styles tomorrow and see how it changes your morning routine. You might find a new favorite that you’ll want to save and share.

Sarah Mitchell — Founder & Editor-in-Chief
Sarah Mitchell is the founder and editorial voice behind Hair Level Up. A licensed cosmetologist with more than 15 years of experience, she has styled A-list celebrities for editorial shoots and red carpets, with work featured in Vogue, Elle, and Harper’s Bazaar. Early in her career, she trained under the legendary hairstylist Oribe in New York, an apprenticeship that still shapes her editorial eye today. Sarah founded Hair Level Up in 2020 after one bad haircut convinced her that women deserved a destination that felt like a magazine, taught like a stylist, and inspired like an art gallery. She oversees every story from concept to publication, guided by a simple belief: a good story teaches you something, but a great one makes you feel beautiful while it does.